Add Row
Add Element
cropper
update
Marin Home Ideas
update
Add Element
  • Home
  • Categories
    • Home Remodeling Ideas
    • Interior Design & Decor Ideas
    • Gardening & Landscaping Ideas
    • Outdoor Living & Entertaining
    • Health & Wellness at Home
    • DIY at Home
    • Kitchen Ideas
    • Bedroom Ideas
    • Bath Ideas
    • Cooking at Home
    • Home Office Ideas
    • Lighting Ideas
    • Furniture Ideas
    • Architecture Ideas
    • Senior Living at Home
    • Home Finance
    • Real Estate News
July 05.2025
3 Minutes Read

Build a Stunning Sleeper Boardwalk Path on a Budget

Rustic garden walkway with lush greenery and flowers.

Transform Your Space With a Budget-Friendly Boardwalk Path

For homeowners looking to enhance their landscaping without breaking the bank, the creative process of building a sleeper boardwalk is both practical and aesthetically pleasing. Inspired by the "Building Sleeper Boardwalk On A Budget | Episode | Great Home Ideas," let’s explore the benefits of adding a pathway to your outdoor oasis while tapping into cost-effective techniques.

In "Building Sleeper Boardwalk On A Budget | Episode | Great Home Ideas," the discussion dives into innovative landscape design through affordable pathways, exploring key insights that sparked a deeper analysis on our end.

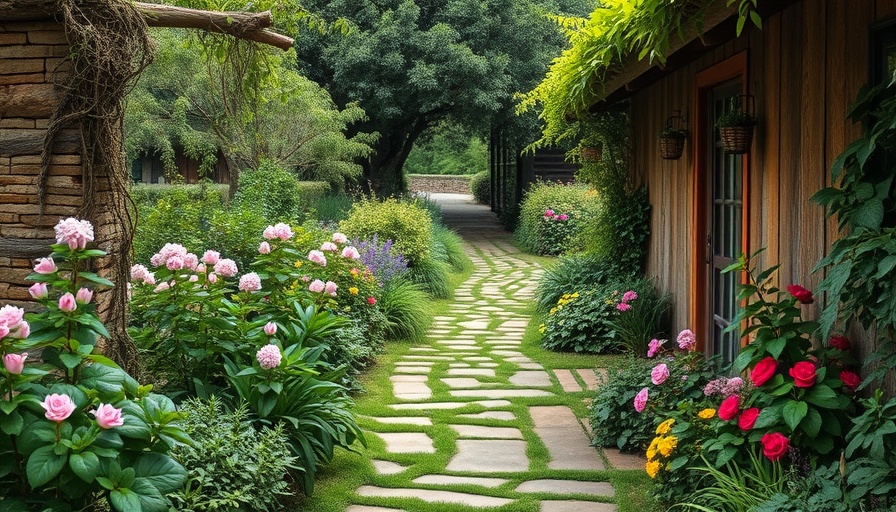
Why Pathways Matter in Garden Design

Consider the integral role pathways play within your garden. Not only do they guide visitors through your landscape, but they also create defined spaces and functional routes to essential areas like storage sheds or vegetable patches. This operational aspect can be beautifully paired with the charm of a well-designed path, seamlessly connecting various elements of your outdoor space.

Understanding Budget-Friendly Materials: Sleepers

Sleepers, usually made from timber, provide an eco-friendly and durable option for creating striking pathways. They come pre-cut and ready for use, which minimizes waste through clever arrangement. As we learned from the video, 2.4m sleepers can effectively create a sturdy pathway with minimal off-cuts – a staple in sustainable gardening.

Your Step-by-Step Guide to Building a Garden Path

Here's a simplified guide on constructing your sleeper path:

  • Planning and Preparation: Mark the area where you want the pathway. A string line can guide you in creating a straight, level path.
  • Base Setup: Lay down some road base to create a solid foundation for your access point.
  • Installation: Arrange your sleepers strategically, staggering cuts to enhance strength.
  • Finishing Touches: Paint your sleepers to give them a fresh look and then secure them in place with screws for extra durability.

This simple yet effective approach not only ensures a long-lasting path but also enriches your environmental footprint, making it an ideal choice for eco-conscious homeowners.

Adding Organic Beauty: Planting Along Your Path

Once your pathway is installed, consider bringing some life to the border with organic planting. Native violets, for instance, can add bursts of color while also supporting local biodiversity. By alternating plant placement on either side, you'll create a natural flow that enhances accessibility while remaining visually appealing.

Beyond the Basics: Decorative Options for Paths

Engage with your landscape by incorporating decorative elements like garden lighting or flower beds along your path. Staggered planting of perennial flowers can add bursts of color throughout the seasons or consider installing a butterfly garden to attract pollinators, enhancing the overall ambiance and health of your home’s ecosystem.

Sustaining Your Newly Built Path

After creating your outdoor path, ensure its longevity with regular maintenance. Watering schedules and weeding techniques will help keep the surrounding plants vibrant, while mulching can suppress weeds and retain moisture. It's all part of maintaining a healthy ecosystem that benefits both your property and the environment.

Conclusion: Embrace DIY with Heart

Building a sleeper boardwalk path is not only an affordable DIY project but also serves as a beautiful transformation of your outdoor space. By planning and investing in sustainable practices, you contribute positively to your environment while enjoying a practical and aesthetic enhancement to your garden. Whether you are gardening for the first time or are a seasoned green thumb, this project is a wonderful way to bring creativity and functionality together in your yard. Ready to get started? Gather your materials and let your garden shine.

Gardening & Landscaping Ideas

2 Views

0 Comments

Write A Comment

*
*
Related Posts All Posts
09.13.2025

Why Ponytail Palms are the Ideal Indoor Plants for Your Home

Update Discovering the Unique Beauty of Ponytail Palms If you’ve ever found yourself enamored with the tropics but hesitant to embrace the daily demands of traditional palm trees, the ponytail palm might just be the solution you’ve been searching for. Known scientifically as Beaucarnea recurvata, this intriguing plant is not actually a palm but a succulent from the Asparagaceae family. This means it offers a striking aesthetic with far less maintenance than its moisture-loving counterparts. The Allure of Ponytail Palms With their bulging caudex and long, curly leaves, ponytail palms evoke a whimsical image that can charm any space, whether indoors or outdoors. Native to semi-desert regions of southeastern Mexico and Central America, the ponytail palm has adapted beautifully to drier environments, making it an ideal candidate for many households. Instead of the usual misting and humidity, it thrives in bright indirectly lit environments and requires well-draining soil, condensing all the beauty of a tropical plant into a low-maintenance option. Quick Guide on Growing Your Ponytail Palm Below is a succinct overview of essential care tips for cultivating your ponytail palm: Light: Prefer bright, indirect sunlight, allowing the plant to flourish indoors or in shaded outdoor areas. Water: Water infrequently, allowing the soil to dry out between sessions. This succulent’s caudex helps store water, ensuring the plant's survival during drought-like conditions. Soil: Utilize a loose, sandy, well-draining potting mix. Consider incorporating perlite or sand to enhance drainage. Temperature: Keep temperatures warm, ideally between 60°F to 80°F (16°C to 27°C), as frost can damage this heat-loving plant. Caring for Your Ponytail Palm Maintenance for the ponytail palm is refreshingly straightforward. Invest time in ensuring proper light, soil, and watering techniques, and this plant will reward you with years of beauty. When grown indoors, minimal pruning is required, just enough to manage its shape and appearance. Periodically, check for pests like scale and aphids, though these are rare in resilient specimens. Propagation: Growing Your Collection Ponytail palms can be propagated by seed or through offsets, also known as pups, that develop around the base. However, patience is key—seeds can take weeks to germinate. Alternatively, if you are lucky enough to have a mature plant producing offsets, separating these from the mother plant is a straightforward way to grow your ponytail palm family. Enhancing Your Space with Ponytail Palms The ponytail palm not only serves as a captivating centerpiece in your home but also works beautifully in landscaping projects. Consider these ideas for incorporating them into your garden design: Indoor Decor: Place them near windows or in bright rooms to enhance light and provide a tropical feel. Patio Showpiece: Use ponytail palms as statement pieces in outdoor seating areas or patios for a warm ambiance. Group Planting: Pair them with other succulents or drought-tolerant plants to create a stunning visual display. Conclusion: Embrace the Ease of Indoor Gardening The ponytail palm is an exciting option for anyone seeking to add greenery to their living spaces without the constant upkeep that many other houseplants demand. Easy to care for and visually striking, these plants can thrive in urban settings or smaller homes, contributing both style and a touch of nature. So why not take the plunge? Embrace this low-maintenance beauty and bring a slice of the tropical outdoors into your home - it’s time to let your home garden flourish!

09.13.2025

Unlock the Secrets: Planting and Overwintering Spring Flowering Bulbs in Pots

Update Discover the Joy of Planting Spring Bulbs As winter approaches, many gardeners contemplate a quieter time in their green havens. However, fall is actually the best time to prepare for a spectacular display of spring blooms! Planting and overwintering spring flowering bulbs in pots is a rewarding DIY project that doesn't just beautify your space, but also connects you to nature as you anticipate the joy of vibrant blooms. Why Use Pots for Bulbs? Potted bulbs are a great option for both novice gardeners and seasoned enthusiasts. They offer flexibility in placement and aesthetic enhancement to your outdoor or indoor spaces. This method spares your bulbs from the challenges of poor soil or pests that might plague garden flower beds. Plus, you can bring them inside to enjoy over the winter months or move them around for an ever-changing garden display. Choosing the Right Bulbs When selecting bulbs, consider varieties like daffodils, tulips, and hyacinths as they thrive in containers and provide stunning color when the weather warms. Look for healthy, firm bulbs, and follow the planting guidelines associated with your chosen species to maximize blooming potential. Steps to Plant Bulbs in Pots Planting bulbs is straightforward! Start by ensuring that your pots have drainage holes to prevent waterlogging. Fill the pots with well-draining potting mix, then place the bulbs according to their depth requirements—usually about two to three times their height. Water them gently and place the pots in a cool area that stays above freezing during winter. Caring for Your Potted Bulbs Once planted, monitor their moisture levels. Keep the soil evenly moist but never saturated, as this can lead to rot. Apply mulch on top to retain moisture and provide insulation against winter chills. If you live in extremely cold regions, consider wrapping pots in insulating materials to protect the bulbs. Bringing Life to Your Indoor Spaces If you’ve planted indoors, find bright spots near windows. The gradual increase in daylight will coax them to bloom beautifully in spring. As they sprout, reposition them for sunlight during the day, but avoid drafts or direct heat sources. Remember, indoor plants like these can brighten your living space and make it feel more welcoming during the dreary winter months! What to Expect in Spring As spring arrives, the anticipation grows! Be ready for vibrant colors and fragrant blooms in your pots. Each flower offers a low-maintenance yet impressive return on your investment of time and care. Additionally, these flowering bulbs can be great conversation starters for visitors as they enjoy your beautiful garden. Conclusion: A Gardener’s Anticipation Planting spring flowering bulbs is more than just gardening—it's about the little moments that bring joy and life into our spaces. From the excitement of planting to the awaited splendor of blooming flowers, nurturing your garden fosters a deeper connection with nature. So, dive into this delightful gardening project! Create your own spectacular display of spring colors. For more gardening tips, consider joining a local gardening club or subscribing to community gardening workshops. Let's celebrate nature together and cultivate spaces filled with life!

09.13.2025

Discover the Joy of Planting Spring Flowering Bulbs in Pots!

Update Why Planting Spring Bulbs in Pots is a Game Changer Have you ever watched the miracle of spring unfold from the comfort of your cozy home? Planting spring flowering bulbs in pots is one of the simplest yet most rewarding gardening projects you can undertake. Not only does it allow you to enjoy vibrant colors as the flowers bloom, but it also offers an easy way to create stunning garden designs without heavily investing time or resources. Choosing the Right Bulbs for Your Space When selecting spring bulbs, consider your climate and the specific conditions of your garden. Popular varieties like tulips, daffodils, and hyacinths thrive in pots, providing bursts of color in your flower garden. For a unique twist, try mixing colors and species for a more vibrant display. Remember, the right combination of garden plants can create a stunning focal point in your outdoor space! Steps to Planting and Caring for Bulbs in Pots Before you dive into planting, let’s go over the essential steps: Choose Quality Pots: Select pots that offer good drainage. Terra cotta pots are excellent for promoting airflow and preventing rot. Use the Right Soil: Invest in high-quality potting soil enriched with organic fertilizers. This ensures your bulbs receive the necessary nutrients! Plant at the Right Depth: A general rule is to plant bulbs three times their height. For most spring bulbs, that means about 6 to 8 inches deep. Water Wisely: After planting, water thoroughly but avoid waterlogging, which can lead to rot. Mulch Wisely: Adding garden mulch can help retain moisture and suppress weeds. Winterizing Your Pots for Maximum Growth As the chilly months creep in, it’s essential to protect your bulbs. If your pots are particularly exposed, consider insulating them by wrapping them in burlap or moving them to a sheltered location. This will help prevent frost damage, ensuring strong growth come spring. Remember, garden winterizing is not just necessary for outdoor beds but also crucial for your potted bulbs. Transforming Your Garden with Container Gardening Container gardening means flexibility! You can reposition your flower pots whenever you wish, allowing for dynamic garden designs. Want a pop of color on your entrance steps or a lively addition to your patio? Container gardening provides endless opportunities for creative backyard landscaping. Plus, it’s a fantastic solution for those with space constraints or poor soil conditions. Gardening as a Community Activity Engaging in gardening can foster community spirit. Consider inviting friends or neighbors to join you in a planting session. Share tips, trade bulbs, and inspire each other to create stunning layers of spring beauty. Gardening not only beautifies our surroundings but strengthens the bonds between us, showcasing the unique character of our local communities. Moving Forward: The Joy of Spring Blooms The anticipation of seeing your planted bulbs bloom is worth the wait. As the days grow longer, the excitement builds—knowing that the fruits of your labor will soon provide enjoyment and color. Take a moment to appreciate the beauty of nature and how it enriches our lives. Whether you’re an experienced gardener or a curious newcomer, planting spring flowering bulbs in pots is a rewarding way to contribute to your home’s charm and enhance community ties. So grab your gardening tools and start planning your spring bulb pots today! Experience the thrill of watching new life emerge as everything aligns just right for your blooming oasis. Get ready to make this gardening season unforgettable!

Terms of Service

Privacy Policy

Core Modal Title

Sorry, no results found

You Might Find These Articles Interesting

T
Please Check Your Email
We Will Be Following Up Shortly
*
*
*