Add Row
Add Element
cropper
update
Marin Home Ideas
update
Add Element
  • Home
  • Categories
    • Home Remodeling Ideas
    • Interior Design & Decor Ideas
    • Gardening & Landscaping Ideas
    • Outdoor Living & Entertaining
    • Health & Wellness at Home
    • DIY at Home
    • Kitchen Ideas
    • Bedroom Ideas
    • Bath Ideas
    • Cooking at Home
    • Home Office Ideas
    • Lighting Ideas
    • Furniture Ideas
    • Architecture Ideas
    • Senior Living at Home
    • Home Finance
    • Real Estate News
July 29.2025
3 Minutes Read

Create Your Own Terracotta Pot Succulent Centerpiece Today!

DIY terracotta pot succulent centerpiece with candle in garden.

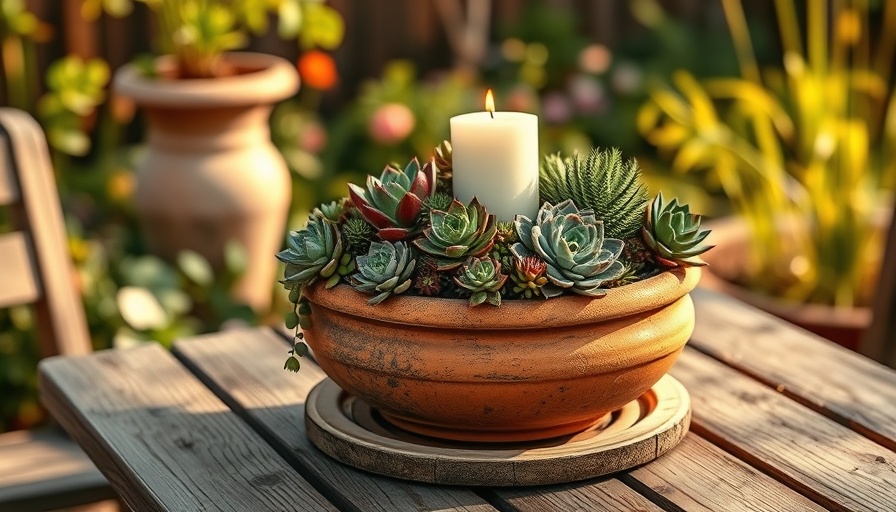
Transform Your Space: The Beauty of a Terracotta Pot Centerpiece

A stunning centerpiece doesn’t have to come with a hefty price tag. Sometimes the most memorable pieces are born from creativity and the simplest of materials. Imagine this: a terracotta pot succulent centerpiece effortlessly designed from leftover items around your garden shed. The perfect blend of artistry and functionality, it serves not only as a standout table decoration but also a conversation starter for outdoor gatherings.

The Practical Benefits of Using Succulents

Succulents have gained popularity in recent years, and for good reason. Their ability to withstand harsh heat and drought conditions makes them ideal for outdoor arrangements, especially in the summer months. Unlike traditional flowers, they require minimal watering, freeing up your time while adding a vibrant touch to your décor. This makes succulents an excellent choice for those looking to create a beautiful yet low-maintenance centerpiece that lasts through the season.

Gathering Materials: What You'll Need

To embark on this delightful DIY project, gather the following materials:

  • A wire hanging basket frame — these can often be found at local dollar stores.
  • Varied sizes of terracotta pots that fit your design concept.
  • Strong garden wire for securing the pots in place.
  • A suitable plant tray to catch any excess water from drainage.
  • Succulent potting soil and an assortment of succulents in colors and textures of your choice.
  • Reindeer moss and a glass hurricane candle holder for added flair.

Your local garden center will be an invaluable resource for sourcing these materials, ensuring that your centerpiece is both beautiful and sustainable.

Step-by-Step Guide to Creating Your Centerpiece

Follow this simple process to create your own succulent centerpiece:

  1. Design Layout: Arrange the terracotta pots on the wire frame, experimenting with sizes and placements until you find a design that resonates with you.
  2. Secure the Pots: Using garden wire, thread through the holes in the pots and secure them to the wire frame. Ensure the center pot is stable but doesn't need wiring.
  3. Prepare for Watering: Line each pot’s drainage hole with newspaper or coffee filters to prevent soil seepage into your tray.
  4. Fill with Soil and Succulents: Pour succulent potting soil into each pot, adding in your selected succulents. Play with different arrangements for texture and color.
  5. Add Finishing Touches: Top off your design with reindeer moss and set a pillar candle within the hurricane holder for a charming glow during evening gatherings.

Voyaging into Creativity: Personal Touches Matter

What makes your succulent centerpiece truly unique is the way it reflects your personality. Consider incorporating items that represent your memories or hobbies. Perhaps you could add small decorations that remind you of cherished moments spent in your garden. Sharing these stories can elevate your centerpiece from just being a decoration to a heartfelt part of your outdoor experience.

Future Gardening Projects to Explore

The joy of gardening doesn’t stop with one project. The thriving community of plant lovers offers continuous inspiration for further experimentation. Here are some ideas for your next gardening project:

  • Container Gardening: Discover how to utilize different containers to create beautiful vertical gardens.
  • Herb Gardens: Learn how to start an indoor herb garden perfect for cooking.
  • Flower Bed Ideas: Explore designs that can elevate your flower beds and create stunning visual interest in your yard.

Each new project allows you to learn and share with fellow gardening enthusiasts, fostering connections and creativity.

Final Thoughts: Engage with Nature and Your Community

Creating a succulent centerpiece is more than just a fun DIY activity; it’s a way to connect with nature and express your creativity. As you enjoy your centerpieces, consider the lessons learned from nurturing your plants and how those lessons can extend into other areas of your life. Remember, every small act of gardening has the potential to build relationships and foster a strong community connection.

So, gather your supplies, unleash your imagination, and embrace the creativity that gardening offers!

Gardening & Landscaping Ideas

1 Views

0 Comments

Write A Comment

*
*
Related Posts All Posts
09.14.2025

Master the Art of Lifting and Storing Iris Rhizomes This Winter!

Update Lifting and Storing Iris Rhizomes: A Seasonal Guide As the vibrant blooms of the iris plants begin to fade, a gardener's duties are far from over. Lifting and storing iris rhizomes during the winter months is crucial to ensure that these stunning flowers return in full glory come spring. Designed to withstand cold, irises mostly thrive in the ground; however, there are instances, such as with late-season divisions or smaller potted plants, where storage becomes necessary. Here’s a comprehensive look at how to accomplish this task effectively. Understanding Rhizomes: The Lifeblood of Irises Rhizomes are the thick, fleshy underground stems from which irises grow, providing them with food and moisture. Although many iris varieties can endure harsh winter conditions, ensuring their health before the return of warmer temperatures is essential. This calls for specific steps to avoid issues like dehydration, rotting, or pest infestations during their storage. Step 1: Lift, Clean, and Trim The optimal timeframe for lifting iris rhizomes is post-bloom, typically between midsummer and early fall. Start by using a garden fork to carefully lift the rhizomes from the soil, taking care to dig at least six inches deep. Provide four inches of space around the rhizome when lifting to prevent damage to the surrounding roots. Once out of the ground, take sharp garden scissors to trim the foliage down to three inches, cutting away any dry or unhealthy leaves. Removing fibrous root mats and trimming the roots back to three inches is essential. After this, let them dry out in a single layer in a warm and protected location, turning them occasionally for even drying. Step 2: Cure and Apply Fungicide To prepare rhizomes for storage, curing is critical. Once they have dried adequately, apply a suitable fungicide to prevent potential fungal diseases—an essential step often overlooked. While this may seem tedious, it is pivotal in ensuring a healthy spring revival. Step 3: Wrap for Protection After curing, wrapping each rhizome in newspaper or a breathable fabric helps retain moisture while providing a barrier against pests. Avoid plastic as it can trap moisture and lead to rotting. Proper wrapping techniques provide the additional layer of protection needed. Step 4: Place in Storage Find a suitable storage location that remains cool, dry, and dark—a garage or shed often works well. Avoid areas with temperature fluctuations that could cause excess moisture. Layer the wrapped rhizomes in a container or box that allows some air circulation to maintain a dry environment during storage. The Importance of Routine Maintenance Regular checks on stored rhizomes during winter help mitigate any risks of mold or disease—this is part of a gardener's ongoing commitment to maintaining healthy plants. Understanding the particular needs of iris and their rhizomes sets the foundation for creating a flourishing garden environment when the frost melts. Tips for Successful Rhizome Storage Consider experimenting with organic fungicides for a healthier gardening approach. Identify pests early by checking your storage container frequently. Maintain a journal of your storage techniques, successes, and challenges—it can illuminate best practices for the future. Keeping your irises healthy through the winter will yield rewarding results in the blooming season. By understanding the lifecycle and care of iris rhizomes, you can create a flourishing horticultural experience filled with beauty and life. Whether you're a seasoned gardener or just starting, there is a wealth of information and community support available. For those keen on enhancing their gardening skills, many online resources and local gardening clubs can offer insights and hands-on experience. By sharing knowledge and engaging with fellow gardeners, you can foster growth—not just for your plants, but for your gardening journey. Participate in your local gardening community today, and cultivate both your knowledge and your garden.

09.14.2025

Unlock Joyful Spring Blooms by Planting Perennial Tulips

Update Planting Perennial Tulips: A Gift for Future Springs As the days begin to shorten and the air turns crisp, autumn beckons us to start thinking about our spring gardens. Among the most cherished harbingers of spring are tulips, and after a long winter, nothing is quite as refreshing as their colorful blooms piercing through the thawing earth. However, if you want to enjoy this vivid display year after year, the secret lies in planting perennial tulips. Choosing the Right Perennial Bulbs When embarking on your quest for perennial tulips, it’s crucial to choose the right bulbs that not only promise to bloom year after year but also thrive in your garden’s unique climate. Look for terms like “naturalizing” and “perennializing” on packaging. These indicate a greater chance of survival across seasons. The best types to consider include the Darwin Hybrid, Greigii, Kafmanniana, and Fosteriana tulips, all known for their perennial capabilities. Be mindful of the climate zone where you live—from zones 3 to 8, tulips require cold winters coupled with well-drained soil and sunshine. Naturalizing Tulips: Growing a Living Legacy Naturalizing goes a step beyond merely perennializing; it means creating a tulip garden that not only returns year after year but also multiplies over time. The most suitable varieties for naturalizing are the Species, Fosteriana, and Kafmanniana. These resilient bulbs will not only return but spread, providing a abundant carpet of color in your garden. Timing is Everything: When to Plant Perennial Tulips As with any gardening endeavor, when to plant your tulip bulbs hinges on your location. In areas with severe winters, aim to plant your tulip bulbs by mid to late fall. This timing allows the bulbs to establish roots before the frost becomes fierce. For those residing in milder climates, the naive rule of thumb is to plant before the ground freezes, enabling the bulbs not only to root but to absorb necessary moisture from the cool autumn soil. How to Properly Plant Perennial Tulips Preparation is key to ensuring the longevity of your tulips. When planting, dig a hole roughly 6 to 8 inches deep—this depth protects the bulbs from freeze-thaw cycles while allowing ample space for root expansion. Place the bulbs with the pointed end facing upward and cover with soil. To finish, add a layer of mulch to maintain soil moisture and deter weeds. Caring for Your Perennial Tulips Once established, caring for tulips is relatively easy, though they do benefit from some TLC. Regular watering is crucial, especially during dry spells in spring. It's essential to allow the foliage to die back naturally; this will help the bulbs store energy for the next season. As a bonus, interplanting with perennials or other early bloomers can enhance aesthetic appeal while providing necessary shade during the hotter months. Common Pests and How to Manage Them While tulips are largely resilient, they can fall prey to several pests, most notably aphids and bulb mites. Regular checks on your plants will help catch these pests early; using neem oil as a natural pesticide can prove effective. Additionally, introducing beneficial insects like ladybugs to your garden can help control aphid populations naturally. Final Thoughts: Spring Awaits! With spring just around the corner from your fall planting, you've done more than just create a beautiful garden; you've created a vibrant ecosystem that provides joy not only to yourself but also to pollinators. By taking the time to plant perennial tulips now, you’re investing in years of beautiful blooms to come. Ready to start your gardening journey? Immerse yourself in the exciting world of planting perennial tulips and bring color back into your life!

09.14.2025

Creating the Ultimate Sports Lover's Dream Yard for Family Fun

Update Designing the Dream Sports Yard: An Investment in Family Fun For families who love sports, there’s nothing quite like having the perfect backyard to practice their favorite games. The Abatine family embodies this passion: mom Joe and dad Russell were avid athletes in their youth, and now they’re sharing that enthusiasm with their children. With a busy lifestyle that involves daily activities ranging from soccer to basketball, their dream is to create a yard that nourishes their children’s sporting spirit and invites friends to join the fun.In Creating A Sports Lover’s Dream Yard, the discussion dives into backyard renovations for sports lovers, exploring key insights that sparked deeper analysis on our end. Transforming a Drab Space into Sporting Heaven As depicted in the video Creating A Sports Lover’s Dream Yard, the transformation begins with acknowledging the limitations of a poorly maintained yard. The Abatine family's backyard, previously muddy and unattractive, is ripe for a makeover. Key to this renovation is the use of durable, synthetic grass to withstand heavy traffic while providing a safe playing surface for multiple sports. With a cricket pitch, soccer goals, and a basketball area, this yard caters to a variety of athletic engagements. Choosing the Right Materials and Layout One vital aspect of backyard renovations is selecting the right materials that enhance functionality without compromising aesthetic appeal. This renovation uses synthetic grass designed to handle high usage, ensuring longevity. The transition from natural grass to synthetic turf is not merely a matter of convenience; it also addresses sustainability concerns, as synthetic options typically require less water and maintenance. Creative Solutions for Every Sport One of the standout features from the makeover is the ingenious design of sports amenities that cater to diverse interests. For young players, a DIY self-feeding ball machine offers an opportunity for endless practice in their new space. A raised deck for spectators ensures that parents can comfortably watch their children play, turning the area into a community hub of sorts. This kind of thoughtful design highlights the importance of versatility in backyard renovations. Incorporating Nature: Landscaping for the Active Family No backyard is complete without a touch of greenery! The recommended flora, such as the hardy guy lily and Lamandra, work perfectly within the sporting environment, offering beauty that is both resilient and easy to manage. Planting flowers and bushes that can withstand the occasional soccer ball or basketball bounce is crucial not only for aesthetics but also for creating a family-friendly space where kids can thrive. Additional Considerations for Future Garden Projects As families like the Abatines look ahead, they should consider other gardening opportunities that may enhance their yards. Adding a vegetable garden can provide educational lessons for children about sustainability and nutrition while fostering a love for gardening. Other ideas could include implementing irrigation systems that support their lawns, or creating specialized zones for activities like container gardening or herb gardens for culinary inspiration. These pursuits align beautifully with an eco-friendly lifestyle. Final Thoughts: The Importance of Family Time and Play Building a yard that encourages sports fosters community and family togetherness. The Abatine family now has a space where they can engage in outdoor fun while simultaneously nurturing their children's athletic abilities. Not only does this backyard renovation provide a physical outlet for sports enthusiasts, but it also serves as a beautiful reminder of the power of family bonding through shared activities. Gardening for families can also become a collective effort, offering time spent together every season, whether planting, pruning trees, or enjoying a peaceful evening with garden lighting. As you imagine your own backyard transformation, consider how you can bring the joy of sports and gardening into your home. Start small, whether that's planting flowers or planning out a vegetable garden—there's no limit to how you can create your dream outdoor living space!

Terms of Service

Privacy Policy

Core Modal Title

Sorry, no results found

You Might Find These Articles Interesting

T
Please Check Your Email
We Will Be Following Up Shortly
*
*
*