Add Row
Add Element
cropper
update
Marin Home Ideas
update
Add Element
  • Home
  • Categories
    • Home Remodeling Ideas
    • Interior Design & Decor Ideas
    • Gardening & Landscaping Ideas
    • Outdoor Living & Entertaining
    • Health & Wellness at Home
    • DIY at Home
    • Kitchen Ideas
    • Bedroom Ideas
    • Bath Ideas
    • Cooking at Home
    • Home Office Ideas
    • Lighting Ideas
    • Furniture Ideas
    • Architecture Ideas
    • Senior Living at Home
    • Home Finance
    • Real Estate News
August 11.2025
3 Minutes Read

Discover the Rewards of Growing Chantenay Carrots: A Gardener's Guide

Chantenay carrots growing in soil, showcasing tips on how to grow Chantenay carrots.

Chantenay Carrots: A Gardener's Delight

Gardening can often surprise us, bringing forth gifts we didn’t expect. One such treasure is the Chantenay carrot, a delightful vegetable that has become a favorite among garden enthusiasts. These conical, red-hued beauties are not just visually appealing; they also pack a flavorful punch. Let's explore why these carrots are worth growing in your garden and how to do it successfully!

Why Choose Chantenay Carrots?

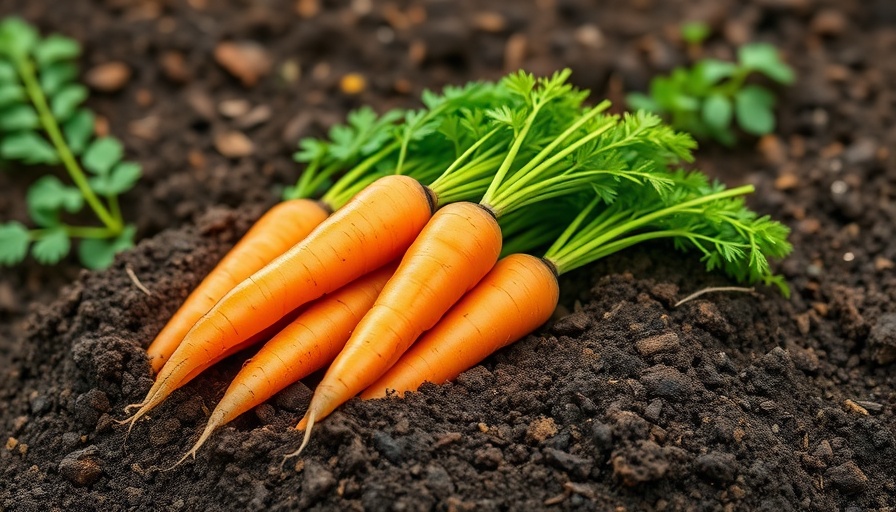
Chantenay carrots, known scientifically as Daucus carota sativus, originate from the Chantenay region of France. They are characterized by their stubby, conical shape and sweet, crunchy texture. This variety can be grown in various USDA hardiness zones (3-10), making them accessible to many gardeners. Chantenay carrots thrive in well-draining sandy or loamy soil and can be sown in both spring and fall.

These carrots are not only easy to grow but also offer a multitude of culinary uses. Whether diced in salads, roasted, or eaten raw, they bring color and flavor to any dish. With a maturity time of about 65-70 days, you won't have to wait long to enjoy your harvest!

Essential Gardening Tips for Growing Chantenay Carrots

If you're eager to grow your own Chantenay carrots, here are some essential tips:

  • Soil Preparation: Ensure your soil is well-drained, sandy, or loamy with a pH between 6.0 and 6.8. Remove any debris or rocks to provide an ideal environment for these carrots.
  • Planting: Sow the seeds approximately 1/4 inch deep, spacing them 6 seeds per inch. Once they sprout, thin them to 2 inches apart to allow room for growth.
  • Watering: Keep the soil moist but not soggy. Chantenay carrots need medium water but be cautious not to flood the roots, which could lead to rot.
  • Pest and Disease Management: Be on the lookout for common garden pests such as aphids and carrot flies. Implementing companion planting can help keep these pests at bay.

Harvesting and Enjoying Your Carrots

Chantenay carrots are typically ready to harvest once they reach 1-2 inches in diameter. Gently pull them from the soil, taking care not to break the roots. They can be stored in a cool, dark place for several weeks. If you find yourself with a surplus, consider preserving them through pickling or freezing to enjoy their flavor year-round.

Creative Cooking Ideas with Chantenay Carrots

The versatility of Chantenay carrots in the kitchen is remarkable. Here are some delicious ideas on how to enjoy them:

  • Raw Snacks: Serve them fresh with a dip for a healthy snack that kids will love.
  • Roasted Vegetables: Toss them with olive oil, salt, and your favorite herbs, then roast until caramelized for a tasty side dish.
  • Soups and Stews: Add diced Chantenay carrots to your soups or stews for a rich flavor boost.

Encouraging Sustainable Practices in Your Garden

By choosing to grow Chantenay carrots organically, you can contribute to sustainable gardening practices. Start your compost bin to enrich your soil naturally and reduce waste. Encourage pollinators by incorporating flowering plants into your garden, which can enhance the health of your plants and improve yields.

As you embark on your gardening journey, remember that growing your own vegetables, such as Chantenay carrots, fosters a connection with nature and provides fresh produce right at your doorstep. It's not just about what you produce, but the experiences and memories formed in the process.

Gardening & Landscaping Ideas

1 Views

0 Comments

Write A Comment

*
*
Related Posts All Posts
08.15.2025

Embrace Sustainable Gardening with 11 Exceptional Sempervivum Varieties

Update Discovering the Magic of Sempervivum: The Ever-Living Succulent If you're venturing into the world of gardening, consider adding Sempervivum, commonly known as hens and chicks, to your collection. With their striking rosette shapes and resilience, these plants epitomize beauty and practicality. Based on the Latin term that means 'always living,' Sempervivum varieties are renowned for their long-lasting nature, making them a valuable addition to both seasoned and novice gardeners alike. 11 Stunning Sempervivum Varieties to Enliven Your Garden Diving into the diverse world of Sempervivum, here are 11 exceptional varieties that are perfect for various gardening styles: Berry Blues: This deep-hued variety thrives in diverse conditions, adding rich blues to your garden. Black Rose: Known for its dramatic dark tones, this plant beautifully contrasts with other garden colors. Commander Hay: An architectural favorite, it brings a distinct shape and elegance to any space. Desert Bloom: This variety blooms with vibrant flowers, attracting pollinators and adding life to your garden. Greenii: A versatile green variety that complements any decor style. Hurricane: This unique plant features twisted rosettes that evoke a sense of movement. Lilac Time: Perfect for those who desire pastel shades in their planting scheme. Oddity: With its unconventional rosette shapes, it’s a conversation starter in any herb garden. Red Lion: This striking variety brings fiery red color, especially in sunny spots. Robin: A friendly, robust plant that’s perfect for pairing with colorful flowers. Ruby Heart: The ruby-tipped leaves offer a stunning, jewel-like appearance, particularly in groups. The Path to Successful Propagation One of the joys of Sempervivum is their ease of propagation. As offsets, or 'chicks,' develop from the parent 'hen,' you can choose to keep them as ground cover or transplant them. This feature not only encourages healthy growth but also allows you to share your beloved succulents with friends and family, a delightful way to connect through gardening. The Importance of Site Selection Gardening Tips for Sempervivum: When planning your garden layout, consider the site where Sempervivum will thrive best. They prefer well-drained soil and can flourish in areas with poor nutrients, making them perfect for rock gardens or sloped areas. Their drought resistance allows them to conserve water more effectively than many traditional garden plants. Designing Your Space: Landscaping Ideas with Sempervivum Incorporating Sempervivum into your landscaping can enhance the aesthetic appeal of your outdoor space. Use them as ground cover across rocky terrains, in raised garden beds, or as a focal point in container gardens. Pairing these vibrant succulents with colorful flowers or ornamental grasses offers eye-catching diversity and a layered look in garden design. DIY Gardening: How to Care for Your Succulents Maintaining healthy Sempervivum is quite straightforward. Regularly check for pests like aphids or mealybugs, and ensure adequate sunlight exposure. For optimum health, use organic fertilizers during the growing season and provide proper drainage to avoid root rot. Creating a Sustainable Garden In today's world, embracing sustainable gardening practices is increasingly important. Sempervivum helps achieve this goal. Their low maintenance needs and drought resistance align perfectly with water conservation efforts. You can have a beautiful garden that supports local wildlife, including bees and butterflies, while minimizing your ecological footprint. Conclusion: Cultivating a Garden for All Seasons As you choose your plants, consider the practical benefits of integrating Sempervivum into your gardening projects. Not only do they yield beautiful aesthetics, but their resilient nature allows them to thrive in various conditions. The joy of incorporating these hardy succulents lasts all year round, providing a unique and stunning landscape for your home. Embrace a greener lifestyle through gardening and let each Sempervivum variety enrich your outdoor space!

08.15.2025

Crafting a Butterfly Feeder: A DIY Guide for Garden Enthusiasts

Update Unlock the Magic of Butterfly Feeding in Your GardenButterflies are not only enchanting to watch but also play a crucial role in pollination, significantly benefiting our gardens. By creating a butterfly feeder, you can easily attract these beautiful creatures to your outdoor space. Not only will you enjoy their vibrant colors, but you'll also enhance your garden's health and biodiversity. This guide provides a step-by-step instructional on how to build your very own butterfly feeder, ensuring these pollinators visit your yard season after season.Gathering Your Essential SuppliesTo kick off your butterfly feeder project, you'll need a few basic materials:Plate: A colorful plate, ideally patterned like a flower, will serve as the base. You can often find affordable options at thrift stores or dollar shops.Mason line or twine: Choose a sturdy material like mason line to withstand the elements.Washer or metal ring: This will help secure your strings for hanging.Optional beads: To add a decorative touch, consider securing colorful beads alongside your strings.Gather these items, and you’re ready to create a butterfly haven!Step-by-Step Guide to Crafting Your FeederFollow these simple steps:Cut five lengths of mason line, each about three feet long for a flower-shaped plate.Loop your strings through a metal ring and tie a double knot.If using beads, add them about a foot from the top and tie knots under each one to hold them in place.Tie all string ends together about six inches from the beads and trim excess, melting the ends to prevent fraying.Set the plate on a holder, hang it in a sunny garden spot, and fill it with butterfly food like fruits and flowers.Delicious Offerings: What to Feed ButterfliesWhen setting up your feeder, it's essential to know what butterflies enjoy. Commonly, they are fond of sweet fruits like:OrangesWatermelonOverripe bananasCreating an inviting atmosphere will attract butterflies, encouraging them to return to your garden continually.Tips for Making Your Garden a Butterfly MagnetAttracting butterflies goes beyond just having a feeder. Here are some tips:Plant a Variety of Flowers: Choose a mix of native flowers that bloom at different times, ensuring there’s always something to feast upon.Provide Shelter: Incorporate shrubs and trees for butterflies to rest and hide from predators.Avoid Chemicals: To protect butterflies and other pollinators, opt for organic gardening methods. Using pesticides can be detrimental to these beautiful creatures.Enhancing Your Butterfly-Friendly Garden DesignCreating a sanctuary for butterflies can significantly enhance your garden's aesthetic and ecological value.Consider integrating flower beds that offer camouflage and safety for caterpillars.Explore incorporating butterfly-friendly plants such as Milkweed, Coneflowers, and Black-eyed Susans.Utilize container gardening if space is limited, ensuring the planting of nectar-rich flowers.Conclusion: Creating a Butterfly ParadiseBuilding a butterfly feeder is not just an enjoyable DIY project—it's a meaningful way to contribute to local wildlife. By inviting butterflies into your garden, you’re fostering biodiversity and creating a beautiful, vibrant outdoor space. Now, roll up your sleeves and start crafting your butterfly oasis; you’ll reap the benefits of a thriving garden full of life and color!

08.15.2025

Discover the Art of Upcycling: A Creative Way to Transform Your Home

Update The Joy of Upcycling: Breathing New Life into Old Treasures In a world where sustainability is becoming paramount, upcycling has emerged as a delightful way to transform discarded items into practical pieces of art. In the recent show titled Easy Upcycling and Crafty Projects, viewers were introduced to numerous creative ways to revive old items, turning them from forgotten relics into functional beauties. This article dives deeper into the wonderful world of upcycling, focusing on tips for transforming old furniture, like a rustic ladder and repurposing everyday items into unique projects.In Easy Upcycling and Crafty Projects, the hosts explore innovative ways to rejuvenate old treasures through creative recycling, prompting us to analyze and expand upon their inspiring ideas. From Ladder to Bookshelf: A Transformation Story One of the showcased projects involved transforming an old ladder into a stylish bookshelf. This concept not only preserves the ladder’s character but also highlights its unique aesthetic. As viewers watched, Adam stripped the ladder of old metal bars, cut it to size, and used galvanized pipes to create supports. By doing so, he ensured functionality while maintaining the rustic charm that defined the original piece. This project exemplifies how something deemed unusable can find new life within the home. Crafting a Stylish Stool from Everyday Materials The show also highlighted the process of crafting a stool from a discarded piece of furniture—a dress pond, which was elegantly transformed into a practical addition for any home. With techniques like the mortise and tenon joints, viewers learned about the importance of craftsmanship in creating durable and beautiful furniture pieces. This emphasis on detail not only enhances the durability of crafted items but makes for an engaging DIY endeavor. Logs to Benches: Outdoor Projects to Inspire Imagine turning logs, destined for mulch, into stunning outdoor benches. The creative approach taken by the hosts involved using minimal tools—just a chainsaw and a desire to create. By carefully cutting into the logs at an angle, they fashioned logs into seats that could serve as both a sculpture and a functional feature of a garden. Such projects offer fantastic avenues to personalize outdoor spaces while contributing to an eco-friendly lifestyle. Tips for Successful Upcycling Projects Ready to embark on your upcycling journey? Here are some practical insights to make the most of your projects: Identify Quality Materials: Look for items that have sturdy structures, like old furniture or unique hardwood pieces. These will be more rewarding to transform. Tools Matter: Basic tools such as saws, screws, and sanders can be more than enough for most projects. There’s no need for expensive equipment to start. Use Your Imagination: Think outside the box; a simple chair can become a garden swing, and old jars can be turned into trendy terrariums. Involve Family and Friends: Inviting others to join in the creative process can provide inspiration, make the task enjoyable, and strengthen connections. Growing a Container Garden: An Upcycle Opportunity While we discuss upcycling, let’s not forget about container gardening! This brings an eco-friendly angle to gardening by repurposing items like old buckets or tubs. By incorporating organic gardening techniques, anyone can create stunning garden designs right at home, contributing to sustainability. Not only does this offer a practical way of growing plants and vegetables, but it also adds beauty and improved air quality to living spaces. Future Predictions for Upcycling Trends As sustainable living continues to gain traction, upcycling is poised to expand beyond traditional crafts. With growing interest in DIY culture, expect to see more community workshops pop up, encouraging collective efforts towards crafting and sustainability. Not only does this trend empower individuals to create personalized items, but it also fosters community bonds through shared creativity. Final Thoughts: Join the Upcycling Movement! Whether you're handling old furniture or transforming everyday items, upcycling is a joyous way to bring new life to your home while supporting sustainable practices. It allows for boundless creativity, provides functional art, and ultimately makes each project uniquely yours. So, gather those materials, unleash your creativity, and dive into the world of upcycling!

Terms of Service

Privacy Policy

Core Modal Title

Sorry, no results found

You Might Find These Articles Interesting

T
Please Check Your Email
We Will Be Following Up Shortly
*
*
*