Add Row
Add Element
cropper
update
Marin Home Ideas
update
Add Element
  • Home
  • Categories
    • Home Remodeling Ideas
    • Interior Design & Decor Ideas
    • Gardening & Landscaping Ideas
    • Outdoor Living & Entertaining
    • Health & Wellness at Home
    • DIY at Home
    • Kitchen Ideas
    • Bedroom Ideas
    • Bath Ideas
    • Cooking at Home
    • Home Office Ideas
    • Lighting Ideas
    • Furniture Ideas
    • Architecture Ideas
    • Senior Living at Home
    • Home Finance
    • Real Estate News
August 10.2025
3 Minutes Read

Explore Gardening Tips for Growing Stunning Romanesco Broccoli

Close-up of romanesco broccoli with fractal patterns, gardening tips.

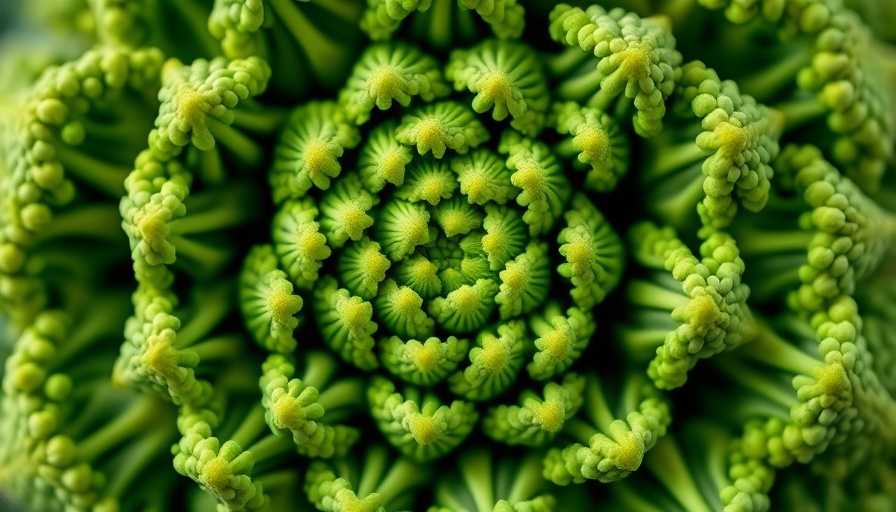
Discover the Unique Beauty of Romanesco Broccoli

If there exists a contender for the title of the most visually striking vegetable, it has to be Romanesco broccoli. Its swirling, fractal appearance dazzles both the eye and the palate, capturing the attention of anyone venturing down the produce aisle. Even children, with their innate curiosity, often stop in awe before this intricate marvel, part of the Brassica family, which includes its more commonly known relatives—broccoli, cauliflower, and cabbage.

What Exactly is Romanesco Broccoli?

Before we delve into the planting techniques for Romanesco, let’s clarify some misconceptions. Despite its name and appearance, Romanesco isn’t simply a new variety of broccoli. Often referred to as “Roman cauliflower,” its actual lineage traces back to centuries of selective breeding in Italy, where it was cultivated before the 15th century. It’s considered a variety of Brassica oleracea and, while it bears resemblance to both cauliflower and broccoli, it's a distinct plant known for its slightly nutty flavor, making it a delightful addition to many dishes.

Step-by-Step Guide to Growing Romanesco

For those eager to grow this stunning vegetable at home, here’s a concise guide on how to plant and cultivate Romanesco broccoli:

  • Sowing: Start seeds indoors about 4-6 weeks before the last frost. Use organic seed starting mix and keep them moist but not soggy.
  • Planting: Once seedlings have 2-3 true leaves, transplant them to the garden. Space them 16-18 inches apart, as they will develop into large, impressive heads.
  • Soil Requirements: Romanesco thrives in rich, well-draining soil with a pH of 6.0-7.5. Amending the soil with compost can boost nutrient levels and encourage healthy growth.
  • Watering: Keep the soil consistently moist, especially during dry spells. Romanesco prefers moderate water needs, so deep watering is key.
  • Harvesting: Typically, Romanesco will take 75-100 days to mature. Look for a firm head that is well-defined but hasn’t begun to flower.

Pest and Disease Management

As with any garden plant, Romanesco is not immune to pests. Common culprits include aphids and cabbage worms. Employing organic pest control methods such as introducing beneficial insects or using neem oil can help maintain a healthy garden. Regular inspection of the leaves can assist in catching infestations early.

Nutritional Benefits of Romanesco

Beyond its striking aesthetics, Romanesco is packed with nutritional benefits. It’s rich in vitamins C and K, and provides a good source of fiber, making it a perfect addition to a well-rounded diet. Its unique texture and taste can be highlighted in a variety of recipes, from steaming and roasting to stir-fries and salads.

Incorporating Romanesco into Your Cooking

Once you’ve harvested your Romanesco, numerous culinary options await:

  • Roasted Romanesco: Tossed in olive oil, garlic, and salt, then baked until golden, this preparation accentuates its natural flavors.
  • Romanesco Stir-Fry: Combine with other vegetables and a protein source for a colorful, nutritious meal.
  • Raw Romanesco: Serve it in salads or as part of a veggie platter; its funky shape makes it a conversation starter at gatherings.

Final Thoughts

Whether you consider yourself a gardening novice or an experienced green thumb, growing Romanesco broccoli can cultivate not just an appreciation of beauty in your garden but also foster a deeper understanding of sustainable living and self-sufficiency. Start your journey with this unique vegetable today, and enjoy the plethora of flavors and nutrients it brings to your meals!

Gardening & Landscaping Ideas

14 Views

0 Comments

Write A Comment

*
*
Related Posts All Posts
11.11.2025

Experience the Best of Self-Care with DIY Coffee Bean Massage Bars

Update Indulge in the Comfort of Coffee Bean Massage Bars With the hustle and bustle of daily life, many of us are yearning for a way to unwind and pamper ourselves without the need for a spa visit. Enter, the coffee bean massage bar, a simple yet luxurious way to soothe both weary muscles and minds in the comfort of your own home. These solid massage bars combine the alluring aroma of fresh coffee with nourishing ingredients that not only soften the skin but also provide a delightful massage experience. Crafting Your Own Coffee Bean Massage Bars Making your very own coffee bean massage bars is surprisingly easy, requiring just four key ingredients: beeswax, grapeseed oil, cocoa butter, and roasted coffee beans. The combination of these items not only offers a wonderful texture but also boasts numerous skin benefits. The beeswax acts as a natural barrier that helps lock in moisture, while cocoa butter is known for its rich moisturizing properties and pleasant scent. Meanwhile, grapeseed oil helps to facilitate a smooth application and is packed with essential vitamins. The Hidden Benefits of Coffee for Your Skin We often think of coffee as our morning pick-me-up, but did you know it also has therapeutic properties when used in skincare? The caffeine in coffee is known to stimulate circulation and may help reduce the appearance of cellulite. When massaged into the skin, these bars can promote a firmer, smoother complexion, making them not just a treat for your senses but for your skin as well. Important Steps in the DIY Process The process of making these massage bars is straightforward and rewarding. Start by weighing your ingredients and adding them to a double boiler. Stir gently over low heat until the mixture melds beautifully. Once melted, add the roasted coffee beans and carefully pour the blend into your silicone molds. Allow them to cool for about an hour, and voilà—you have delightful massage bars ready for use! Creative Packaging Ideas for Gifting Thinking about gifting your homemade massage bars? They make incredible presents for friends and family, especially when packaged creatively. Consider placing the bars in miniature burlap coffee sacks, labeling them with personalized tags made using letter stamps. This thoughtful touch not only highlights your effort but adds a rustic charm that speaks to the care you took in making the gift. Common FAQ: Caring for Your Coffee Bean Massage Bars One question that commonly arises is about the usage and longevity of these bars. Unlike traditional oil products, coffee bean massage bars can be used multiple times before being used up. To ensure the bars retain their quality, store them in a cool, dry place or even in the refrigerator to extend their shelf life. Conclusion: Elevate Your Self-care Routine Whether you're treating yourself after a long day or looking for a heartfelt, handmade gift, coffee bean massage bars are perfect for creating a pampering experience at home. Not only do they soothe strained muscles, but they also connect you to the comforting ritual of self-care. So why not indulge in the rejuvenating benefits today? Grab your ingredients and transform a simple evening into a luxurious spa experience right in your living room. Remember that caring for your own well-being often reflects how much you care for those around you. So take a moment to celebrate yourself—after all, you deserve it!

11.10.2025

Transform Your Sidewalk Strip Into a Blossoming Stinzen Planting Paradise

Update Revitalize Your Sidewalk Strip with Stinzen Planting Have you ever looked at that neglected patch of grass between the sidewalk and the street and wondered what to do with it? If so, you're not alone! Not only is it an ideal spot for plants, but it's also a great opportunity to beautify your community. Enter the concept of stinzen planting, a technique that allows anyone to transform these small, often forgotten spaces into vibrant pockets of life through beautiful bulbs. What is Stinzen Planting? Originating in the Netherlands, stinzen planting involves naturalizing bulbs in a way that creates stunning displays of flowers during the early spring months. Historically, this technique was a sign of affluence, showcasing one’s wealth through flower-laden front yards. Today, however, it has evolved into a community-building initiative. In sharing beauty through nature, stinzen planting can foster connections among neighbors and add a touch of color and life to public spaces. Modern Interpretations of Stinzen Plantings While traditional stinzen planting focused on prestige, modern gardeners are using it to unite their communities. I embarked on this journey in my own neighborhood, encouraging local residents to join in on the planting of various bulbs in the strip of grass outside our homes. Our collective effort aims to transform what was once a dull stretch into a lively Flower Boulevard, bursting into color each spring. Choosing the Right Bulbs for Sidewalk Landscaping When considering stinzen planting, selecting the right bulbs is crucial. Popular options like crocuses, snowdrops, and daffodils thrive in these settings, providing a rich source of pollen and nectar for early seasonal pollinators. It’s essential to choose bulbs that bloom at different times, ensuring a continuous display of color throughout the spring. Additionally, these flowers are low-maintenance, making them perfect for the often sparse and shaded areas of sidewalk strips. Tips for a Successful Sidewalk Strip Garden Here are a few tips to help you get started with your stinzen planting project: Assess the Soil: Ensure the soil in your sidewalk strip can support plant life. These areas often have poor, compact soil, so consider amending it with compost. Get Neighborhood Involvement: Transforming your sidewalk strip into a community project invites neighbors to participate, making the gardening process enjoyable. Utilize Gardening Tools: Invest in gardening tools like an auger attachment for a drill, which makes planting bulbs easier. Caring for Your Bulb Gardens Post-Bloom One of the frequent concerns people have about planting bulbs is what happens after they bloom. The answer? Wait for their leaves to die back before mowing, allowing the bulbs to absorb energy for the next blooming season. This natural process not only facilitates the growth of your flowers but also aids in nurturing the surrounding lawn. Engaging the Community Through Gardening Creating beautiful areas through stinzen planting can do more than please the eye; it invites community interaction and connection. By collaborating with neighbors, you not only foster a sense of belonging but also contribute to local biodiversity and health. Discussing gardening tips, plant care, and design ideas with nearby residents can further enhance the experience. Vision for the Future: A Community in Bloom Looking ahead, the prospect of seeing entire blocks adorned with flowers presents an inspiring vision for community gardening projects. Together, we can create more green spaces that bring joy, beauty, and a deepened sense of connection to our neighborhoods. What if every front yard held a story of shared effort and love for the earth? As we plant and nurture, it's essential to remember that gardening is about more than just aesthetics; it fosters friendships, encourages environmental awareness, and brightens our urban landscapes.

11.10.2025

Create Memorable Gifts: DIY Natural Beauty Products for the Holidays

Update DIY Natural Beauty Gifts: The Heartfelt Way to Celebrate The holiday season is a time for giving, and what better way to show your love than with a handmade gift? DIY natural beauty products make wonderful presents that are not only thoughtful but also affordable. From soothing bath bombs to delightful soaps, creating your own beauty gifts allows you to express your creativity while delivering joy to your friends and family. The Allure of Homemade Beauty Products Store-bought gifts often lack a personal touch, but when you create something with your own hands, it carries a significance that can't be matched. Many people cherish gifts made just for them, such as a luxurious body butter or a scented bath bomb, which reminds them of the care you've put into making it. The shift to natural ingredients further enhances these products, making them as beneficial for the recipient's skin as they are beautiful. Getting Started: Supplies and Setup Before diving into your DIY beauty products, it’s crucial to set up your workspace. You don't need a fancy lab; a clean kitchen counter or dining table can suffice. Make sure you have essential tools such as mixing bowls, measuring spoons, and clean containers for storage. Safety first: always sanitize your workspace and wear gloves when handling ingredients, especially oils and certain botanicals. Your Guide to Beautiful and Natural Gift Recipes Here are some delightful DIY beauty recipes that are simple yet impressive to create: Floral Bath Bombs: A fun addition to any bath, these fizzing delights can be customized with your favorite essential oils. Lavender Bath Salts: This classic recipe incorporates the relaxing properties of lavender to create a soothing bath experience. Sweet Orange Lip Balm: With just a few ingredients, this nourishing balm keeps lips soft and hydrated. Pomegranate Eye Serum: Ideal for a thoughtful touch, this light serum provides moisturizing benefits while combating signs of aging. Cocoa Butter Bath Melts: Rich and indulgent, these melts leave skin feeling nourished and cared for. Why Choose Natural Ingredients? Making the switch from commercial beauty products to DIY natural alternatives not only supports sustainability but also ensures that what you're applying to your skin is free from harsh chemicals. Natural ingredients offer many benefits including nourishment, hydration, and skin-soothing properties. Using botanical ingredients like shea butter, almond oil, and essential oils can enhance the quality of your DIY gifts. Packaging and Presentation: The Finishing Touch Once your beauty products are made, consider how you'll package them. A simple glass jar or an elegant tin can elevate even the simplest of creations. Adding a handwritten tag with the product’s name and its ingredients not only personalizes the gift but also informs the receiver of what they are using. Make it even more festive with a ribbon or decorative fabric to wrap the jars. Emotional Connections Through Handmade Gifts Handmade gifts resonate on a deeper level than those bought in stores. They are tokens of love, effort, and thoughtfulness. As you gather your supplies and begin to craft these gifts, keep in mind the smiles and joy they will bring to those you cherish. This season, give the gift of love with beautiful DIY natural beauty products that reflect your sentiments. Take the Next Step So roll up your sleeves and dive into the world of DIY natural beauty! As you embark on your crafting journey, remember it’s not just about the product, but the love and care that goes into making each one. Your friends and family will not only appreciate the effort but will be touched by the affection that each handmade gift embodies.

Terms of Service

Privacy Policy

Core Modal Title

Sorry, no results found

You Might Find These Articles Interesting

T
Please Check Your Email
We Will Be Following Up Shortly
*
*
*