Add Row
Add Element
cropper
update
Marin Home Ideas
update
Add Element
  • Home
  • Categories
    • Home Remodeling Ideas
    • Interior Design & Decor Ideas
    • Gardening & Landscaping Ideas
    • Outdoor Living & Entertaining
    • Health & Wellness at Home
    • DIY at Home
    • Kitchen Ideas
    • Bedroom Ideas
    • Bath Ideas
    • Cooking at Home
    • Home Office Ideas
    • Lighting Ideas
    • Furniture Ideas
    • Architecture Ideas
    • Senior Living at Home
    • Home Finance
    • Real Estate News
July 23.2025
3 Minutes Read

From Dirt to Delight: How to Create a Family-Friendly Garden

Modern backyard garden with patio dining setup, lush greenery.

Transforming a Dismal Yard into a Vibrant Family Garden

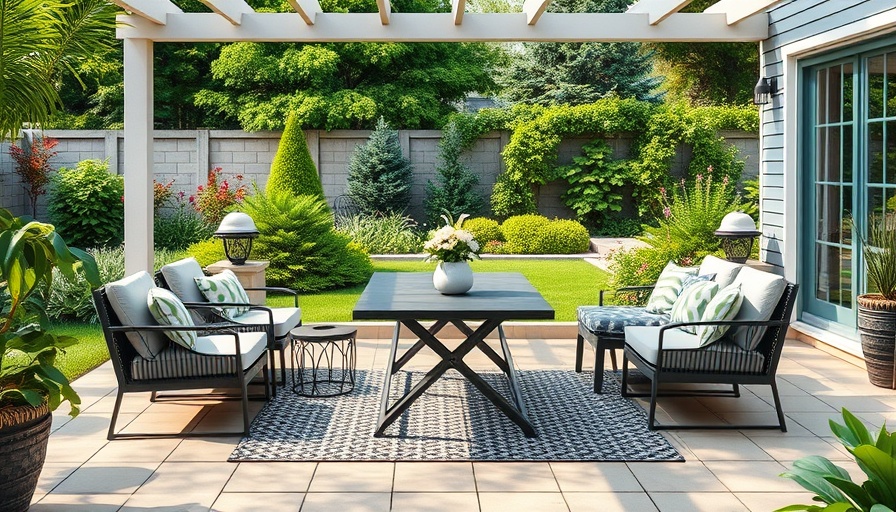
Emma faced a common yet daunting challenge: a bare backyard in need of transformation. As a new homeowner and mom on maternity leave with her little boy, Thomas, she felt trapped in her home, longing for a safe outdoor space where her family could enjoy quality time together. With a dirt yard devoid of charm, Emma reached out for help to turn her lifeless outdoor environment into a flourishing family-friendly garden.

In 'Bare Backyard To Family Friendly Garden | Great Home Ideas', we explore the journey of transforming an empty yard into a vibrant family-friendly space, leading us to delve deeper into the essentials of garden design and maintenance.

The Vision for a Family-Friendly Oasis

The renovation project kicked off with a vision—creating an inviting outdoor space for gatherings, play, and relaxation. The plan included a deck for outdoor entertaining, a boardwalk leading to different zones of the garden, and beautiful plants that could withstand the elements. Each element was designed to make this new garden not just aesthetically pleasing but also functional for Emma and her family.

Building Strong Foundations: Decking and Boardwalks

Construction began with preparing the deck, which called for staining the treated pine wood. The deck became the centerpiece for gatherings, allowing friends and family to come together. Alongside it, a boardwalk was constructed, providing accessibility while adding visual appeal. It’s essential in garden design to consider the layout and flow of a space, ensuring that each section serves a purpose while looking harmonious.

Choosing the Right Plants: Health and Beauty

One of the most exciting stages of the transformation was selecting plants. The goal was to infuse life into the garden while ensuring easy maintenance. This is where Emma’s knowledge would grow alongside her garden. By opting for plants like a compact magnolia and the Emerald Queen fishbone plant, she created a striking contrast of colors and textures. Insights into soil health and the importance of mulching play a huge role in the longevity and beauty of garden plants.

Incorporating Functional Features

Beyond aesthetics, the garden needed practical elements, such as plants that could bloom annually while withstanding local climate conditions. Features like container gardening for herbs added a personal touch—an edible garden where fresh ingredients could grow right at home! The importance of organic gardening practices became evident, as they not only enhance soil health but also contribute to the overall ecosystem.

Lighting: Transforming Evenings Into Magical Moments

As day turns into night, the ambiance of any garden can drastically change. Emma's garden concluded with the addition of garden lighting, a feature that highlights the landscape and extends the outdoor experience into the evening. String lights not only illuminate paths but also create picturesque moments perfect for family gatherings.

Creating Your Own Backyard Paradise: The Takeaway

Emma's garden journey illustrates that with thoughtful planning and the right resources, transforming a bare yard into a stunning sanctuary is possible. The key takeaways for anyone looking to revamp their outdoor space include understanding your needs, investing in hardy plants, utilizing space strategically, and embracing the opportunity to learn along the way.

A successful garden reflects not just your lifestyle, but enhances it. Emma and her family now have a space where they can create memories, celebrate milestones, and enjoy the beauty of nature—all at their doorstep.

Are you ready to take on your own garden project? Whether it’s small changes or a complete overhaul, remember that the journey starts with a single step—or a single plant!

Gardening & Landscaping Ideas

12 Views

0 Comments

Write A Comment

*
*
Related Posts All Posts
12.18.2025

Embrace the Holidays: Create Your Rustic Christmas Candle Centerpiece

Update Add Rustic Warmth to Your Holiday Home As the holiday season approaches, many of us are eager to welcome the warmth and coziness of Christmas into our homes. A beautiful way to enhance this ambiance is with a charming rustic and natural Christmas candle centerpiece. This DIY project can be created using materials you likely have at hand, especially if you love gardening and foraging for natural decor. What Makes This Centerpiece Special? This centerpiece isn't just another piece of decor; it embodies the spirit of comfort and creativity. Using fresh-cut greenery from your own garden not only adds a personal touch but is also a great way to utilize what’s around you. Imagine bringing the beauty of nature indoors and combining it with the warm glow of candles, setting a serene, festive mood for all your holiday gatherings. The Joy of Using Garden Greens Foraging from your garden offers a sustainable way to create holiday decor. Many evergreens, like Fraser fir and Portuguese laurel, are prime choices for this centerpiece. These plants are low maintenance; they don’t require watering, and they can be disposed of easily after the season. Plus, when paired with colorful berries, they offer a visually stunning contrast that elevates the entire decor. Creating Your Candle Centerpiece: Step by Step Gathering the right materials is the first step. You will need a small wooden planter box, dry floral foam (not wet floral foam), taper candles, and of course, fresh-cut greenery from your garden. Start by cutting your greens so they fit neatly into the box, utilizing a mix of both needle-leaf and broad-leaf varieties for texture and color. Arrange the craft foam in the box and place your taper candles into it, ensuring they are evenly spaced. Once your candles are secure, begin layering your greenery, working from the outside in—allowing cascading greens to frame the design and vibrant berries to burst from the center. Finally, light your candles and step back to admire your handiwork! Safety First: Candle Precautions While the glow of candles creates a cozy atmosphere, it’s essential to prioritize safety when using them around natural materials. Never leave candles burning unattended, particularly when near greenery. Consider alternative options like electric candles for a worry-free solution while still enjoying the visual appeal of a well-decorated centerpiece. Crafting Beyond Christmas: Timeless Decor Ideas Though this project perfectly suits the holiday season, your creativity doesn’t have to stop there. Consider designing similar centerpieces for different occasions, like spring baskets or summer gatherings using seasonal blooms and colors. With some modifications, the principles of this project can easily be adapted to any festive occasion, ensuring that your home stays beautiful year-round. Exploring Other DIY Holiday Projects If you’re inspired to craft more holiday decor items, think about creating a fresh foraged wreath or experimenting with simple rustic decor accents that can brighten your home during winter. There’s no shortage of creativity waiting to be harvested from your garden! In conclusion, making a rustic and natural Christmas candle centerpiece not only beautifies your space but also brings a sense of serenity to your celebrations. This DIY project is about embracing nature's beauty and making your holiday warm with a personal touch. So gather your materials, get crafting, and light up your holidays with a centerpiece that tells your unique story.

12.18.2025

Wood Ash in Gardening: The Nutrient-Rich Secret You Need to Know About!

Update Transform Your Wood Ash into Garden Gold As winter wraps its icy arms around Vermont, many of us find ourselves cozying up to the warm glow of the fireplace. This comforting ritual, however, leaves behind piles of wood ash that often find their way into landfills. But what if you could put that ash to use? It turns out, wood ash can be a boon to your garden when used correctly! The Nutritional Treasure in Wood Ash Wood ash contains essential nutrients that your plants crave. Composed of vital minerals such as potassium, calcium, and magnesium, it enriches the soil and enhances fertility. Its high calcium content is particularly beneficial for neutralizing excessively acidic soils, which many gardeners face. But before you start spreading ash like confetti, it’s crucial to test your soil’s pH to determine if it’s truly needed. Soil testing is essential—adding ash to alkaline soils (above 7.0) can lead to harmful effects by increasing alkalinity and soluble salts. Timing is Everything When it comes to composting wood ash, timing and moderation play vital roles. The general rule of thumb is to use ash in small amounts—no more than 5% of your compost. According to gardening experts, once your compost nears maturity, adding ash could elevate pH levels too much, releasing heavy metals into the environment. Therefore, it’s wise to incorporate cooled ashes directly into a new or uncooked pile rather than your finished compost. Safety First: Handle Wood Ash with Care While wood ash can be a powerful tool, safety should always come first. When handling wood ash, always wear gloves, eye protection, and a mask. This protects you from irritation and dust inhalation. Ensure that the ash is completely cool before adding it to your compost or garden bed. How to Properly Incorporate Wood Ash To effectively use wood ash in your garden, start by sprinkling it onto a compost pile along with your regular mix of brown and green materials. Aim to apply a quarter-inch layer of ash for each 18-inch section of browns, and add it to every six inches of greens. Make sure to turn the pile well to incorporate the ash evenly. Wood Ash: The When and Where Using wood ash is not a blanket solution for all garden types. It’s especially beneficial in areas where soil is acidic and lacks potassium. However, avoid using it on acid-loving plants like blueberries or azaleas. Instead, consider using the ash on lawns needing lime or areas that benefit from added potassium. Cautions and Misconceptions about Wood Ash With the right knowledge, wood ash can be a valuable amendment for your gardening endeavors. However, a common misconception is that more is better—this isn't true! Over-application can lead to nutrient imbalances and damage your soil structure. Always err on the side of caution and moderate your applications based on thorough testing. Final Thoughts: Enjoy the Benefits of Wood Ash In conclusion, wood ash is a sustainable garden amendment that can substantially benefit your soil, provided you use it wisely. By testing your soil, adhering to appropriate application methods, and prioritizing safety, you can transform a waste product into a gardener’s ally. So, the next time you clear out your fireplace, remember: that ash may just be the key to a flourishing garden this spring! Join the movement towards sustainable gardening! Incorporate composting, and discover how every part of your gardening process can contribute to a healthier earth. Enjoy experimenting and see the benefits you've created in your backyard!

12.17.2025

Unlock Creativity This Holiday: Recycle Christmas Cards Into Gift Tags

Update Transforming Memories: Recycled Christmas Cards as Gift Tags The holiday season is filled with beautiful memories captured in cards from friends and family. However, as the festivities wind down, many of those cherished cards are left to gather dust or be discarded. Recycling Christmas cards into gift tags not only provides a creative outlet but also promotes a sustainable practice by reducing waste. This simple craft allows you to repurpose those heartfelt greetings into practical items that bring joy throughout the year. Materials You’ll Need for a Charming Craft Project To begin this enchanting journey of upcycling, gather your supplies. You will need: Christmas cards Tag punch or scissors Hole punch or an alternative for threading Baker’s twine, ribbon, or string Having these items on hand will ensure your crafting experience is both smooth and enjoyable. You’ll be amazed at how many beautiful tags can be created from a single card! The Simple Process: How to Create Gift Tags from Cards With your materials ready, let’s dive into the steps of creating gift tags: Sort and Select: Go through your collection of Christmas cards, keeping those with captivating imagery and removing any that contain personalized messages. Only use the front of the card where the design shines. Punch or Cut: If you have a tag punch, position your card accordingly and make your cuts. You can also use scissors or pinking shears for decorative edges. Aim for shapes that will look appealing on gifts, like rectangles or festive shapes. Create Holes: Don’t forget to punch holes at the top of each tag for threading. Using a hole punch simplifies this step, but if one isn't available, a sturdy needle can substitute. Accessorize Your Tags: Thread the tags with baker’s twine, festive ribbons, or leftover strings. This will add a finishing touch prepped for adorning presents. Store with Love: Keep your beautifully crafted tags in a special box for next holiday season, or even use them for birthdays and other occasions throughout the year. By following these straightforward steps, you’ll find the task takes very little time, allowing you to embrace your holiday spirits while being environmentally conscious. Embrace the Joy of Sustainability While this project is fulfilling, it also ties into broader conversations about sustainability and waste reduction during the holiday season. Many people find themselves overwhelmed by the amount of waste generated during this festive period. By recycling Christmas cards, you’re not only creating something beautiful but also curbing unnecessary landfill contributions. This initiative aligns with the growing trend of conscious living, and every individual action counts towards a healthier planet. Beyond Christmas: Year-Round Usability While transforming Christmas cards into gift tags aligns perfectly with the season, the creativity doesn’t stop there. Consider saving cards from various occasions—birthdays, thank-yous, and other festive events—to ensure you have an array of unique gift tags at your disposal. Brightly colored and themed tags will make any present more personal and heartfelt. Community Connection: Share Your Creations Sharing this kind of crafting idea often inspires others in the community to engage in similar projects. Crafting together, whether in virtual gatherings or local workshops, fosters connections and allows for expression beyond traditional holiday greetings. It’s an opportunity for bonding over shared creativity and sustainability efforts. Whether you're a seasoned crafter or a newcomer wanting to explore DIY projects, transforming Christmas cards into gift tags is a fun, easy way to express creativity while adding a personal touch to gift-giving. So gather those old cards, roll up your sleeves, and get crafting! Your gifts will not only be wrapped with love but also with a story worth sharing.

Terms of Service

Privacy Policy

Core Modal Title

Sorry, no results found

You Might Find These Articles Interesting

T
Please Check Your Email
We Will Be Following Up Shortly
*
*
*