Add Row
Add Element
cropper
update
Marin Home Ideas
update
Add Element
  • Home
  • Categories
    • Home Remodeling Ideas
    • Interior Design & Decor Ideas
    • Gardening & Landscaping Ideas
    • Outdoor Living & Entertaining
    • Health & Wellness at Home
    • DIY at Home
    • Kitchen Ideas
    • Bedroom Ideas
    • Bath Ideas
    • Cooking at Home
    • Home Office Ideas
    • Lighting Ideas
    • Furniture Ideas
    • Architecture Ideas
    • Senior Living at Home
    • Home Finance
    • Real Estate News
April 23.2025
3 Minutes Read

How Deadheading Fuchsia Flowers Enhances Your Flower Garden

Close-up of fuchsia flowers with vibrant colors in sunlight, highlighting how to deadhead fuchsia flowers.

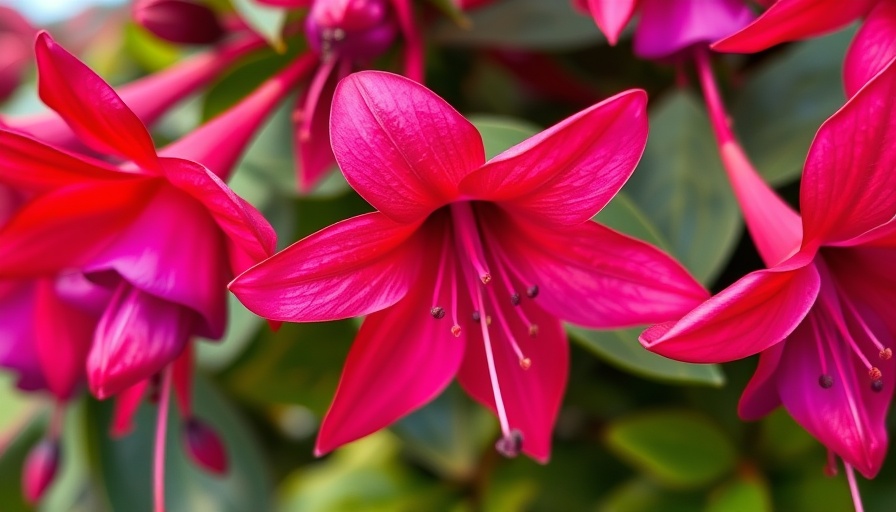
Unveiling the Charm of Fuchsia Flowers

Fuchsias are famous for their vibrant, dangling blossoms that create a breathtaking spectacle throughout the growing season. However, these gorgeous plants require a bit of effort and know-how to flourish to their fullest potential. Proper care, including the vital practice of deadheading, is key to keeping your fuchsias blooming beautifully.

Why Deadheading is Important for Fuchsias?

While fuchsia plants can drop their flowers naturally, deadheading plays a crucial role in maximizing flower production. Removing spent blossoms not only tidies up your plants but also encourages a prolonged display of those exquisite blooms. When a flower fades, the plant begins to focus on developing the seed pod; unfortunately, this often leads to a halt in flowering. Thus, by ensuring no flowers are left to form pods, you can keep your fuchsias bursting with color and vitality.

What’s interesting is that some fuchsia varieties will continue blooming even if you skip the deadheading. However, to be on the safe side—and ensure your plants look their best—removing faded flowers is always a good practice.

When Should You Deadhead Fuchsia? Timing is Key!

Timing is everything when it comes to deadheading. The right moment is when you notice wilted flowers starting to drop. Most fuchsias bloom from spring to summer, and the frequency of their blooms can vary by species. Some flowers may only last a few days, while others can remain vibrant longer.

Regular checking is a must. You'll want to inspect your plants daily during peak blooming. If flowers are falling to the ground too quickly, it’s a sign to take action. Dropping flowers often indicate they are past their prime, displaying signs like browning edges or soft petals, which signal their time has come.

A Step-by-Step Guide to Proper Deadheading

To successfully deadhead your fuchsias, you’ll need a pair of clean scissors or garden clippers. Here’s a simple step-by-step guide:

  1. Inspect: Look for flowers that are wilting or already fallen.
  2. Snip: Using your scissors, cut the flower stem right at the base, just above the leaf node.
  3. Clean: It's essential to clean your tools after each use with a 1:10 bleach-water solution to prevent any plant disease.
  4. Observe: After deadheading, pay attention to your fuchsias and see if the blooming increases.

Additional Plant Care Tips for a Thriving Fuchsia Garden

Besides deadheading, maintain optimal health for your fuchsias. Ensure they receive adequate sunlight—most require partial shade—and keep their soil well-drained. Regular feeding with organic fertilizers can enrich the soil nutrients, fostering even more robust growth and blooms.

Don’t forget to water properly! Fuchsias prefer consistently moist conditions, but make sure not to overwater, as soggy soil can lead to root rot. A good tip is to monitor the top inch of the soil; when it feels dry, it's time to water.

Conclusion: Cultivating Joy with Your Fuchsias

Taking the time to deadhead your fuchsias and care for them will ultimately reward you with continuous, gorgeous blooms that elevate your garden’s aesthetic. The effort you put into garden maintenance reflects not only in the health of your plants but also in the joy they bring to your space.

So grab your scissors and start deadheading those fuchsias! You'll find that these simple gardening tips will not only make your flowers thrive but also enhance your gardening journey.

Gardening & Landscaping Ideas

6 Views

0 Comments

Write A Comment

*
*
Related Posts All Posts
02.09.2026

Revamp Your Space: 10 Kitchen Design Elements to Embrace Now

Update Transform Your Kitchen with These 10 Essential Design Elements Renovating your kitchen is an exciting endeavor that can breathe new life into your home. Whether you're a seasoned chef or someone who simply enjoys the warmth of family gatherings, creating a kitchen that inspires creativity and connection is key. In this article, we’ll explore ten indispensable design elements that will enhance your kitchen renovation, making it not just functional but also a welcoming hub for heartwarming moments.In '10 KITCHEN DESIGN ELEMENTS TO INCLUDE IN YOUR KITCHEN RENOVATION,' the discussion dives into crucial aspects of kitchen design, exploring key insights that sparked deeper analysis on our end. The Heart of the Home: A Stylish, Functional Layout The layout is the backbone of a kitchen. An effective design prioritizes workflow, placing essential tools like the stove, fridge, and sink in a triangular formation for seamless movement. Opt for an open concept that allows light to flood in and encourages conversation while cooking. Incorporating an island can provide extra prep space, making it the perfect spot for chatting while preparing meals. Rich Textures and Warm Colors Navigating through different textures adds depth and character to your kitchen. Consider mixing materials such as wood, stone, and metal to create a visually stunning environment that feels warm and inviting. Adding warm colors—like soft yellows and earth tones—can enhance the cozy feel of the space. Paint your cabinets in a soothing color or introduce a bold backsplash to add personality in a fun and friendly way. Optimal Lighting for Ambiance and Functionality Good lighting transforms any space, and kitchens benefit from a layered approach. Combine ambient lighting with task and accent lighting to brighten up your kitchen work zones and highlight architectural features. Pendant lights over the island not only enhance visibility but also serve as striking design statements. Natural light from large windows can further elevate the overall mood, bringing the outdoors in. Kitchen Garden: Growing Your Own Herbs and Vegetables Imagine snipping fresh herbs from an indoor garden or container patio to flavor your meals. Incorporating a small herb garden adds not only a splash of greenery but also brings fragrances and a personal touch to your culinary adventures. Use stylish pots to grow basil, thyme, or rosemary, which can be conveniently placed near your cooking areas. Multifunctional Furniture with Storage Solutions In any kitchen renovation, storage is paramount. Incorporate multifunctional furniture, such as benches with storage or islands that double as dining spaces. Utilize innovative cabinetry solutions such as pull-out drawers and shelves to keep your kitchen organized and accessible while maximizing space. Consider adding garden decor or plant elements that can serve as both functional items and beautiful visuals. Smart Kitchen Technology: Modern Convenience In today’s digital age, smart technology can create a more convenient cooking experience. Integrating smart appliances—including refrigerators that can manage grocery lists and ovens that can be controlled via smartphone—can greatly save time and enhance your lifestyle. These technologies not only elevate functionality but can also create a futuristic aesthetic that is both sleek and user-friendly. Highlighting Sustainable Choices in Design Eco-friendliness is becoming increasingly important in kitchen renovations. Look for sustainable materials and energy-efficient appliances that can help you reduce your carbon footprint and save on utility bills. From reclaimed wood for cabinetry to low-flow faucets, there are eco-conscious options available that will not only look good but also be good for the planet. Personal Touches: Reflecting Your Unique Style It’s essential to reflect your personality through your kitchen design. This can be done through custom cabinetry, unique art pieces, or even a wall dedicated to family recipes. Paint a mural that mirrors the view of your backyard vegetable garden or use cheerful tableware displaying vibrant floral motifs. Such personalization creates not only a functional space but also a joyful environment that celebrates your life and family. Outdoor Connection: Embracing Nature Consider a seamless transition from your kitchen to your outdoor living space. Bi-fold doors can open up to a patio or garden, making it easy to entertain guests outside, enjoy a meal while surrounded by flowers and plants, or simply bask in the joy of your surroundings. Adding a vegetable garden seems like a natural extension of your kitchen, allowing you to easily incorporate fresh ingredients into your meals. The Power of Accessibility: Consideration for All Creating a kitchen that is accessible and comfortable for everyone—especially if you have elderly family members—should be a priority in your design. Ensure that countertops are at an appropriate height, and consider installing pull-out shelves to reduce the need for bending or stretching. Thoughtfulness in design fosters an inclusive atmosphere where everyone can cook, bake, and enjoy time together. As you embark on your kitchen renovation journey, keep these ten essential elements in mind. By integrating functionality with personality, along with a sprinkle of greenery and technology, you can create a beautiful hub where culinary memories are made and cherished.

02.09.2026

Discover the Benefits of Easy DIY Rose Toner for Radiant Skin

Update Revitalize Your Skincare with Easy DIY Rose Toner In the world of skincare, finding the right balance between effective ingredients and affordability can be a challenge. However, with the simple magic of roses, you can create a refreshing and hydrating toner that fits seamlessly into your routine. Not only does a DIY rose toner rejuvenate your skin, but it's also an enjoyable project that celebrates the beauty of self-care. What Makes Rosewater Toner a Must-Have? Rosewater has long been cherished for its myriad benefits – from its soothing properties to its delightful fragrance. Incorporating rosewater into your daily skincare can: Balance pH Levels: Rosewater helps maintain the skin's natural pH, promoting a healthy complexion. Reduce Redness and Irritation: Its anti-inflammatory properties make it ideal for calming sensitive skin conditions like rosacea or acne. Hydrate and Refresh: A quick spritz provides instant hydration, plumping up tired skin and enhancing its natural glow. This incredible toner can be made with just a couple of ingredients. In addition to fresh rose petals and distilled water, some recipes incorporate witch hazel or apple cider vinegar for added skin benefits. The Joy of DIY: A Step-by-Step Guide The process of creating your own rose toner is not just about skincare; it’s an opportunity for self-expression through DIY. Here’s a simple method to craft a soothing rose toner at home: Gather Your Ingredients: You will need fresh rose petals (preferably organic), distilled water, and optionally, witch hazel and apple cider vinegar. Making Rosewater: Place the petals in a pot and cover them with distilled water. Simmer for about 20-30 minutes until the petals lose their color. Strain the mixture to extract your rosewater. Create the Toner: For a simple toner, mix one part rosewater with one part distilled water or use witch hazel for a more astringent blend. Optionally, add a bit of apple cider vinegar to enhance the toner’s effectiveness. Once combined, decant into a clean spray bottle. A chilled tonic stored in the fridge not only lasts up to six months but also feels invigorating when applied to the skin. Enhancing Your Bloom: The Benefits of DIY Beauty Beyond the beauty benefits of rose toner, creating your own products offers unique advantages: Customization: Make the toner suitable for your specific skin type by adjusting the ingredients. Cost-Effectiveness: DIY skincare can save you money compared to purchasing high-end coffee from beauty stores. Connection to Nature: By using organic ingredients, you embrace a more sustainable and botanical approach to beauty. This approach fosters a deeper appreciation for your skincare routine and aligns with values of organic gardening and reclamation of nature’s gifts. Inspiration from Nature: Growing Your Own Roses Why not go a step further and grow your own roses? Embracing organic gardening allows you to have a constant supply of beautiful blooms without pesticides or chemicals. Not only does this promote sustainable living, but it also instills a sense of accomplishment and connection to your environment. Consider creating a flower garden that provides not only beauty but also essential ingredients for your DIY projects. Herbs, vegetables, and even roses can be grown in small raised beds or containers, perfect for any size backyard or balcony. Final Thoughts: Celebrate Self-Care with DIY Creating your own rose toner is more than just a skincare step; it’s a moment of self-care that celebrates your creativity and nurtures your skin. As you embark on your DIY journey, remember to play around with different ingredients and methods, finding the perfect blend that soothes and revitalizes your skin while connecting you with nature. Embrace the joy of homemade beauty, and let the enchantment of roses elevate your skincare routine!

02.08.2026

Caring for Cold-Damaged Forsythia: Recovery and Care Tips

Update Understanding Forsythia: A Hardy Yet Vulnerable Shrub Forsythia shrubs are among the first harbingers of spring, showcasing their cheerful yellow blossoms as the days grow warmer. Known for their rapid growth and ease of care, they can thrive in USDA hardiness zones 5 through 8, tolerating frigid temperatures down to -20°F. However, their resilience doesn't make them immune to the harsh realities of winter. While dormant, forsythia can still succumb to cold damage, particularly affecting their delicate flower buds. Identifying Cold Damage in Forsythia Cold damage can take various forms, primarily impacting the forsythia’s flower buds. Understanding the symptoms is critical for effective plant care. Signs of damage include dry or wrinkled stems, color changes in twigs, and reduced bloom production in the spring. While some parts of the forsythia, such as leaf buds and branches, may withstand colder temperatures, the vulnerable flower buds are often the first to go. The Steps to Revive Your Forsythia If you’ve noticed signs of winter harm on your forsythia, there’s no need for despair—you can take steps to help your plant recover. Here’s what you should consider: Patience is Key As with many aspects of gardening, patience plays a crucial role in plant recovery. Wait until late spring or early summer before engaging with your forsythia. This allows the shrub to rebound from cold damage and develop new shoots that indicate health. Trying to prune too early can jeopardize this recovery process. Pruning Cold-Damaged Forsythia Once you’ve allowed your forsythia some time and have observed new growth, you can prune as necessary. Begin by removing any dead or severely damaged branches, cutting back to the crown if needed. It’s generally safe to eliminate up to one-third of the canes each year. This form of rejuvenation can bolster the shrub's health and enhance next year’s bloom potential. Fostering a Healthy Environment for Future Blooms To ensure your forsythia thrives in the future, consider implementing a few best practices. Regular watering during dry spells, mulching for moisture retention, and periodic fertilization can significantly improve your shrub’s resilience against harsh weather conditions. Is Cold Damage Something to Worry About Every Winter? While cold damage can certainly happen, it’s important to remember that forsythias are typically very resilient. In regions where winters can lead to unexpected drops in temperature, planting in a sheltered area can also help mitigate such risks. Installing windbreaks or strategically placing larger plants nearby can provide your forsythia with a bit of shelter from harsh winds and freezing temperatures. Conclusion: Your Forsythia’s Recovery Journey Gardening requires a blend of knowledge, patience, and sometimes a little optimism. Your forsythia can often bounce back from winter’s chill with the right care. By understanding the signs of cold damage and how to respond, you can enjoy these bright yellow flowers for many springs to come. Remember, it’s not just about recovering a single shrub; it’s about nurturing a lifelong gardening relationship filled with beauty and resilience.

Terms of Service

Privacy Policy

Core Modal Title

Sorry, no results found

You Might Find These Articles Interesting

T
Please Check Your Email
We Will Be Following Up Shortly
*
*
*