Add Row
Add Element
cropper
update
Marin Home Ideas
update
Add Element
  • Home
  • Categories
    • Home Remodeling Ideas
    • Interior Design & Decor Ideas
    • Gardening & Landscaping Ideas
    • Outdoor Living & Entertaining
    • Health & Wellness at Home
    • DIY at Home
    • Kitchen Ideas
    • Bedroom Ideas
    • Bath Ideas
    • Cooking at Home
    • Home Office Ideas
    • Lighting Ideas
    • Furniture Ideas
    • Architecture Ideas
    • Senior Living at Home
    • Home Finance
    • Real Estate News
May 19.2025
3 Minutes Read

How to Create a Bee Bath: Essential Gardening Tips for Pollinators

Ceramic bee bath with stones in garden setting

Creating a Welcoming Oasis: The Importance of Bee Baths

In the hustle of gardening, we often focus our attention on planting and landscape design, forgetting that the health of our gardens also relies on equally crucial elements, such as water for pollinators. A simple yet effective way to support these vital creatures is through a DIY bee bath. This article walks you through the creation of a bee bath and highlights its importance in your local ecosystem.

Why Bees Matter to Your Garden's Ecosystem

Bees are not just visitors but essential partners in maintaining garden health. They contribute to the pollination of about 75% of the fruits, nuts, and vegetables we enjoy, making them integral to our food supply. Additionally, bees help in supporting the growth of plants that feed wildlife. Consequently, providing bees with water is equally important as planting bee-friendly plants.

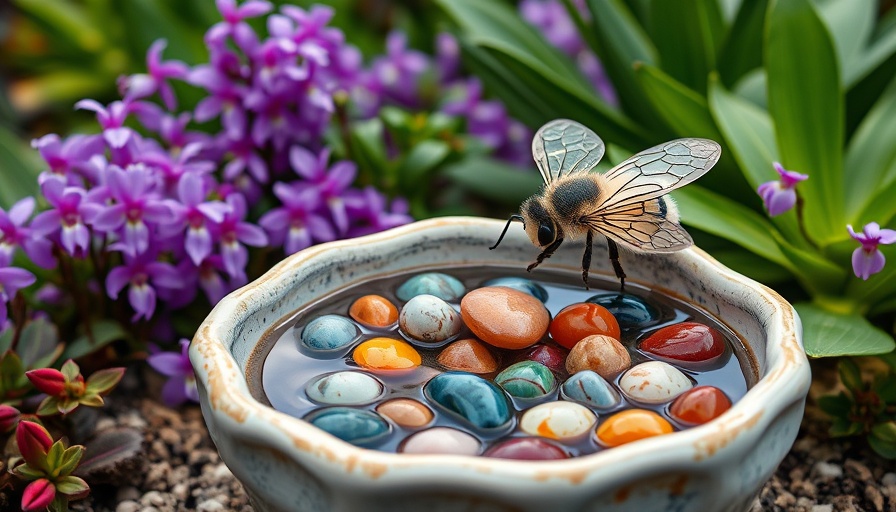
Easy Steps to Make a Bee Bath

Making a bee bath is a straightforward process, requiring just a few materials and minimal time. All you need is:

  • A shallow dish
  • A plant pot as a base
  • River stones for perches
  • Fresh water

To construct your bee bath, turn the pot upside down and place the dish on top. Fill the dish with an adequate amount of water, ensuring that it remains shallow enough for the bees to perch safely. Adding river stones gives the bees ample landing spots, creating a safe drinking environment.

Maintaining Your Bee Bath for Healthier Pollinators

Regular maintenance is vital to prevent the growth of harmful microorganisms. To keep your bee bath clean and safe, change the water daily and clean the bath weekly. Providing fresh water will help ensure that the bees remain healthy and draw them to your garden all summer long.

Connecting with Nature: The Emotional Benefits of Creating a Bee Bath

Engaging with pollinators can deepen our connections to nature and enrich our gardening experiences. Watching bees visit your bath can evoke feelings of tranquility and joy, providing a peaceful environment to unwind after a busy day. Moreover, inviting bees into your space fosters a greater sense of ecological responsibility, enhancing the beauty of your garden.

Common Misconceptions About Pollinators

Many people fear bees, believing they are aggressive and likely to sting. However, the truth is that bees are typically harmless. They're primarily focused on collecting nectar and pollen, and their inclination to sting diminishes when they're busy. Educating yourself and your family about the vital role that bees play in our gardens encourages a friendlier relationship with these hardworking insects.

More Ways to Help Pollinators Thrive in Your Garden

Beyond a bee bath, there are many ways to create a welcoming environment for pollinators:

  • Plant native flowers and herbs that are rich in nectar.
  • Avoid using pesticides that can harm bees.
  • Create habitats with a diversity of plants.

Considering these elements will not only attract bees but also create a vibrant garden ecosystem.

The Broader Implications: Pollinators as Indicators of Ecological Health

Pollinators, like bees, serve as indicators of ecological health, reflecting the state of our environment. By fostering habitats that support these creatures, we contribute significantly to biodiversity, ensuring that our gardens provide habitat and resources for a wide range of wildlife.

In incorporating a bee bath into your gardening practices, you’re not just creating a functional piece for your garden—you're actively participating in enhancing the local ecosystem. This simple act can lead to a cascade of benefits for your plants and the local pollinator population.

In conclusion, dedicating a bit of your garden to a bee bath not only assists bees but enriches your gardening journey. So why wait? Start planning your bee bath today!

0 Views

0 Comments

Write A Comment

*
*
Related Posts All Posts
08.28.2025

Unlock Garden Beauty: Learn How to Trim Hedges Effectively!

Update Transform Your Garden: The Essential Guide to Trimming Hedges When it comes to creating a beautiful garden, hedges can serve as both functional and stunning elements, providing privacy and structure. But to thrive, hedges need the right care and trimming techniques. If you’ve ever looked at a raggedy hedge and wondered how to make your garden bloom with life, you’re in the right place. With this comprehensive guide, you can learn how to trim hedges effectively and maintain their lovely appearance year-round. Understanding the Right Timing for Hedge Trimming One of the main factors in achieving a flourishing hedge is knowing when to trim. In general, hedges should be pruned in early spring or late winter, before new growth begins. This approach encourages healthy growth and a lush appearance. However, it's vital to consider the specific species of your hedge, as some may thrive better with different pruning schedules. Aim for a mix of seasonal care! It’s also crucial to regularly assess your hedge throughout the growing season to ensure you aren’t letting any wild branches take over. Choosing the Right Hedges for Your Garden Your hedge choices play a significant role in how easy or challenging pruning may be in the future. Slow-growing varieties such as boxwood and yew are excellent choices for easy maintenance, while others like laurel can grow rapidly, requiring more diligent trimming. Investing in the right plants will pay off, transforming your garden into a sleek green wall. The Trimming Techniques You Need Trimming hedges requires finesse, so using the right tools is essential. Hand tools such as pruners and shears are great for small and young hedges, while electric trimmers can help with larger or mature hedges. Ensure your tools are clean and sharp before starting—this fosters smooth cuts and minimizes damage to your plants. Integrating Hedges Into Your Landscape Design When choosing to trim and shape your hedges, keep in mind how they interact with the rest of your garden. Hedges can frame flower beds, create pathways, or act as natural fences. By maintaining a clean edge and consistent shape, you will ensure that your hedges enhance your overall landscape design rather than detract from it. A Common Misconception: Pruning vs. Trimming Many gardeners confuse the terms pruning and trimming. While both are crucial for plant health, pruning usually involves removing dead or diseased wood, whereas trimming keeps plants in shape. Understanding the difference helps you maintain a healthy hedge structure and encourages new growth, paving the way for a vibrant garden. Benefits of Hedge Pruning Beyond Aesthetics The advantages of keeping your hedges well-trimmed go beyond just looking good! Hedging plants can boost biodiversity in your garden by providing habitats for various wildlife. Additionally, healthy hedges can help with controlling pests and improving air circulation throughout your garden. By actively pruning and caring for your hedges, you contribute to a thriving environment for your entire garden ecosystem. Conclusion: Embrace Your Garden’s Potential As you embark on your journey to trim and shape your hedges, remember that patience and regular care are key to making the most of your gardening space. Whether you aim for a structured look or a more whimsical shape, your efforts in trimming hedges will enhance both your home and the surrounding community by creating an inviting outdoor space. Explore the right resources, plan your trimming for success, and watch as your garden flourishes with beauty and life! Transform your backyard into a beautiful oasis and keep your hedges looking spectacular year-round!

08.28.2025

What You Need to Know About How Long a Home Inspection Takes

Update Understanding Home Inspections: Duration Demystified When it comes to home buying or selling, knowing how long a home inspection takes is critical. Most home inspections typically range from two to four hours, but this duration can vary based on several influencing factors. This article will break down these factors, providing real estate professionals with essential insights into the home inspection process. The Size of the Home Matters The dimensions of a home are a primary factor affecting inspection duration. Generally, a standard-sized home can expect a two to four-hour inspection, while larger properties, such as those exceeding 3,000 square feet, might need up to six hours for a proper assessment. Homes with multiple stories, sprawling layouts, and numerous bathrooms can significantly extend an inspector's time on-site, so setting realistic expectations for clients can help avoid surprises during transactions. The Age of the Property: Know What to Expect Older homes often come with hidden complexities that require more thorough examinations. Original features, such as outdated plumbing, electrical systems, and HVAC components, can necessitate additional scrutiny. Therefore, an older home may take longer to inspect, sometimes exceeding four hours depending on the condition and any visible signs of wear. On the other hand, newly constructed homes typically incorporate modern systems that may streamline the inspection process, allowing it to finish quicker, often under two hours. Condition: Maintaining a Balance The overall condition of a property plays a vital role in determining inspection duration. Homes that have been meticulously maintained often allow for quicker evaluations, as inspectors will encounter fewer problems. Conversely, a home that shows signs of neglect or distress will likely hold a longer inspection as the inspector must identify all failing elements and evaluate the need for repairs. For sellers, ensuring the home is in good shape before listing can expedite this process, making for a smoother transaction process. The Inspector's Thoroughness: Experience Counts Inspector experience can heavily influence the length of inspection time. A highly diligent inspector will take extra time to check every accessible system and component, ensuring a comprehensive overview of the property’s status. It's essential for real estate professionals to recommend seasoned inspectors who practice thorough evaluations, enhancing the reliability of their findings. This not only aids buyers in making informed decisions but also solidifies the trust and integrity that defines a good realtor-client relationship. Specialized Inspections: Beyond the Basics In addition to standard home inspections, specialty inspections can further extend the time required. Such inspections include: Radon Testing: Radon inspections may prolong the timeline due to the need for a testing device to remain in the home for at least 48 hours. Pest Inspections: These inspections concentrate on any pest-related issues, like termites or rodents, and often require additional time to assess a home thoroughly. Sewer Scope Inspections: This inspection utilizes specialty cameras to check the sewer lines, which typically adds hours to the overall process. With these added evaluations in mind, it's essential for real estate agents to communicate the potential for longer times during the inspection phase, ultimately helping manage their clients' expectations effectively. Take Control of the Home Selling Experience! Understanding how long a home inspection takes can have a remarkable impact on the home-selling process. By factoring in the size, age, and condition of the property, as well as the thoroughness of an inspector and any specialty inspections required, real estate professionals can better prepare their clients for what lies ahead. Incorporating this knowledge helps foster trust, aligns expectations, and ultimately, leads to smoother transactions. For resources on locating the best inspectors or learning more about the intricacies of selling a home, stay updated with reliable real estate websites and professionals.

08.28.2025

Unlocking Profit: How to Sell Your House with a Home Equity Loan

Update Can You Sell Your House with a Home Equity Loan? If you've been wondering, "Can I sell my house if I have a home equity loan?" the answer is yes – but it's important to understand the implications. Many homeowners find themselves in a position of needing to sell while still owing money on their home equity loans. The good news is that you can use the proceeds from your home sale to pay off this type of debt, provided you take a few key steps to ensure a smooth transaction. Understanding Your Financial Position is Key Before putting your property on the market, assess your financial situation thoroughly. This means calculating the amount you still owe on both your primary mortgage and your home equity loan. Start by requesting payoff statements from both lenders, as these documents provide the exact amounts required to satisfy each loan by your home's anticipated closing date. Remember, these balances include not only the principal but also any accrued interest. Additionally, consider the potential complications that may arise if your home is worth less than you owe on your mortgages, commonly referred to as being "underwater" on your loan. In such cases, selling your house may be a more complex process, potentially involving negotiations with the bank for a short sale. Preparing to Sell: Steps for a Successful Sale Preparation is crucial when selling a home with a home equity loan. Start by contacting both your primary mortgage lender and home equity loan servicer to request current payoff statements. Understanding their unique requirements is essential, as specific procedures may need to be followed for the sale to go through smoothly. Gather all your loan documents, including the original home equity loan agreement, as some contracts may include restrictions that could affect potential buyers. Don’t forget to factor in necessary repairs and upgrades that will make your house more marketable. Calculate Your Expected Net Proceeds To maximize your profits, it’s important to calculate your expected net proceeds accurately. This involves subtracting the total amounts due for your mortgages, estimated closing costs, real estate commissions, and the costs of repairs from your anticipated sale price. By conducting this homework ahead of time, you’re better equipped to set a realistic listing price and avoid surprises at the closing table. Understanding the Closing Process with Multiple Mortgages When you sell a property with a home equity loan, both loans must be paid off at closing. This process is typically handled by your title company or closing attorney, who will coordinate with all involved lenders to ensure that the proper payoff amounts are calculated and settled from the sale proceeds. Make sure you're aware of any applicable early repayment penalties or tax implications that may arise when you pay off your loans. Your real estate agent can help you navigate these issues. Wise Decisions for Your Real Estate Future Equipped with this knowledge, you can now enter the real estate market with confidence. Whether you’re exploring homes for sale on platforms like Zillow, navigating listings through Redfin, or searching for investment property options, understanding your financial obligations is paramount in making informed decisions. As the real estate market continues to evolve, staying updated on trends, seeking advice from real estate professionals, and learning about your options within this field can transform your approach to buying and selling properties. Call to Action: Get Professional Assistance Don’t go through this process alone. Connect with a trusted real estate agent who can help you identify potential homes for sale nearby, navigate the intricacies of your financial situation, and ensure a successful sale. Leverage their expertise to gain a strong advantage in today's competitive market.

Terms of Service

Privacy Policy

Core Modal Title

Sorry, no results found

You Might Find These Articles Interesting

T
Please Check Your Email
We Will Be Following Up Shortly
*
*
*