Add Row
Add Element
cropper
update
Marin Home Ideas
update
Add Element
  • Home
  • Categories
    • Home Remodeling Ideas
    • Interior Design & Decor Ideas
    • Gardening & Landscaping Ideas
    • Outdoor Living & Entertaining
    • Health & Wellness at Home
    • DIY at Home
    • Kitchen Ideas
    • Bedroom Ideas
    • Bath Ideas
    • Cooking at Home
    • Home Office Ideas
    • Lighting Ideas
    • Furniture Ideas
    • Architecture Ideas
    • Senior Living at Home
    • Home Finance
    • Real Estate News
May 17.2025
3 Minutes Read

How to Grow Greek Oregano: Your Essential Guide to Flavorful Herbs

Close-up of Greek oregano leaves showing how to grow Greek oregano.

Unleash the Flavor of Your Kitchen: Grow Greek Oregano at Home

Greek oregano, known scientifically as Origanum vulgare var. hirtum, holds a special place in culinary practices, especially within North America. Its slightly spicy, earthy flavor enhances a variety of dishes, making it a must-have for any home cook or aspiring chef. For those interested in sustainable living and healthy cooking, growing your own Greek oregano adds fresh flavors to your meals while reducing the carbon footprint associated with store-bought herbs.

Growing Greek Oregano: Quick Overview

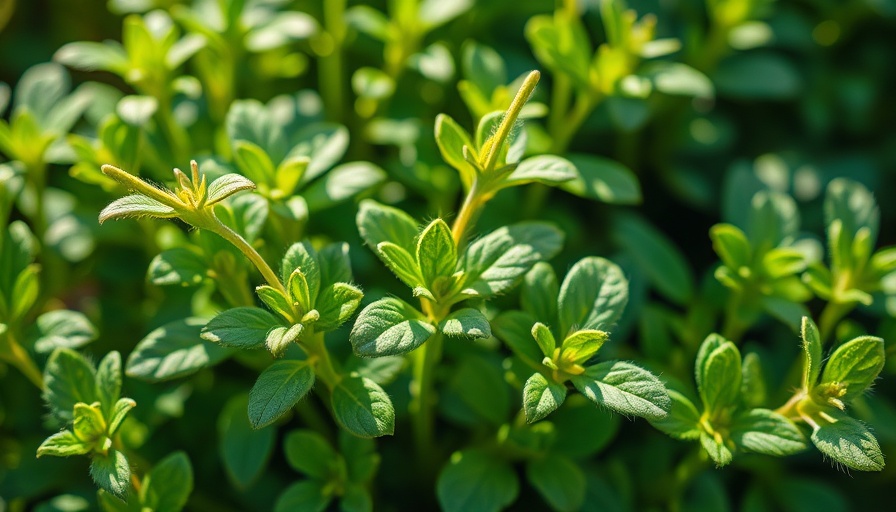
This perennial herb thrives in USDA hardiness zones 5 to 10 and can reach sizes of up to 2 feet tall and wide, making it an excellent choice for both garden beds and container gardening. Greek oregano loves full sun and well-draining, sandy loam soil, with a pH of 6.5 to 7.0, favoring a slightly acidic to neutral environment.

When planting, keep a distance of 12 inches between plants and bury seeds at a depth of 1/8 inch, while transplants should roam a little deeper, resting at the depth of their pots. It’s a low-maintenance plant, known for its drought resistance and robust nature.

The Magic of Oregano: Cultural Significance and Culinary Uses

Originating from the rocky terrains of Greece and Turkey, Greek oregano is not just an herb but a cultural touchpoint rich with history. Used extensively in Mediterranean cuisine, it plays a pivotal role in flavoring traditional dishes such as pizza, pasta sauces, and Greek salads. Incorporating Greek oregano into your dishes ensures a taste of the Mediterranean right in your kitchen!

Pest Control for a Flourishing Oregano

Like all plants, Greek oregano is not immune to pests. Common threats include aphids and spider mites, which can affect plant health and yield. An organic approach to pest control can include companion planting, where you plant herbs and flowers that naturally repel these pests. Consider nearby marigolds or basil as natural partners to your oregano.

Harvesting and Preserving Your Bounty

When it's time to harvest, wait until the flowers bloom, which typically occurs from mid-summer to fall. This is when the flavor is at its peak. Use garden scissors to snip off the stems and leaves, allowing the remaining plant to continue thriving. You can dry the harvested oregano for later use or store it fresh in your fridge.

Practical Tips for Success in Your Herb Garden

1. **Water Wisely**: Greek oregano requires minimal watering, adjusting to a watering routine that dries the soil between waterings. 2. **Fertilization**: Use organic fertilizers sparingly. Oregano prefers nutrient-poor soils which contribute to its robust flavor. 3. **Companion Planting**: Integrate flowers that attract pollinators to boost growth and health, making your garden a hub for wildlife like bees and butterflies that enhance biodiversity.

Conclusion: The Reward of Home-Grown Flavor

Growing your own Greek oregano not only adds flavor to your kitchen but also cultivates a connection to the garden and the environment. By following these tips, you will enjoy an abundant and aromatic herb that elevates every meal. Start your journey with Greek oregano today and embrace the joy of home gardening!

Gardening & Landscaping Ideas

5 Views

0 Comments

Write A Comment

*
*
Related Posts All Posts
11.12.2025

Unlock the Beauty of Your Garden: Create Stunning Dried Flower Art

Update Transform Your Garden's Beauty Into Art As winter approaches, many gardening enthusiasts often wonder how to keep their beloved blooms alive and thriving. One delightful way to do this is by creating dried flower art with embroidery hoops. This heartwarming fusion of gardening and craft can breathe new life into your seasonal decor, providing a beautiful way to display the fruits of your labor through the colder months. Choosing the Right Dried Flowers for Your Art Not all flowers dry equally; some retain their color and structure better than others. To create stunning pieces of embroidery art, consider flowers like strawflowers, yarrow, gomphrena, and hydrangeas. Additionally, including elements such as baby’s breath, twigs, and seed pods can introduce depth and dimension to your work. Mixing smaller flowers and branching stems will help achieve a textured look, akin to a vibrant garden. Getting Started: Tools and Materials Before diving into your project, gather the necessary supplies including: Embroidery hoop Tulle (or chicken wire for a rustic aesthetic) Embroidery thread (make sure to have white and green on hand) Dried flowers Hot glue gun for secure placement Fine point scissors for delicate trims These materials will help create a delightful canvas where your flowers can shine. Crafting Your Dried Flower Embroidery Art Start by laying out your flowers in the embroidery hoop to determine a general design, taking a photo for reference. Once satisfied with the arrangement, place tulle within the hoops, ensuring it’s taut but not warped. You can secure your flowers using thread, weaving techniques, or hot glue, depending on your preference and the size of the blooms. For example, using embroidery thread can yield intricate results, while hot glue is faster for tougher, larger flowers. Start with your base flowers, possibly using pressed leaves or ferns. Then, layer the 3D flowers on top, meticulously securing them in place. This approach not only highlights the individual beauty of each flower but tells the story of your garden. Exploring More Creative Ideas Once you’re comfortable with the basics, let your creativity run wild! Consider incorporating found objects like pinecones or dried grasses into your designs. Try different sizes of hoops, mix flowers with varying textures, and play with colors to mirror your garden’s personality through each season. Dried Flower Art as a Gift Crafting dried flower art also makes for thoughtful gifts. These pieces serve as a comforting reminder of nature’s beauty and your dedication to creating something new. Family and friends will cherish these artisanal decorations as not just gifts, but stories of your gardening journey. Sustainable Gardening Practices: A Natural Approach to Art This art form aligns beautifully with organic gardening and sustainable practices. By utilizing the resources already present in your garden, you’re promoting a waste-free environment while encouraging plant health. Learn how to nurture your plants sustainably, and incorporate practices such as composting and companion planting to enrich your garden’s soil. Conclusion: Bring Your Garden into Your Home Dried flower embroidery art is more than just a craft; it’s a celebration of the gardening journey. Not only does it enhance your home decor, but it also connects your creativity with the beauty of nature’s handiwork. So gather your materials, honor the season, and embark on this artistic journey. You may soon find that you’re not only gardening but crafting memories that will last long into winter. Ready to share your creativity with your community? Host a workshop or join a local crafting group to inspire others and exchange ideas. Together, you can foster an appreciation for the beauty found in nature—one stitch at a time!

11.12.2025

Explore the Delightful World of Old Man Cactus Care and Growth

Update Meet the Old Man Cactus: A Charming Addition to Your Home If you're looking to add a unique touch to your indoor garden, let me introduce you to the Cephalocereus senilis, commonly known as the Old Man Cactus. This distinctive plant, characterized by its plume of white 'hair' resembling the mane of an old man, is originally from the eastern regions of Mexico. Not only is it a conversation starter, but it also embodies a quirky charm that can brighten up any space. Why Choose an Old Man Cactus? The Old Man Cactus provides several advantages for indoor gardening enthusiasts. Its low-maintenance nature makes it a perfect choice for beginners and busy gardeners alike. It thrives in bright, indirect sunlight and requires minimal watering, making it an ideal plant for those who might forget about their watering schedules. Furthermore, its compact size, which caps at around three feet tall indoors, allows it to fit comfortably in living rooms or study areas. Basic Care Tips for Your Old Man Cactus This cactus is not only appealing for its visual aesthetics but also for its resilience. Below are some essential care tips to ensure your Old Man Cactus remains healthy: Light Conditions: It thrives best in bright, direct sunlight. Position it close to a south-facing window for optimal growth. Watering: The Old Man Cactus prefers dry soil. Water sparingly, allowing the top couple of inches of soil to dry out completely between waterings. Overwatering is a common mistake and can lead to root rot. Soil Type: Use a well-draining cactus or succulent potting mix, ideally mixed with sand or perlite for enhanced drainage. Temperature: Maintain indoor temperatures above 65°F (18°C). A winter hibernation when it's cooler can help promote blooming during summer. Common Pests and How to Combat Them Although the Old Man Cactus is relatively resistant to pests, monitoring it closely for issues is advised. Mealybugs and scale insects can sometimes find solace in its hair, so it's crucial to check regularly. If you identify any pests, treating them with an appropriate organic pesticide can help protect your plant. Propagation: Share the Joy of Your Cactus One of the exciting aspects of growing an Old Man Cactus is its ability to propagate easily. You can grow new plants from both seeds and cuttings: From Cuttings: Allow cuttings to callus for a couple of days before planting them in a soilless mix. Keep the humidity low and ensure they receive plenty of indirect sunlight until roots develop. From Seeds: Growing from seeds can be a fun project, albeit slower than cuttings. Seeds require a warm environment and lots of light. Patience is essential! Incorporating Old Man Cactus into Your Home Design The Old Man Cactus can enhance your interior decor by serving as a bold, standalone centerpiece or as part of a larger succulent arrangement. It pairs well with other low-maintenance plants like bromeliads and various succulents, all sharing similar care requirements. Environmental Considerations and Future Growth Notably, the Old Man Cactus is facing environmental challenges in its native habitat. This could mean that the rarity of the plants will increase as they become more endangered. By cultivating them in your home, you not only enjoy their beauty but also contribute to their conservation. With the right care, the Old Man Cactus can live for over a century, becoming a cherished part of your family for generations. Final Thoughts: A Prickly Companion Owning an Old Man Cactus requires minimal effort while offering visual appeal and a touch of whimsy to your living space. As you embark on your journey of growing this charming plant, remember to provide it with bright sunlight, keep it firm but not overly wet, and watch it thrive. Consider exploring various garden plants or even creating an indoor succulent garden that includes the Old Man Cactus as a star attraction!

11.12.2025

Discover How to Care For Your Fishbone Cactus: Tips and Tricks

Update The Allure of Fishbone Cactus: A Unique Addition to Indoor GardensIf you're seeking an extraordinary plant to enhance your indoor space, look no further than the fishbone cactus (Disocactus anguliger). Also known as ric rac or zig zag cactus, this epiphytic succulent captivates with its striking foliage and vibrant blooms. The fishbone cactus is an evergreen that can reach up to 18 inches tall and 3 feet wide, providing a splash of green that thrives in varying light conditions, making it perfect for both novice and experienced gardeners.Unveiling the Unique CharacteristicsThis fascinating plant features long, leafless stems that exhibit a zigzag pattern reminiscent of a fish's skeleton. The alternating lobes enhance its visual appeal and make it a conversation starter. The fishbone cactus develops striking trumpet-shaped flowers in hues of yellow and white during the summer and fall months, offering not only beauty but also the potential for producing edible fruit, akin to the prized dragon fruit. Despite its unconventional appearance, the fishbone cactus is low-maintenance, making it an ideal choice for busy plant lovers.Caring for Your Fishbone Cactus: Essential GuidelinesUnderstanding how to care for your fishbone cactus is key to maintaining its health and vibrancy:Light RequirementsThis tropical succulent flourishes in bright, indirect light but can adapt to lower light conditions. Avoid placing it in direct afternoon sunlight, as it can scorch the leaves. Ideal placements include east-facing windows, where it can bask in the gentle morning sun.Soil and WateringAs an epiphyte, the fishbone cactus thrives in well-draining soil mixes. A combination of cactus soil, perlite, and orchid bark creates the ideal growing medium. When it comes to watering, it's essential to allow the top 2–3 inches of soil to dry out before your next watering to avoid root rot, a common mistake with this species.Humidity and TemperatureOriginating from Mexico, this cactus enjoys warm and humid environments. Keeping the temperature between 60°F to 78°F and maintaining a relative humidity above 60% will enhance its growth. Including it in a plant group or placing it in a kitchen can help provide the humidity it craves.Fertilizing for GrowthTo encourage blooming and robust growth, fertilize your fishbone cactus with a diluted liquid cactus fertilizer once in early spring. This helps promote healthy blooms and foliage, ensuring your plant remains vibrant.Propagation: Expanding Your Cactus CollectionOne of the delightful aspects of owning a fishbone cactus is its ability to reproduce through stem cuttings. Here’s how you can propagate your plant:Using clean, sharp scissors, take cuttings about 4–5 inches long.Let the cuttings sit in a dry location for 24 hours to form a callus.Plant the callused cuttings in a suitable potting mix, ensuring the soil remains slightly moist.Provide bright, indirect light, and after a few weeks, you should see new growth, indicating successful propagation.Common Problems and SolutionsWhile fishbone cacti are generally problem-free, they can be susceptible to pests like mealybugs and aphids if under stress. Keeping a close eye on your plant and implementing good care practices helps mitigate potential issues. Overwatering can lead to root rot, while lack of light can result in leggy growth. Adjusting light exposure and watering based on the plant's conditions will keep your fishbone cactus thriving.The Unique Contribution to Your Indoor GardenBeyond its aesthetic appeal, the fishbone cactus serves as a reminder of nature's diversity and resilience. Whether displayed in a hanging pot or as part of a larger plant collection, it reflects a gentle but vivid expression of life. So, if you’re ready to add an exceptional touch to your indoor space, consider inviting a fishbone cactus into your home.Call to Action: Start Your Gardening Journey Today!Embrace the joy of indoor gardening by welcoming a fishbone cactus into your home. With minimal care and fantastic growth potential, this delightful plant will soon become a cherished part of your indoor sanctuary, enhancing your environment and spirit.

Terms of Service

Privacy Policy

Core Modal Title

Sorry, no results found

You Might Find These Articles Interesting

T
Please Check Your Email
We Will Be Following Up Shortly
*
*
*