Add Row
Add Element
cropper
update
Marin Home Ideas
update
Add Element
  • Home
  • Categories
    • Home Remodeling Ideas
    • Interior Design & Decor Ideas
    • Gardening & Landscaping Ideas
    • Outdoor Living & Entertaining
    • Health & Wellness at Home
    • DIY at Home
    • Kitchen Ideas
    • Bedroom Ideas
    • Bath Ideas
    • Cooking at Home
    • Home Office Ideas
    • Lighting Ideas
    • Furniture Ideas
    • Architecture Ideas
    • Senior Living at Home
    • Home Finance
    • Real Estate News
March 14.2025
3 Minutes Read

Illuminate Your Life: DIY Candle Making Essentials for Beginners

Close-up of candle making with skewers and wax containers.

Light Up Your Home with DIY Candle Making: A Simple Guide

Imagine the warm glow and soothing scent of homemade candles filling your living space. Candle making is not just a delightful DIY project; it’s also a wonderful way to express creativity while creating unique gifts for yourself and others. With some basic supplies and a few easy steps, you can craft candles that enhance the ambience of your home.

Gathering Your Supplies: The Basics of Candle Making

Before you dive into the process of candle making, it’s essential to gather all the necessary supplies. Here’s what you will need:

  • Wax: Choose from natural options like beeswax or soy wax, which are eco-friendlier and contribute to a healthy environment at home. Alternatively, paraffin is more economical but less sustainable.
  • Wicks: Options include ECO wicks made from cotton and paper, hemp wicks, or wood wicks for a rustic touch.
  • Containers: Glass jars, metal tins, or even beautifully designed coconut shells can be used as vessels for your candles.
  • Scent: Essential oils are ideal for adding fragrances, while synthetic options may provide strong scents.
  • Tools: You will require a double boiler, kitchen thermometer, measuring cups, and a mixing spoon. Having a kitchen scale is optional but can make measuring wax and scent easier.

Mastering the Candle Making Basics

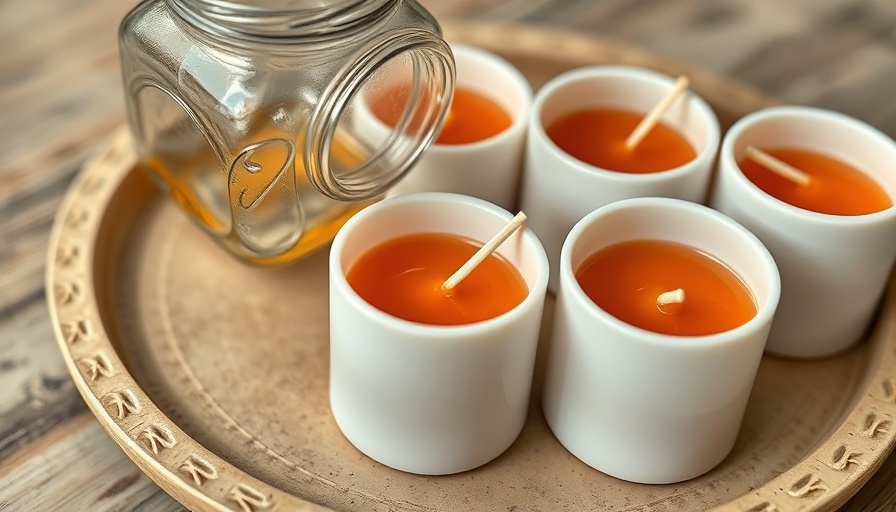
The process of making candles can be incredibly satisfying. Start by measuring out the wax based on the container’s size – typically, one pound of wax will adequately fill a medium-sized jar. Using a double boiler, gently heat the wax until it reaches around 185°F.

Once melted, incorporate your chosen scent, stirring well for distribution. Allow the wax to cool before pouring it into your prepared container. To ensure the wick remains centered while pouring, secure it with a clothespin or a stick.

Choosing the Right Wax: The Best for Beginners

As a beginner, selecting the right type of wax is crucial:

  • Beeswax: Naturally fragrant, beeswax is often considered the best quality wax but can be on the pricier side.
  • Soy Wax: This vegetable-based wax is popular among DIY enthusiasts due to its affordability and ability to hold scent well.
  • Paraffin Wax: Although economical, it’s derived from petroleum, raising concerns about health and environmental impacts.

Understanding Scent Throw: What You Need to Know

Scent throw is an essential factor in creating enjoyable candles. It refers to the area around your candle that fills with fragrance as it burns. To enhance scent throw:

  • The type of wax used can affect the scent’s reach - soy wax has better scent binding than paraffin.
  • The wick thickness and size must align with the wax to optimize scent output.
  • Add the right amount of fragrance oil – typically one ounce of scent oil for every pound of wax.

Common Misconceptions about Candle Making

Many people believe candle making is too complicated or requires expensive equipment. In reality, it’s a simple and rewarding DIY project that only requires patience and practice. Additionally, misconceptions about the scents can deter creativity; experimenting with different fragrances can lead to unique combinations that express personal style.

Future Trends in Candle Making

With an increasing focus on sustainability, natural waxes like soy, palm, and beeswax are becoming the norm in DIY communities. Furthermore, many DIY-ers are exploring furniture and home decor that complement their candle making, integrating eco-friendly materials into their lifestyles. Expect to see more creative ways to package and gift these homemade creations as the craft becomes more popular.

Taking Action: Start Your Candle Making Journey

Ready to dive into the world of candle making? Gather your materials and set some time aside to experience the joy of crafting your own candles. Whether you’re making a cozy nightlight for your home or crafting personalized gifts for friends and family, your creativity can shine through in each unique candle. Remember, the simple joy of creating something beautiful from scratch can be incredibly fulfilling. Enjoy the process!

DIY at Home

7 Views

0 Comments

Write A Comment

*
*
Related Posts All Posts
02.14.2026

How to Remove Snow Safely from Your Deck Without Damage

Update DIY Hacks for Safe Snow Removal on Decks Winter can be a beautiful but challenging time, especially for homeowners with decks that could easily be damaged by snow removal practices. If you cherish your outdoor space, here's how you can correctly remove snow without sacrificing the integrity of your deck or hard surfaces. Following expert tips can not only maintain your deck but also ensure safety for you and your loved ones when snowy weather hits. Understanding the Risks of Improper Snow Removal Snow accumulates on your deck and may seem innocuous, but improperly removing it can lead to significant damage over time. Notably, leading deck expert Dave Kile emphasizes that the issue often isn't the snow itself but the methods employed to remove it. If snow is left to compact into ice, a more aggressive—and potentially damaging—scraping is often required. It's essential to understand that while the immediate visual impacts of scraping or using the wrong type of shovel may be minimal, the long-term effects can include warped boards, loosened hardware, and unsightly cracks. Essential Tools for Gentle Snow Removal When it comes to snow removal, the right tools make all the difference. A plastic shovel with a rubber edge is recommended to glide smoothly over the surface without causing scratches. Instead of metal shovels, which can scratch or gouge wood and composite surfaces, opt for softer, more forgiving alternatives. Expert advice suggests using plastic push shovels or even a simple broom for light, fluffy snow. If the snow is heavier, remember to shovel parallel to the deck boards to avoid catching edges and damaging fasteners. Snow Removal Tips from the Experts Here are a few key practices from professionals to ensure your deck remains in tip-top shape during winter: Clear Snow Regularly: Don’t just shovel paths or leave piles on one side of the deck. Remove all snow to prevent excess weight that can compromise structural integrity. Be Cautious with Ice Melts: If ice formed, ensure to use calcium chloride on wood surfaces, avoiding rock salt that can damage. For harder surfaces, consider calcium magnesium acetate for minimal impact. Inspect and Maintain: Before the winter season, ensure your deck’s structure is solid—check for loose screws, nails, or signs of damage that might be exacerbated by heavy snow. Protecting Your Deck's Aesthetics Snow removal should be done with both safety and aesthetics in mind. Excessive scratching or discoloration can negatively affect your deck's appearance. Regular maintenance—even in winter—can help preserve your deck's visual appeal. Touch up any scratches with a suitable deck paint or sealant once the weather is clear to prevent moisture from compromising the wood. Checking for Structural Safety While decks are generally built to withstand significant snow loads, it's essential to recognize the threshold where snow becomes a safety hazard. Decks built to code can handle substantial weight, but if snow accumulates to depths greater than three and a half feet, it’s wise to start removing it to avoid potential collapses. Final Reminders Removing snow from your deck isn’t just about keeping the area tidy; it’s about protecting your investment and ensuring the safety of everyone who uses it. By taking the correct precautions and employing the right techniques for snow removal, you can enjoy your beautiful deck even in the cold months without worrying about damage. For a hassle-free winter, make sure to prep your deck with preventive measures and follow the experts’ tips on snow removal to keep it in pristine condition. So grab your plastic shovel, warm up your biceps, and safely remove that snow—it’s what’s best for both you and your deck! For more DIY home improvement and maintenance tips throughout the seasons, be sure to explore practical strategies that can help you create a safe and enjoyable environment in your home. Remember, winter maintenance can be gentle and effective!

02.14.2026

Essential Tips on How to Clean Work Boots for Longevity

Update How to Keep Your Work Boots in Pristine Condition Work boots are not just footwear; they are vital companions that support you through long hours on the job site. Properly maintaining your boots can significantly extend their lifespan and keep your feet comfortable and healthy. Whether you’re navigating muddy terrain or working in a sterile environment, knowing how to clean your work boots is crucial. Why Cleaning Your Work Boots Matters Many workers underestimate the importance of boot maintenance. A dirty boot doesn’t just look bad; it can even lead to discomfort and health issues if debris accumulates. Regular cleaning helps prevent wear and oxidation of materials, keeping them effective and safe. Cleaning your boots doesn’t have to be arduous; steady maintenance can lead to long-lasting protection. Daily Maintenance Tips for Work Boots Establishing a routine can keep your work boots in top shape. Here are some tips to incorporate into your daily or weekly maintenance: Air Them Out: After each use, allow your boots to dry naturally in a well-ventilated area. Avoid heaters or direct sunlight, which can damage leather and alter their shape. Remove Debris: Give your boots a light tap to shake off dirt, then use a soft brush to remove stubborn particles. Wipe Down: A damp cloth can help get rid of excess dust, focusing on seams and any crevices. Condition Regularly: Use leather conditioner occasionally to prevent drying and cracking, which can extend the life of your boots significantly. How to Clean Work Boots Thoroughly For a more in-depth cleaning, consider following these steps—a bit more involved, but worth it for your boots’ longevity: Remove the Laces: Start by taking off the laces and soaking them in warm, soapy water. This can help remove any stubborn dirt. Knock Off Mud: For dried mud, firmly knock the boots together. For lingering dirt, a soft nylon brush works wonders without damaging the leather. Wash the Exterior: Use lukewarm water mixed with a small amount of gentle soap to scrub the outer layers carefully. Pay special attention to tough stains, using a brush if needed. Interior Care: If the inside of your boots is muddy or wet, remove insoles and clean them separately. With warm, soapy water, scrub the insides and allow to air dry. Final Touch: After cleaning, re-apply conditioner to maintain the leather’s softness. How to Store Work Boots Storage conditions can significantly affect your work boots' integrity over time. Here are some recommendations: Store them upright in a cardboard box—this promotes airflow and prevents moisture buildup. Avoid plastic containers which can trap moisture and lead to mold. Keep boots in a room-temperature environment, ideally below 77°F, ensuring about 70% humidity or less. Signs That You Need New Work Boots No matter how well you care for your boots, wear and tear is inevitable, especially if you’re continuously on your feet under varying conditions. Be on the lookout for these signs: Visible damage like cracks, loose fasteners, or worn-out soles. Discomfort during wear; consistent aches can indicate it's time for new footwear. Unexpected wear patterns or changes in the boot’s physical appearance. Do-It-Yourself Tricks for Maintaining Work Boots Integrate some DIY techniques to enhance the cleaning process and care for your work boots: Use baking soda inside your boots overnight to neutralize odors. For a homemade conditioning solution, mix olive oil and vinegar in equal parts for an effective repellent against moisture. Rotate between pairs of boots to allow each to air out properly, balancing support and freshness. Conclusion: Invest in Your Footwear Your work boots are more than just a utility—investing time and effort into their care ultimately enhances your comfort, support, and overall health. By adopting these routines, your boots will be equipped to face each workday, ensuring you perform at your best. Embrace your boots’ potential, and let them do their job—you won't regret it!

02.14.2026

Protecting Your Plants from Snowstorms: Essential Tips and Strategies

Update Understanding the Dual Impact of Snow on Plants While snow often brings picturesque winter scenery, it can pose both risks and benefits to your garden. A light snowfall serves as a natural insulator for perennials and protects the ground from harsh winter winds, effectively safeguarding delicate roots. However, heavier snow loads can cause branches to bend or break, particularly in susceptible species like evergreens and certain deciduous trees. According to Sharon Yiesla, a Plant Knowledge Specialist at The Morton Arboretum, it’s essential to understand how your specific plants respond to snow to provide adequate protection. Identifying Vulnerable Plants in Your Garden Not every plant requires the same level of protection. Most hardy outdoor plants, those that are well-adapted to your USDA Hardiness Zone, can weather typical winter storms with ease. On the other hand, evergreens often require a bit more care due to their potential for snow damage. The open structure of arborvitae can easily accumulate snow, leading to collapse under its weight. Similarly, delicate deciduous plants, like small Japanese maples, may face risks during heavy snowfalls, thus necessitating protective measures. Pre-Storm Preparations: Get Your Garden Ready Preparing your plants before the storm hits is crucial for minimizing winter damage. Here are some proactive steps you can take: Loosely Tie Evergreens: For evergreens that tend to splay, tie their branches together using flexible materials such as fabric strips or old pantyhose. This will help prevent splitting or bending under heavy snow. Stakes for Support: Installing stakes around deciduous shrubs can help maintain their shape and support against accumulating snow. Utilize bamboo or metal stakes and gently tie branches with twine to offer additional stability. Cover Younger Plants: Protect new or tender plantings with wooden A-frames or lightweight covers. If you anticipate snow in areas where it’s uncommon, consider using bed sheets or cloth tarps to shield especially vulnerable plants. During the Storm: Monitor and Maintain Once the snow has started, your job isn’t finished! Monitoring your plants during the storm is critical to ensure their survival: Remove Heavy Snow: If possible, gently brush off heavy snow from evergreens and deciduous trees. It's best to avoid vigorous shaking, especially if the snow has frozen to the branches, as this could cause breaks. Opt for Caution: If snow loads become too dense, it might be wiser to leave some snow on the branches so that they can melt naturally without risk of fracturing. Post-Storm Recovery: Revitalizing Your Plants Once the storm has passed, check in on your garden to assess any damage. Take care to: Gently Prune Broken Limbs: For branches that have snapped, prune them back to prevent issues with pests and diseases. Provide Nutrients: To help your plants recover from the stress of winter weather, consider fertilizing in early spring when the risk of frost subsides, to invigorate their growth. Tips for Future Winters: Planning Ahead To effectively prepare for future winter storms, keep these tips in mind: Choose Hardy Varieties: Invest in plants that are well-suited to your zone. Hardy varieties are generally more resilient to winter’s rigors. Educate Yourself: Research the specific snow tolerance of each type of plant in your garden. The right knowledge can prevent costly mistakes and help maintain a flourishing garden. Consider Winter Mulching: Apply organic mulch around the base of your plants this winter. Mulching helps protect roots and conserve moisture during the freezing months. By understanding how snow affects your plants and taking proactive measures, you can help your garden weather even the toughest winter storms. Remember, it’s not just about surviving but thriving, even in winter!

Terms of Service

Privacy Policy

Core Modal Title

Sorry, no results found

You Might Find These Articles Interesting

T
Please Check Your Email
We Will Be Following Up Shortly
*
*
*