 Add Row
  Add
Add 


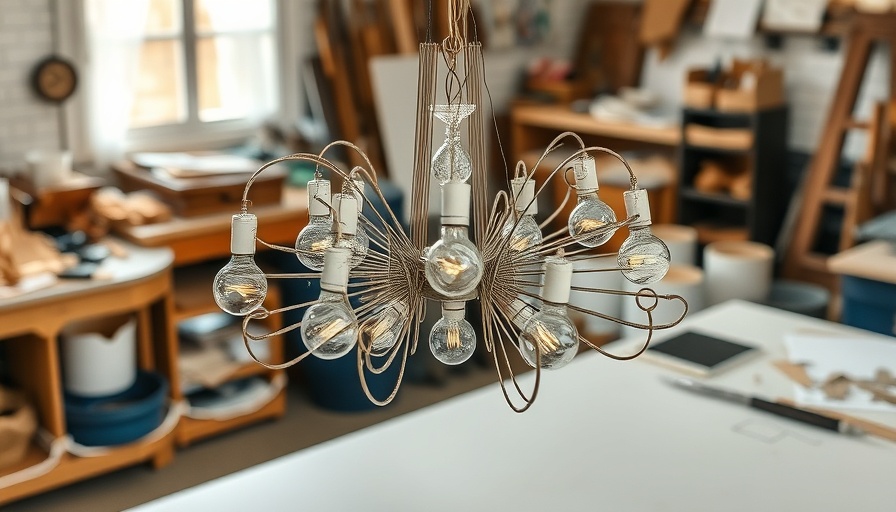
Igniting Your Creativity: The DIY Flower Chandelier
Have you ever dreamed of adding a personal touch to your home that combines beauty and creativity? Enter the DIY flower chandelier, a captivating project that can transform any space—a walk-in closet, a cozy living room, or even an outdoor patio. You don't have to shell out thousands of dollars for a show-stopping light fixture; instead, you can create your own masterpiece that reflects your individual style and creativity.
The Joy of DIY Projects
Whenever I embark on a DIY project, I feel a rush of excitement. Whether it's creating a flower chandelier or framing a doorway, each project presents an opportunity to express my personality and decor style. DIY projects like these not only beautify your space but also offer the satisfaction that comes from crafting something with your own hands. In this journey, your home transforms into a canvas where you a paint a unique narrative that reflects who you are.
Finding Inspiration: Balancing Cost and Creativity
For my chandelier, I drew inspiration from a stunning floral fixture I found online that cost over $2500. It's easy to fall in love with elegant designs, but for many of us, such prices are simply impractical. This is where creativity comes into play. Instead of leaving that dream light out of reach, I took the plunge to replicate it at a fraction of the cost. Remember, with a little resourcefulness and some handy tools, what’s deemed unaffordable can become achievable.
Step-by-Step Guide: Bringing Your Vision to Life
Creating your chandelier begins with selecting a basic chandelier shape that you find appealing. I chose one with a specific form that would allow the flowers to be attached seamlessly—think of it like building a framework where creativity meets structure. The project kicked off with separating the bottom cap of the chandelier to prepare it for attaching flower stems. As you work, ensuring that the wires connecting the light remain unobstructed is vital, transforming what could be chaos into a harmonious result.
Tools and Techniques to Master DIY Projects
Having the right tools is crucial for any DIY endeavor. I used a handheld drill to create precise holes in the metal cap that will house the flower stems. This handy equipment is instrumental in ensuring that your project remains both safe and effective. Also, don't hesitate to employ a miter saw for cutting metal rods to size—accuracy can make a significant difference in your final product. Remember, each tool isn’t just a means to an end but a partner in building your dream space.
Embracing the Creative Process: Challenges and Triumphs
As with any creative venture, challenges such as drilling holes at the right angle and spacing flower stems accurately can arise. But remember, it’s all part of the experience! Each hole drilled and every adjustment made is a step closer to your vision. Embrace these hiccups; they aren’t just obstacles but opportunities to innovate. You never know; a flaw could lead to a unique touch that enhances your creation.
The Emotional Impact of Crafting
The emotional connection you build with your DIY projects is one of the greatest benefits of engaging in such activities. Each flower stuck into the chandelier symbolizes not just a piece of decor but reflects your effort, time, and love poured into its creation. As the chandelier comes together, the personal stories associated with every choice—weaving in colors, textures, and materials—bring an intimate warmth to your home.
Final Thoughts: Your DIY Journey Awaits!
As I move forward with the flower chandelier project, I am reminded of the transformative power of DIY endeavors. They not only beautify our spaces but also have the potential to strengthen our creativity and build our confidence. If you’ve been contemplating a DIY project, now is the time to take the plunge. Gather your materials, unleash your creativity, and let your home tell your unique story.

Write A Comment