Add Row
Add Element
cropper
update
Marin Home Ideas
update
Add Element
  • Home
  • Categories
    • Home Remodeling Ideas
    • Interior Design & Decor Ideas
    • Gardening & Landscaping Ideas
    • Outdoor Living & Entertaining
    • Health & Wellness at Home
    • DIY at Home
    • Kitchen Ideas
    • Bedroom Ideas
    • Bath Ideas
    • Cooking at Home
    • Home Office Ideas
    • Lighting Ideas
    • Furniture Ideas
    • Architecture Ideas
    • Senior Living at Home
    • Home Finance
    • Real Estate News
Add Row
Add Element
July 14.2025
3 Minutes Read

Discover How to Create a Beautiful Culinary Herb Wreath for Your Kitchen

Culinary herb wreath with rosemary and lavender on wooden table

Transform Your Culinary Experience With an Herb Wreath

Imagine stepping into your kitchen, greeted by the aromatic scents of your favorite herbs hanging in a wreath. Not only do these culinary herb wreaths provide a functional way to keep your favorite herbs at hand, but they add a touch of beauty and organic charm to your space.

The Joy of Herb Gardening

Herb gardening has become a rewarding hobby for many, with enthusiasts enjoying the benefits of fresh herbs year-round. With over 25 types of herbs in my garden, the sheer delight of harvesting these fragrant plants is unmatched. With harvest season in full swing, it’s time to explore the creative ways to use your bountiful harvest—such as creating a stunning herb wreath that can elevate your cooking and your kitchen decor.

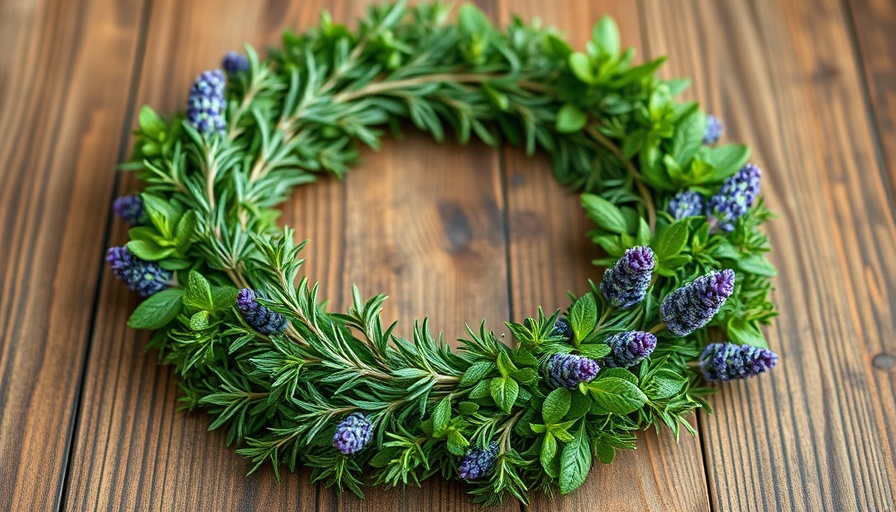
Choosing the Right Herbs for Your Wreath

When selecting herbs for your wreath, it's best to go for those with woody stems that retain their shape as they dry. Think about using aromatics like rosemary, sage, and thyme as your base. The visual appeal can be enhanced by adding herbal flowers such as lavender or fennel blossoms. However, it's important to experiment and see which herbs hold their shape the best. Adding culinary favorites like bay and oregano not only improves your wreath's usability but also contributes to its fragrance.

Guide to Making Your Own Culinary Herb Wreath

Here’s a simple guide to creating your own herb wreath. Start by gathering a wreath frame, floral wire, rubber bands, twist ties, and your chosen assortment of herb stems, leaves, and flowers. Begin with a sturdy base—rosewood or rosemary works excellently—using floral wire to secure your herbs in place. You can either create small bunches with rubber bands or poke individual sprigs directly into the wreath frame, securing them with wire as you go. Patience is essential, but the final product will be a breathtaking, functional work of art.

How Long Will Your Herb Wreath Last?

Many fresh herb wreaths last for a couple of months, but those made from hardier herbs tend to dry nicely and can last even longer. To maximize the longevity of your wreath, choose herbs known for their ability to dry well, such as thyme and lavender. Storing it in a shady, dry place helps it preserve its beauty and functionality.

Beyond the Wreath: Creative Uses for Herbs

Once you master the art of crafting a wreath, don't stop there! Fresh and dried herbs can be used in numerous kitchen delights. From invigorating your cooking with fresh herb-infused oils to making homemade herbal vinegar, your culinary possibilities expand significantly. Remember, the next time you're crafting a dish, a simple snip from the wreath can elevate the flavor profile, making your meals not just delicious but memorable.

The Community Benefits of Herb Gardening

The rise in herb gardening reflects a broader trend towards sustainable living and organic gardening. With concerns over food sources and pesticides ever-growing, backyard gardens offer a perfect solution. By growing your own herbs, you significantly reduce your carbon footprint while enjoying fresh, chemical-free ingredients right from your home. Moreover, herb gardens can foster community spirit, transforming backyards and balconies into vibrant, green spaces that invite sharing and collaboration among neighbors.

Embrace the Joy of Gardening

Culinary herb wreaths exemplify how gardening can improve not just what is on your plate but also the ambiance of your home. Taking the time to grow, harvest, and create might just become one of your most cherished routines. Plus, who wouldn’t love a kitchen adorned with aromatic, beautiful herbs?

Join the Movement

Why not join the growing community of herb gardeners? Whether you have vast outdoor space or just a sunny windowsill, cultivating herbs adds beauty, flavor, and bonding to your food preparation routines. Gather your friends or family, share ideas about gardening projects, and feel the rewarding connection that comes with nurturing plants.

Gardening & Landscaping Ideas

1 Views

0 Comments

Write A Comment

*
*
Related Posts All Posts
07.17.2025

Affordable Tips for Creating a Vintage Kitchen on a Budget

Update Transforming Your Kitchen on a Budget Imagine walking into a brand-new vintage-inspired kitchen, each corner echoing warmth and nostalgia, yet you haven’t spent a small fortune. This dream is within reach for those who might not have the budget for a full renovation. A fresh coat of paint can unlock a world of affordability, creativity, and style changes that will give your kitchen a revitalized look in a fraction of the time it takes for complete remodeling.In 'Creating Vintage Style Kitchen On A Budget | Great Home Ideas', the discussion dives into DIY kitchen transformations, exploring key insights that sparked deeper analysis on our end. The Power of Preparation As the old adage goes, “Proper preparation prevents poor performance.” This rings especially true in the world of DIY renovations. The first and most crucial step in your kitchen transformation journey is clearing the space and preparing surfaces for painting. Before diving into this creative endeavor, it’s essential to choose the right products. Opt for high-quality paint, like the Dulux Renovation range, which provides a durable finish. Cleaning surfaces thoroughly with sugar soap ensures a clean slate for your work—literally! Color Choices That Speak Choosing the right color can be a game changer when creating a vintage kitchen. For a timeless vintage vibe, consider muted tones like greens and wood accents, which can warm any space. Take inspiration from items you love, just as many successful designers do. Gather decorative pieces that resonate with you, such as a hand-painted landscape or vintage kitchen accessories. By integrating these personal touches, your kitchen will feel uniquely yours while still embodying that vintage charm. Practical Countertop Solutions If you think achieving that classic rustic charm requires splurging on expensive materials, think again. Timber benchtops, like rubberwood, are affordable and can tie the whole vintage theme together beautifully. At under $100 per panel, economically extending your countertop for more prep space makes it a win-win. DIY enthusiasts can stain this wood to match their decor or leave it natural for a rustic feel. Space Maximization Techniques No one wants a cluttered kitchen, especially when cooking or entertaining. Extending your benchtop isn’t merely about aesthetics; it enhances functionality. Creative storage solutions like movable butcher blocks can also provide ample space for food preparation while doubling as storage. These systems combine practicality with style, making them perfect additions to any kitchen. Black Accents: A Stylish Addition As you cement the foundation of your design with paint choices and countertops, don’t overlook the accessories. Incorporating sleek black fixtures like sink taps, lighting, and handles can add an elegant and modern flair to your vintage-inspired kitchen. The juxtaposition of old and new not only provides character but ensures your space remains appealing and functional. Utilizing Vertical Space When it comes to keeping a kitchen spacious and airy, vertical storage is essential. Wall-mounted shelves, affixed with black accents, can highlight decorative items or additional storage without crowding countertops. Additionally, consider installations like chalkboard panels not just for function—to jot down lists or recipes—but as a design element that adds a playful twist. Insider Tips for DIY Enthusiasts For those eager to ensure their kitchen transformation is both beautiful and practical, one pivotal tip is to label your cabinet doors before removal. This makes reassembly seamless and saves time. If you need to fill any holes or cracks, take a moment to patch those up with putty and let it dry before applying your new coats of paint. The Beauty of the Finished Product As the project reaches completion, step back and admire your handiwork. A thoughtfully renovated kitchen can reflect personal taste while providing functionality and comfort. An average scored kitchen transformed into a stunning space filled with character awaits those willing to invest time and creativity into their design. If you’re ready to embark on your journey to creating a vintage kitchen on a budget, take the plunge! Use these insights to guide you, and remember to enjoy the process. After all, your kitchen is more than just a cooking space—it’s the heart of your home where memories are made.

07.17.2025

Master the Art of Growing Jelly Bean Plants with These Tips!

Update Discover the Cultivation of Jelly Bean Plants: A Beginner’s GuideIf you're searching for a resilient yet charming succulent, look no further than the jelly bean plant, scientifically known as Sedum x rubrotinctum. Also referred to as 'pork and beans', this vibrant plant is known for its unique, bead-like leaves that resemble actual jelly beans, making it an intriguing addition to any garden, especially for enthusiasts of container gardening.Why Choose Jelly Bean Plants for Your Garden?This succulent thrives in USDA hardiness zones 9 through 11, making it a perfect candidate for gardeners in warmer climates. Jelly bean plants are particularly beneficial for water-wise gardening due to their drought-resistant properties. Let's explore some of their main advantages:Low Maintenance: This hardy plant requires little care once established, freeing up your time for other gardening projects.Attractive Foliage: Their colorful leaves add a fun visual appeal and can turn any space into a whimsical garden.Versatility: Ideal for rock gardens, indoor plants, or as a ground cover, they can adapt to many landscapes.Essentials for Growing Jelly Bean PlantsTo cultivate healthy jelly bean plants, here are some essential tips:Optimal Growing ConditionsJelly bean plants flourish in full sun to partial shade. They prefer well-draining soil that is loose and sandy, mimicking their native habitat in Mexico. Regular exposure to the sun will enhance their vibrant colors. Ensure the pH level of the soil is between slightly acidic (6.6) to slightly alkaline (7.8) for optimal growth.Maintenance and CareThis plant's care involves simple practices like infrequent watering. Allow the soil to dry out completely between waterings to prevent root rot. During the growing season, minimal fertilization using organic options can promote growth without harming the plant or the environment.Propagation TechniquesPropagating jelly bean plants can be an exciting venture! These succulents can be easily grown from leaf cuttings. Simply remove a healthy leaf, let it dry for a few days until a callus forms, and then place it on moist soil. Over the weeks, you’ll notice new roots and leaves sprouting!Boosting Garden Aesthetics with Jelly Bean PlantsIntegrating these plants into your landscape can enhance its aesthetic quickly. Their colorful leaves contrast beautifully against gravel paths and rocky landscapes, making them ideal for front yard landscaping or as part of a series of backyard landscaping features. Consider planting them in groups or alongside other succulents for a dynamic look.Addressing Common Pests and DiseasesDespite their robust nature, jelly bean plants can be susceptible to issues such as mealybugs and aphids. Regularly inspect your plants and treat them with organic pesticides when necessary to maintain their health and vitality.FAQs: All You Need to Know About the Jelly Bean PlantHow tall do jelly bean plants grow?The mature size of jelly bean plants is between 6 to 8 inches tall, with a potential spread of up to 24 inches wide, making them a stunning ground cover.Can they survive in colder climates?Unfortunately, jelly bean plants are not frost-hardy and should be protected from freezing temperatures. Consider bringing them indoors during winter if you live in a cooler area.Final Thoughts: Embrace DIY GardeningIncorporating jelly bean plants into your garden not only enhances its beauty but also allows you to explore a fun and engaging hobby. Why not take a step towards creating your vibrant garden masterpiece today? Visit your local nursery or search online for jelly bean plants and start your gardening journey!

07.17.2025

Transform Your Garden with Nigella: Easy Tips for Growing Love-in-a-Mist Flowers

Update Why Nigella Plants Are Essential for Your Flower GardenAs gardening continues to burgeon as a beloved hobby, more people are turning to eco-friendly and aesthetically pleasing plants. Among these, nigella plants—often overshadowed by more popular flowers—are making a resurgence. Particularly known as love-in-a-mist, **Nigella damascena** not only brings unique beauty to gardens but is also easy to cultivate and maintain, making it an excellent addition for both novice and experienced gardeners. Meet the Lovely NigellaThe nigella plant originates from southern Europe, North Africa, and Southwest Asia and is characterized by its delicate, fern-like foliage and whimsical blooms. These include star-shaped flowers that can be shades of blue, purple, pink, or white, each featuring lacy bracts that add charm. The plant blooms in spring and early summer, attracting pollinators like bees while maintaining its deer-resistant status. As the flowers turn into seed pods, they can be dried and arranged for long-lasting decor, enhancing your floral arrangements with texture and interest. Planting and Caring for Nigella: Timing Is EverythingNigella plants thrive in USDA zones 2-11, making them suitable for a wide range of climates. They are cool-season annuals that prefer cooler conditions for initial growth. The best time to sow nigella seeds is in the spring, directly in the garden bed about 1-2 weeks before the last frost, or in the fall for those in milder regions. When planting, cover the seeds lightly with soil, as they require darkness to germinate. Spacing them about six inches apart ensures optimal blooming and growth. Unlocking the Beauty of HarvestingWhen it comes to harvesting, patients reap the greatest rewards. Wait until the blooms are fully established, usually around 65-70 days post planting, before cutting them for bouquets. Alternatively, allow the blooms to mature into seed pods for dried arrangements. This dual purpose not only extends your harvest but allows for creative expression in both fresh and dried floral decor. Succession Planting for Continued BloomsTo maximize flower production, consider succession planting your nigella seeds every few weeks up until June. This strategy not only extends the blooming window but also ensures a steady supply of both blooms for fresh arrangements and pods for dried decor. The Diverse Varieties of NigellaDiving deeper into nigella, you’ll find a variety of captivating cultivars, including the white-flowered 'Albion' and the dark blue 'Miss Jekyll.' Each brings its own flair to the garden, ensuring that there's a nigella for every aesthetic preference. Creating a Pollinator-Friendly GardenIncorporating nigella into your garden promotes biodiversity, attracting important pollinators. Given their flowering nature, these plants are a crucial food source for bees and other beneficial insects, contributing to a healthier, vibrant ecosystem. Challenges and ConsiderationsWhile nigella plants are hardy, potential challenges include pest control and ensuring proper planting depth. Nevertheless, implementing sustainable gardening practices, such as organic pest control and proper soil management techniques, will yield a flourishing nigella garden while minimizing environmental impact. Embracing the DIY Spirit in Garden DesignWith their enchanting beauty and ease of care, nigella plants open the door to myriad DIY gardening projects. From designing unique flower arrangements to creating garden borders that boast vibrant colors, they empower gardeners to express their artistic vision. Final Thoughts on NigellaGrowing nigella plants can elevate your gardening game, providing not just stunning blooms, but also a chance to engage with nature. By nurturing these charming flowers, you’ll not only beautify your space but also contribute to a healthier ecosystem for our beloved pollinators. So whether you are looking to enhance fresh arrangements or create long-lasting dried decor, nigella is a plant that deserves a place in your garden!

Add Row
Add Element
cropper
update
Welcome to Marin Home Ideas
cropper
update

Welcome to Marin Home Ideas: Your Inspiration for Beautiful Living in Marin.
Whether you're dreaming of a full home remodel, refreshing your interior design, or creating the perfect outdoor oasis, Marin Home Ideas is your go-to source for inspiration and expert advice.
From stunning kitchen and bathroom renovations to stylish decor trends, smart home upgrades, and lush garden transformations, we bring you the latest in home design and improvement. 

  • update
  • update
  • update
  • update
  • update
  • update
  • update
Add Element

COMPANY

  • Privacy Policy
  • Terms of Use
  • Advertise
  • Contact Us
  • Menu 5
  • Menu 6
Add Element

4153075228

AVAILABLE FROM 8AM - 5PM

Add Element

ABOUT US

Marin Home Ideas is your go-to resource for turning your Marin home into a true haven. Our blog covers everything from creative remodeling and stylish decor to gardening tips, outdoor living, and smart financial moves. 

Add Element

© 2025 CompanyName All Rights Reserved. Address . Contact Us . Terms of Service . Privacy Policy

Terms of Service

Privacy Policy

Core Modal Title

Sorry, no results found

You Might Find These Articles Interesting

T
Please Check Your Email
We Will Be Following Up Shortly
*
*
*