 Add Row
  Add
Add 


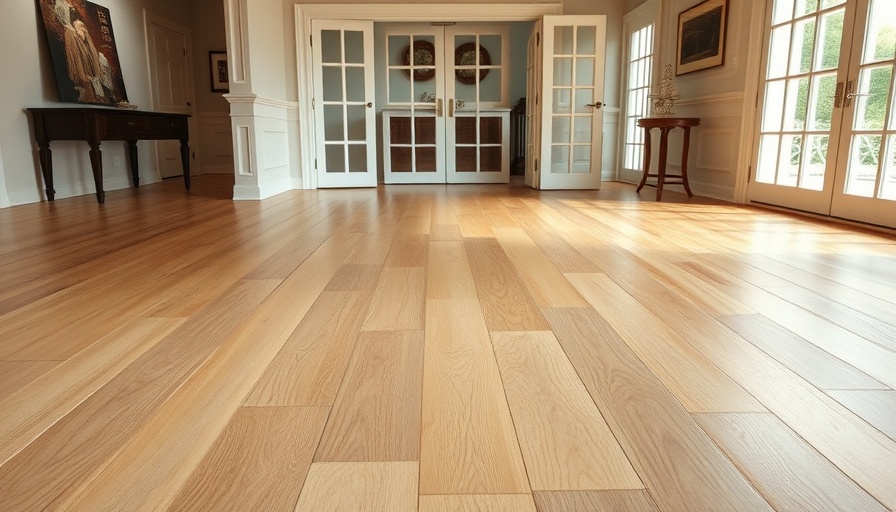
Transforming Your Home: The Journey of Red Oak Floors
There's something uniquely satisfying about completing a home project, especially when it enhances the warmth and beauty of your living space. The recent renovation of my bedroom suite with elegant red oak hardwood floors finished in Bona Natural Seal and Bona Traffic HD marks a triumphant step in my home improvement journey. From the meticulous sanding to the final finish, I’m excited to share not just the results, but the process and insights that might help fellow DIY enthusiasts.
The Importance of the Right Finish
Choosing the right finish for hardwood floors can significantly impact both the aesthetic quality and durability of your flooring. In this case, I opted for Bona Natural Seal, which provides a beautiful foundation, and Bona Traffic HD in an extra matte finish for final protection. This combination not only enhances the natural beauty of the red oak wood but also sets the tone for a tranquil and inviting atmosphere.
Step-By-Step Process to Achieve a Flawless Finish
The preparation phase of this project was crucial. I started with sanding the floors progressively, beginning with 36-grit sandpaper and moving through the grits up to 100. Every pass improved the surface, ensuring that the sealer and finish would adhere properly. After that, I applied one coat of Bona Natural Seal followed by two coats of Bona Traffic HD. A bit of sanding between coats with 220-grit sandpaper helped achieve that smooth texture.
Light’s Role in Floor Aesthetics
Another critical element to consider is lighting. The foyer of my bedroom suite has limited lighting, so the 5000K daylight LED bulbs showcased the true nature of my floors without any warm undertones. Conversely, in the bedroom, where natural light flooded in, the floors appeared warmer and more vibrant under the sun's rays. The lighting environment significantly influences how these finishes are perceived, a detail that any homeowner should keep in mind when deciding on flooring and finishes.
Practical Tips for Future Renovators
For those considering a similar project, I’ve rounded up a few practical insights you might find useful:
- Test finishes in small areas before committing to the entire floor to see how they look in various lighting.
- Ensure to allow proper drying time between coats for a robust finish.
- Invest in quality tools, like a good roller and sandpaper, as they can make a significant difference in the application process.
Finding Inspiration in Community
While DIY projects can often feel solitary, there’s a vibrant community of online best-practice sharers and local enthusiasts eager to share their experiences, struggles, and triumphs. Engaging in this dialogue, whether through forums or social media, can yield heaps of valuable ideas and support. I found myself searching for images of finished hardwood floors like mine, desperately wanting to see what my vision could become. Luckily, by sharing my own images, I hope to assist someone in their journey, just like others assisted me.
Further Considerations: What I Learned from This Experience
The process of revitalizing my bedroom suite floors with red oak has not been merely about achieving a beautiful result; it has been a journey of self-expression through home improvement. Every scratch, every coat of finish, and each light adjustment further personalized my space. It served as a reminder that a house doesn’t just become a home through decoration but through the stories and efforts woven into its very foundation.


Write A Comment