Add Row
Add Element
cropper
update
Marin Home Ideas
update
Add Element
  • Home
  • Categories
    • Home Remodeling Ideas
    • Interior Design & Decor Ideas
    • Gardening & Landscaping Ideas
    • Outdoor Living & Entertaining
    • Health & Wellness at Home
    • DIY at Home
    • Kitchen Ideas
    • Bedroom Ideas
    • Bath Ideas
    • Cooking at Home
    • Home Office Ideas
    • Lighting Ideas
    • Furniture Ideas
    • Architecture Ideas
    • Senior Living at Home
    • Home Finance
    • Real Estate News
Add Row
Add Element
May 15.2025
3 Minutes Read

Transform Your Cooking: Expert Tips for Drying Herbs and Preserving Flavor

Bundles of herbs drying on a wooden fence in a garden.

Unlock the Joy of Drying Your Homegrown Herbs

Growing your own herbs can bring a delightful flavor into your kitchen and wellness routines. However, when those warm months fade and the temperatures drop, preserving your herb bounty becomes essential for year-round enjoyment. In this article, we will take a journey through effective herb harvesting and drying techniques, providing you with insights into maintaining the quality of your fresh flavors long after the season has ended.

Mastering the Art of Herb Harvesting

Before diving into drying techniques, it's crucial to understand how to properly harvest herbs to preserve their potent flavors and aromatic oils. Harvesting at the right time is the key. Aim for early morning when the dew has dried and before the heat of the day hits. This ensures the essential oils are at their highest concentration. Remember, the best time to cut herbs is just before they bloom; pinching back excess flowers can also help promote more leaf growth.

Steps for Preparing Herbs After Harvesting

Once you've harvested your herbs, preparation is essential. Avoid washing them right after cutting, as this can introduce moisture that leads to mold growth. Instead, opt for organic herbs that are free from pesticides, ensuring what's in your kitchen is not only delicious but also safe for consumption. Use clean scissors or pruners to cut the stems just above the leaf nodes, encouraging bushier growth.

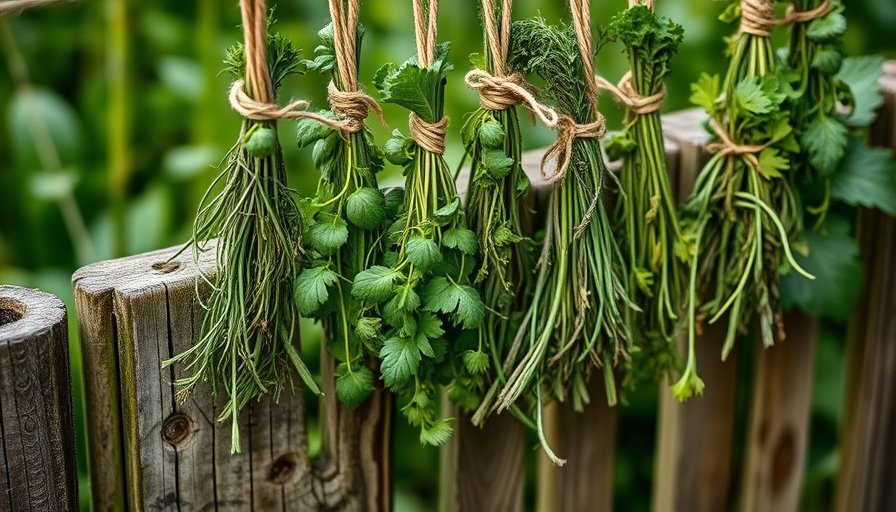
Effective Techniques for Drying Fresh Herbs

There are various methods to dry your herbs, each with its unique benefits. Here are four popular techniques:

  • Hang Dried Method: Bundle your herbs and hang them upside down in a dark, dry area with good air circulation. This method preserves their flavor and aroma effectively.
  • Air Drying: Lay your herbs flat on a drying rack or mesh screen in a well-ventilated area. This method takes longer but is natural and straightforward.
  • Dehydrator: Invest in a food dehydrator for a faster drying process. This method retains flavor well and is less affected by environmental factors.
  • Oven Drying: For those in a hurry, low-temperature oven drying can be efficient. Set your oven at a low temperature (around 180°F) and check regularly to avoid cooking.

Storing Your Dried Herbs Like a Pro

Proper storage of dried herbs is critical to maintaining their flavors. Use airtight containers, glass jars, or vacuum-sealed bags to keep moisture and light out. Store your herbs in a cool, dark place to extend their shelf life. Remember, light and heat can degrade their quality over time, so get creative with your storage! Opt for decorative jars that add charm to your kitchen.

The Best Herbs for Drying: A Salute to Flavor

Not all herbs are created equal when it comes to drying. Some retain their flavors beautifully, while others might lose potency. Here are some of the best herbs for drying:

  • Thyme
  • Oregano
  • Sage
  • Mint
  • Rosemary
  • Basil
  • Chamomile

Including these herbs in your garden ensures you have a variety of flavors to dry and enjoy throughout the year.

Planning Ahead: Common Misinterpretations about Drying

Many novice gardeners might believe that every herb can be dried the same way or that they can dry herbs after washing them. Understanding each herb's unique characteristics and respecting their need for minimal water is essential. Moreover, know that some herbs, like parsley or cilantro, are better used fresh, as they can lose their characteristic flavors when dried. Get to know your herbs, and you'll make smarter gardening and usage decisions!

Inspiring Quotes to Delight Your Green Thumb

"To plant a garden is to believe in tomorrow." This beautiful sentiment reminds us that gardening isn't just about the present; it's a dedication to the future. You grow your herbs today to flavor not just your meals, but memories to come.

The Time to Get Started is Now!

If you have an abundance of herbs, don’t let them go to waste! Embrace these tips and techniques to dry and store your treasures, extending your harvest long into colder months. By preserving your herbs, you're ensuring that your culinary creativity doesn't have to wait for the next growing season.

Gardening & Landscaping Ideas

3 Views

0 Comments

Write A Comment

*
*
Related Posts All Posts
07.08.2025

Expert Tips to Identify, Prevent, and Treat Sunburn on Cactus Plants

Update Understanding Cactus Sunburn: An Introduction When we think of sunburn, we often picture our own skin suffering under the relentless sun. However, even the most resilient of plants, like cacti, can experience sunburn. Cacti thrive in arid environments where they are acclimated to intense sunlight; surprisingly, they still have limits. Whether you’re a passionate gardener or just starting your plant care journey, understanding how to identify, prevent, and treat sunburn on cactus plants can be crucial for maintaining their health and beauty. Symptoms of Sunburn on Cacti The first signs of sunburn on cacti often manifest as discoloration on their epidermis. This may start as pale yellow or white patches that darken over time to brown or even black as the tissue dies. Interestingly, some cacti may develop red or purple hues depending on their pigmentation and the severity of their sun exposure. Initially, damage could be merely cosmetic, but severe sunburn may lead to cracked or necrotic tissues, impacting the plant's health significantly. Common Causes of Cactus Sunburn Cacti are well adapted to sunbaked environments, yet they can suffer severe sunburn from abrupt changes in their light exposure. Moving them suddenly from a shaded area, such as inside your home, to full sunlight can overwhelm their protective mechanisms. Without acclimatization, the cacti can't produce the necessary pigments to safeguard against excessive UV rays, leading to sunburn. Other causes include heatwaves, reflected light from nearby surfaces, and incorrectly timed watering, which can exacerbate the issue. Prevention Techniques to Protect Your Cactus Preventing sunburn is mainly about creating a gradual exposure regimen for your cacti. When transitioning them to brighter spots, do so slowly over several days. Additionally, placing them in partial shade during the hottest months can be beneficial. Using shade cloths or repositioning them strategically within the garden can effectively shield them from midday sun. Lastly, ensuring your cactus gets adequate hydration is fundamental; however, be cautious about overwatering, which can lead to other problems. Effective Treatments for Sunburned Cacti If your cactus has already succumbed to sunburn, don’t fret. Assessing the level of damage is crucial. For mild cases, simply reducing exposure to sunlight and allowing the plant to recover might suffice. In more severe cases, you may need to remove the damaged parts to prevent further disease spread. Applying a diluted fungicide can also help minimize the risk of opportunistic pathogens entering through the affected areas. Common Misconceptions About Cacti and Sunlight One misconception is that all cacti can thrive in any light condition. While it’s true that they are generally tolerant of sunlight, specific varieties, particularly those with thin skin or heavy pigmentation, are vulnerable to sunburn. For example, Opuntia and Mammillaria species are particularly susceptible and require careful attention to their light environment. Understanding the diverse ranges of cacti is essential to provide proper care. Gardening Tips to Enhance Cactus Health For those looking to maintain vibrant cacti, a few gardening tips can prove invaluable. Regularly inspecting your plants not only for sunburn but also for pests can safeguard their health. Ensuring that the soil mixture is appropriate for cactus growth—typically a half-and-half mixture of soil and sand—can also help in providing them with enough drainage. Experimenting with garden layouts to find the best positioning for your sun-loving plants is also a creative way to trial their growth in your unique garden plan. Conclusion: Embrace Cacti Care with Confidence Caring for cacti goes beyond merely keeping them in sunlight. By understanding the symptoms, causes, and treatment options for cactus sunburn, you can keep your garden thriving. With the right methods, nurturing these unique plants can become a fulfilling and enjoyable endeavor. So, dive into your gardening project with confidence—your indoor plants will thank you!

07.08.2025

Transform Your Backyard with Charming Mason Jar Solar Lights

Update Illuminate Your Garden: The Magic of Mason Jar Solar Lights Imagine a warm evening spent outside, your garden aglow with charming little lights that not only brighten up the space but also bring a touch of whimsy to your backyard gatherings. Mason jar solar lights are the perfect solution for anyone looking to enhance their outdoor ambiance without breaking the bank or spending hours on complex installations. These delightful decor items are easy to make, requiring just a few materials and a little creativity. Why Mason Jar Solar Lights? As the nights grow longer, extending your outdoor enjoyment into the evening hours can be as simple as adding a touch of light. Mason jar solar lights harness the energy of the sun during the day, ensuring that your garden remains vibrant at night. They not only provide illumination but also evoke nostalgia, reminding us of summer nights spent capturing fireflies in quaint jars. Furthermore, they can be a conversation starter for guests and an appealing focal point in your garden design. Step-by-Step Guide to Crafting Your Solar Lights Creating your own Mason jar solar lights is a satisfying DIY project that showcases both sustainability and creativity. Here’s what you'll need: Mason jars with rings Stake solar lights (available at most grocery and craft stores) Double-sided foam tape or glue The construction is as easy as 1-2-3. First, find solar lights with removable tops and the right size Mason jars. The most challenging aspect may be locating these items, but don’t worry—local grocery stores and online retailers offer plenty of options. Once you have gathered your materials, use the double-sided tape to securely attach the solar light top to the jar's lid. This simple hack makes it easy to remove the lights for charging and maintenance. After securing everything in place, allow the solar lights tocharge in sunlight for 4-8 hours, and you'll soon see them illuminate your outdoor space. Using Your Solar Lights Creatively Not only are Mason jar solar lights charming, but they also offer endless opportunities for creativity in garden décor. You might hang them from trees for a picturesque fairy-tale vibe or line your pathways for a welcoming glow. If you’re feeling quirky, mix in colored jars or add embellishments like ribbons or painted patterns to match your garden theme. The beauty lies in your imagination—consider using them as table centerpieces during an outdoor dinner party or clustering them on a shelf for a cozy atmosphere. The Benefits of Solar Lighting Choosing solar lights has multiple benefits. They are energy-efficient, environmentally friendly, and cost-effective since they charge using solar energy. There’s no need for unreliable extension cords or electricity bills. Moreover, solar lights are easy to install and can often be moved easily around the garden to fit your needs throughout the seasons. Connecting with Nature and Community Utilizing DIY projects like Mason jar solar lights connects us not only to the environment but also to our community. As we craft these lights, we embrace a sustainable lifestyle and share our creativity with friends and family. Hosting gatherings where you unveil your DIY skills fosters stronger community bonds and encourages others to engage in similar solar-powered transformations in their own backyards. Creating an Eco-Friendly Garden Incorporating sustainable practices in your gardening efforts extends beyond lighting. Organic gardening, for instance, is rising in popularity. Using natural fertilizers and composting enriches your soil while minimizing your carbon footprint. Together, these practices create an eco-friendly garden space that’s visually appealing and kinder to the planet. Conclusion: Illuminate Your Evenings Mason jar solar lights offer a creative and eco-friendly approach to enhancing your garden space. With just a few simple steps, you can craft beautiful lighting that brings warmth and character to your outdoor evenings. Whether you’re hosting a gathering or simply enjoying a quiet night under the stars, these enchanting lights will surely make your backyard a preferred retreat. So, what are you waiting for? Gather your materials and start crafting your own solar lights today!

07.07.2025

Unlock the Secrets to Growing Kiss-Me-Over-the-Garden-Gate for a Stunning Flower Garden

Update Budding Beauties: The Allure of Kiss-Me-Over-the-Garden-Gate In the vibrant tapestry of cottage gardens, Kiss-Me-Over-the-Garden-Gate (Persicaria orientalis) stands as a testament to the beauty and resilience of nature. Often affectionately called Prince’s Feather, this herbaceous flower enchants gardeners with its lofty stems and pendant blooms, creating a striking display from mid-summer to early fall. Growing Tips for a Flourishing Garden This plant not only serves as a stunning focal point but also thrives in a variety of conditions, making it a gardener's favorite. If you're eager to cultivate this elegant perennial, consider these tips: Soil Type: Prefers moist, rich soils that drain well, with a pH of 6.0-7.5. Sunlight: Full sun yields the best blooms, though it can tolerate partial shade. Location: Its towering height of 4 to 7 feet makes it ideal for the back of flower borders, where it can serve as a sturdy backdrop for shorter flora. Caring for Your Prince’s Feather Once established, Kiss-Me-Over-the-Garden-Gate requires minimal maintenance, thriving with occasional watering and deadheading to encourage more blooms. However, the plant's pushy nature means keeping an eye on its spread. In optimal conditions, it can become quite aggressive—beneficial for filling space but potentially overwhelming if not managed well! Visual Appeal and Garden Design Incorporating this flower into your landscaping not only enhances visual appeal but also supports local wildlife. It attracts a variety of pollinators, making it a perfect choice for eco-conscious gardeners looking to enhance biodiversity. Pests and Diseases: What to Watch For Although generally hardy, Kiss-Me-Over-the-Garden-Gate is not entirely free from challenges. Be on the lookout for common garden pests such as aphids and spider mites, which can affect the plant's health. Implementing integrated pest management techniques, such as introducing beneficial insects or utilizing organic remedies, ensures that your garden remains vibrant and thriving. Crafting Your Garden Narrative This beautiful flower not only adds physical height and texture to your garden but also introduces a layer of history and lore. Traditionally known as a symbol of love and longing, Kiss-Me-Over-the-Garden-Gate is perfect for creating a personal narrative in your outdoor space, inviting introspection and tranquility. Engaging with the Local Gardening Community Consider joining a local gardening group or online forum where you can share your experiences with Prince’s Feather and learn from others. These communities provide a treasure trove of knowledge, tips, and camaraderie which can only enhance your gardening journey. Final Thoughts: Embrace the Ageless Beauty Kiss-Me-Over-the-Garden-Gate encapsulates the essence of a flourishing flower garden. Its beauty is matched only by its hardiness and ease of care, making it a must-have for both seasoned and novice gardeners. Cultivating this plant can provide you with layers of meaning—inviting both beauty and biodiversity into your space. As we learn from each garden experience, embrace the journey and watch your spaces transform into lively environments that reflect your unique aesthetic and values.

Add Row
Add Element
cropper
update
Welcome to Marin Home Ideas
cropper
update

Welcome to Marin Home Ideas: Your Inspiration for Beautiful Living in Marin.
Whether you're dreaming of a full home remodel, refreshing your interior design, or creating the perfect outdoor oasis, Marin Home Ideas is your go-to source for inspiration and expert advice.
From stunning kitchen and bathroom renovations to stylish decor trends, smart home upgrades, and lush garden transformations, we bring you the latest in home design and improvement. 

  • update
  • update
  • update
  • update
  • update
  • update
  • update
Add Element

COMPANY

  • Privacy Policy
  • Terms of Use
  • Advertise
  • Contact Us
  • Menu 5
  • Menu 6
Add Element

4153075228

AVAILABLE FROM 8AM - 5PM

Add Element

ABOUT US

Marin Home Ideas is your go-to resource for turning your Marin home into a true haven. Our blog covers everything from creative remodeling and stylish decor to gardening tips, outdoor living, and smart financial moves. 

Add Element

© 2025 CompanyName All Rights Reserved. Address . Contact Us . Terms of Service . Privacy Policy

Terms of Service

Privacy Policy

Core Modal Title

Sorry, no results found

You Might Find These Articles Interesting

T
Please Check Your Email
We Will Be Following Up Shortly
*
*
*