Add Row
Add Element
cropper
update
Marin Home Ideas
update
Add Element
  • Home
  • Categories
    • Home Remodeling Ideas
    • Interior Design & Decor Ideas
    • Gardening & Landscaping Ideas
    • Outdoor Living & Entertaining
    • Health & Wellness at Home
    • DIY at Home
    • Kitchen Ideas
    • Bedroom Ideas
    • Bath Ideas
    • Cooking at Home
    • Home Office Ideas
    • Lighting Ideas
    • Furniture Ideas
    • Architecture Ideas
    • Senior Living at Home
    • Home Finance
    • Real Estate News
Add Row
Add Element
March 22.2025
3 Minutes Read

Transform Your Small Living Room into a Spacious Haven: Key Design Tips

Make small living room feel large with modern interiors and space management.

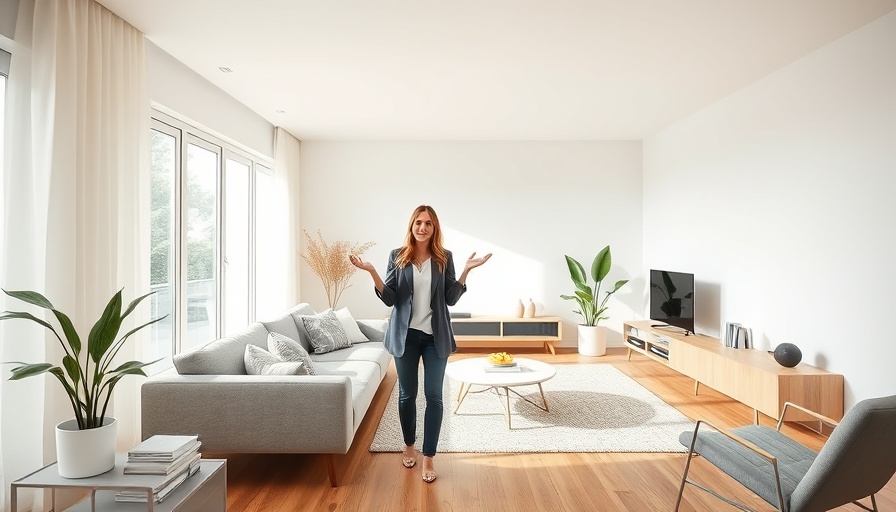
Creating a Cozy Yet Spacious Living Environment

In the quest for an inviting and spacious ambiance in small living rooms, design plays a crucial role. A recent video titled Design Tips To Make A Small Living Room Feel LARGE | Great Home Ideas gives us a glance at how thoughtful renovations can transform cramped spaces into comfortable family hubs. The couple featured in the video wanted their lounge to be a perfect gathering spot, and the steps taken to achieve this can serve as inspiration for anyone looking to optimize their own home.

In Design Tips To Make A Small Living Room Feel LARGE | Great Home Ideas, the discussion dives into effective renovations that maximize small spaces, exploring key insights that sparked deeper analysis on our end.

Choosing the Right Furniture

The choice of furniture can significantly affect how a small space feels. In the video, a contemporary modular corner sofa was selected for its compactness and versatility. By opting for a couch that can be tucked neatly into a corner and has raised legs, it creates an illusion of space without compromising comfort. This strategy illustrates how selecting thoughtfully designed furniture can exponentially impact the energy of a room.

Innovative Storage Solutions

One standout feature shown during the renovation was the clever incorporation of a wraparound shelf. This slimline shelf not only utilized the previously wasted space but also added elegance to the room. By choosing materials that complement the existing decor, such as the beautiful Taz oak, the couple ensured their design was cohesive and chic. Moreover, hidden storage options are an excellent way to manage clutter while keeping decorative flow intact.

Using Color and Material Wisely

The video emphasizes the importance of colors in maximizing space feel. By painting the media wall in a matte dark shade called Monument, the flat screen TV practically disappears, allowing for a cleaner aesthetic that draws the eye outward, adding to an impression of spaciousness. These choices illustrate how smart color scheming can play a significant part in creating a visually arresting yet inviting atmosphere.

Lighting: The Forgotten Element

Lighting not only helps in brightening a room but can also dramatically change how space is perceived. The installment of pendant lights showcased in the video is a beautiful example of how decorative lighting can add character while ensuring functionality. Lighting contributes to the overall mood, creating warmth in small living areas, which is essential for social gatherings.

Decor: Adding Personality

The final touches, such as art pieces that resonate with the color and texture of the room, are vital for personalizing a space. A photograph that encapsulates the warmth of the colors used throughout the lounge can evoke emotion and transform the feeling of the room, making it reflect the life lived within. Effective decor plays an undeniable role in making a house a home, uniting aesthetics with individual stories.

Conclusion: Bringing it All Together

From selecting the right furniture and using inventive storage solutions to wisely applying colors and lighting, every decision contributes to making a small living room feel large and inviting. By combining design principles with a personal touch, anyone can recreate a similar magic in their own space. So if you're gathering friends and family, ensure your living area reflects warmth, functionality, and style. Embrace the transformative power of design!

Gardening & Landscaping Ideas

0 Views

0 Comments

Write A Comment

*
*
Related Posts All Posts
06.19.2025

Unlock the Secrets to Growing Delicious Cucumbers in Pots

Update Why Container Gardening is Ideal for Cucumbers Container gardening opens up a world of possibilities for urban dwellers and those with limited garden space. With cucumbers, you not only can enjoy fresh produce but also enhance your outdoor aesthetics. Growing cucumbers in pots allows you to manage their environment easily, ensuring they receive optimal sunlight and nutrients. This flexibility empowers gardeners to cultivate their greens anywhere, from balconies to patios, giving them the freedom to experiment with different varieties. Understanding Cucumber Varieties: Which is Right for You? Cucumbers come in two main types: bush and vining. Bush cucumbers are compact and designed for container gardening, making them ideal for those working with limited space. Meanwhile, vining cucumbers thrive in larger pots or directly in the ground, requiring extra support structures like trellises. When planning your container garden, consider your space and the desired yield, as both types offer unique advantages. The Essential Tools and Tips for Successful Cucumber Growing To grow healthy cucumbers, you will need a few essential tools. Start with high-quality garden pots—each capable of holding at least five gallons of soil. Beyond that, consider sturdy gardening gloves, a watering can or hose for consistent moisture, and organic fertilizers to boost plant health. Remember, maintaining a routine will ensure your cucumbers grow vigorously and produce delicious fruits. Choosing the Perfect Soil for Your Cucumber Plants Your choice of soil can make all the difference in your cucumber yield. A well-draining potting mix enriched with organic compost benefits cucumbers significantly, allowing them to absorb essential nutrients while also preventing waterlogging. Consider adding peat moss for moisture retention and perlite for aeration. A balanced environment gives your cucumbers the best chance for an abundant harvest. Companion Plants that Benefit Your Cucumber Harvest One of the joys of gardening is exploring companion planting. When growing cucumbers, consider planting them alongside legumes, marigolds, or herbs like dill and basil. These companions not only deter pests but also enhance the cucumber's flavor profile. Understanding plant relationships helps you create a harmonious garden ecosystem, thus increasing your chances of success. Embrace the Joy of Harvesting Your Cucumbers The moment you've been waiting for—harvesting! Cucumbers are ready to pick once they reach about six to eight inches long. They should be firm and bright green for the best flavor. Regular harvesting stimulates further production, so don't be shy! The more you pick, the more your plant will produce, leading to a fruitful summer in your container garden. Simple Steps to Ensure Healthy Growth and Maintenance Regular maintenance is key to thriving cucumber plants. Ensure your plants receive at least six hours of sunlight daily, water consistently to keep soil moist but not soggy, and monitor for pests. Early detection of any potential diseases such as powdery mildew is crucial. Addressing issues promptly will save you much heartache down the road. Why You Should Start Growing Cucumbers Today Growing cucumbers in pots empowers gardeners, regardless of space constraints, to reap fresh produce. The simplicity of container gardening paired with the nutritional benefits of cucumbers makes this a worthwhile endeavor. Take the plunge, gather your supplies, and start planting your cucumbers today for a delightfully crunchy future!

06.18.2025

Discovering the Causes of Yellow Leaves on Zucchini: Solutions Inside!

Update Troubleshooting Yellow Leaves on Zucchini: 7 Common Causes Explained Zucchini, or Cucurbita pepo, is a delightful summer squash loved for its versatility in cooking and ease of growth. Thriving in zones 3 to 9, this bushy, or sometimes vining, plant flourishes in full sun and prefers nutrient-rich, well-draining soil. Depending on the variety, zucchini takes approximately 35 to 60 days to reach maturity, creating a blend of vibrant colors and shapes that can bring any garden to life. However, even the most careful gardener may encounter yellowing leaves on their zucchini plants. This discoloration is more than just an aesthetic issue; it can signal various underlying problems that may derail your gardening efforts. Understanding the causes of yellow leaves can empower you to take corrective actions and save your plants. Here are seven common causes of yellowing zucchini leaves, along with their solutions: 1. Disease: A Hidden Threat Diseases can wreak havoc on zucchini plants, and identifying them early is crucial. One prominent disease, Cucurbit Yellow Vine Disease (CYVD), is caused by the bacterium Serratia marcescens. This disease leads to yellowing and curling of leaves, ultimately resulting in the collapse of the entire plant if not addressed. To combat CYVD, control the squash bug populations, which spread the bacteria, using neem oil or diatomaceous earth, and promptly remove any infected plants. Other diseases, such as downy mildew and various types of leaf spot, often present with yellow spots or fuzzy patches on the leaves. Maintaining good air circulation and avoiding overhead watering can reduce your plants' susceptibility to these issues. 2. Inadequate Sunlight: Seek the Light Zucchini plants thrive in full sunlight. If you notice that your zucchini leaves are turning yellow, it could be a result of insufficient sunlight. Ideally, your plants should receive at least six hours of direct sunlight per day. If they are overshadowed by taller plants or structures, consider relocating them to a sunnier spot. 3. Moisture Stress: The Balance of Water Watering practices can significantly impact the health of your zucchini plants. Both underwatering and overwatering can lead to yellow leaves. Aim for consistent moisture without waterlogging the soil. A good rule of thumb is to check the top inch of soil: if it's dry, it's time to water. 4. Nutrient Deficiency: Feed Wisely Yellowing leaves might indicate a nutrient deficiency, particularly in nitrogen. Regularly fertilizing your zucchini with a balanced, organic fertilizer can provide the essential nutrients plants need to remain lush and green. 5. Pests: Tiny Intruders Pests such as aphids and spider mites can also cause yellowing leaves by sucking the sap from the plant. Keep a watchful eye on your plants and try to spot these pests early. Organic pest control methods, including insecticidal soap or neem oil, can be effective treatments. 6. Weather Extremes: Nature's Effects Extreme temperatures—both high and low—can stress zucchini plants, leading them to exhibit yellowing leaves. Protect your plants from harsh weather by providing shade during intense heat or cover during unexpected frosts. 7. Wrong Soil pH: The Soil's Secrets Lastly, the pH of your soil can directly affect your zucchini plants' health. Ideally, zucchini plants prefer a pH between 6.0 and 7.0. Conduct soil testing to ensure it lays within this optimal range, amending the soil as necessary to restore balance. As you work through these potential issues, remember that yellow leaves do not have to signal doom for your zucchini plants. By understanding the common causes and taking proactive measures, you can promote a bountiful harvest. Happy gardening!

06.18.2025

Discover Stunning Water-Wise Permeable Patio Ideas for Your Backyard

Update Transform Your Outdoor Space: The Benefits of Permeable Patios In an age of increasing environmental awareness, permeable patios stand out as an ingenious solution to facilitate natural water drainage while enhancing outdoor aesthetics. More than just a trendy feature, these patios allow rainwater to seep back into the earth, replenishing the garden’s water reserves and reducing the risk of flooding in urban areas. For homeowners grappling with drainage issues, investing in a permeable patio might just be the most rewarding gardening project they embark on this season. Perfect for DIY Enthusiasts: Easy Installation Steps If you've ever daydreamed about a stunning patio that serves both beauty and function, a DIY permeable patio project could be perfect for you. By following a few simple steps, you can contribute to your landscape in an eco-friendly way. Start by planning your design—consider the location, size, and function of your patio. Then, prepare the soil by grading the area to ensure proper drainage. Adding a layer of gravel before placing the pavers will create a solid, permeable base. Creative Ideas for Your Permeable Patio The beauty of permeable patios lies in their versatility. Whether you're leaning towards a rustic stone design or looking to incorporate vibrant interlocking pavers, your outdoor space can reflect your unique style. Combine different textures or integrate natural elements like nearby flower beds or water features to enhance visual appeal. The integration of greenery and artful decor can transform your patio into a relaxing oasis. Exploring the Environmental Impact One significant advantage of permeable patios is their positive contribution to local ecosystems. As rainwater seeps through the pavers, it nourishes the plants and supports groundwater recharge, mitigating the risk of soil erosion. This not only benefits your garden by promoting plant health but also contributes to the larger environment by decreasing runoff that can overwhelm drainage systems. Social Connection: A Community Approach Creating a permeable patio isn't just a personal project; it opens the door for community engagement. Neighbors can come together to discuss sustainable practices, share tips, and even organize patio installation parties. Such initiatives encourage collective learning and enhance community bonds, fostering a space where everyone contributes to a greener future. Steps to Initiate Your Project To kickstart your permeable patio project, begin by researching any local incentives for implementing water-saving measures. Engage with your community through local gardening clubs or social media groups for shared experiences and tips. Doing so not only enhances your knowledge but also builds connections with other local gardening enthusiasts. Revolutionizing the way we manage outdoor spaces is within reach, and permeable patios offer a functional yet aesthetically pleasing solution. Not only will they enhance the look of your yard, but they also support environmental sustainability. So roll up your sleeves, grab your gardening tools, and start a project that benefits both your home and the earth!

Add Row
Add Element
cropper
update
Welcome to Marin Home Ideas
cropper
update

Welcome to Marin Home Ideas: Your Inspiration for Beautiful Living in Marin.
Whether you're dreaming of a full home remodel, refreshing your interior design, or creating the perfect outdoor oasis, Marin Home Ideas is your go-to source for inspiration and expert advice.
From stunning kitchen and bathroom renovations to stylish decor trends, smart home upgrades, and lush garden transformations, we bring you the latest in home design and improvement. 

  • update
  • update
  • update
  • update
  • update
  • update
  • update
Add Element

COMPANY

  • Privacy Policy
  • Terms of Use
  • Advertise
  • Contact Us
  • Menu 5
  • Menu 6
Add Element

4153075228

AVAILABLE FROM 8AM - 5PM

Add Element

ABOUT US

Marin Home Ideas is your go-to resource for turning your Marin home into a true haven. Our blog covers everything from creative remodeling and stylish decor to gardening tips, outdoor living, and smart financial moves. 

Add Element

© 2025 CompanyName All Rights Reserved. Address . Contact Us . Terms of Service . Privacy Policy

Terms of Service

Privacy Policy

Core Modal Title

Sorry, no results found

You Might Find These Articles Interesting

T
Please Check Your Email
We Will Be Following Up Shortly
*
*
*