Add Row
Add Element
cropper
update
Marin Home Ideas
update
Add Element
  • Home
  • Categories
    • Home Remodeling Ideas
    • Interior Design & Decor Ideas
    • Gardening & Landscaping Ideas
    • Outdoor Living & Entertaining
    • Health & Wellness at Home
    • DIY at Home
    • Kitchen Ideas
    • Bedroom Ideas
    • Bath Ideas
    • Cooking at Home
    • Home Office Ideas
    • Lighting Ideas
    • Furniture Ideas
    • Architecture Ideas
    • Senior Living at Home
    • Home Finance
    • Real Estate News
May 01.2025
3 Minutes Read

Transform Your Space: How to Effectively Remove Popcorn Ceilings

Worker removing popcorn ceilings using spray in a bright room.

Understanding Popcorn Ceilings

Popcorn ceilings, also known as acoustic or cottage cheese ceilings, were a popular choice among homeowners for their sound-dampening qualities and ability to mask imperfections. These textured surfaces flourished in mid-20th century homes, but as interior design trends evolved, many homeowners are seeking a cleaner, more modern aesthetic. For anyone looking to revamp their home, removing popcorn ceilings can dramatically transform the visual space.

Step-by-Step Guide to Removing Popcorn Ceilings

Removing popcorn ceilings might seem like a Herculean task, but with the right steps, any homeowner can approach this project with confidence. Here’s a comprehensive guide:

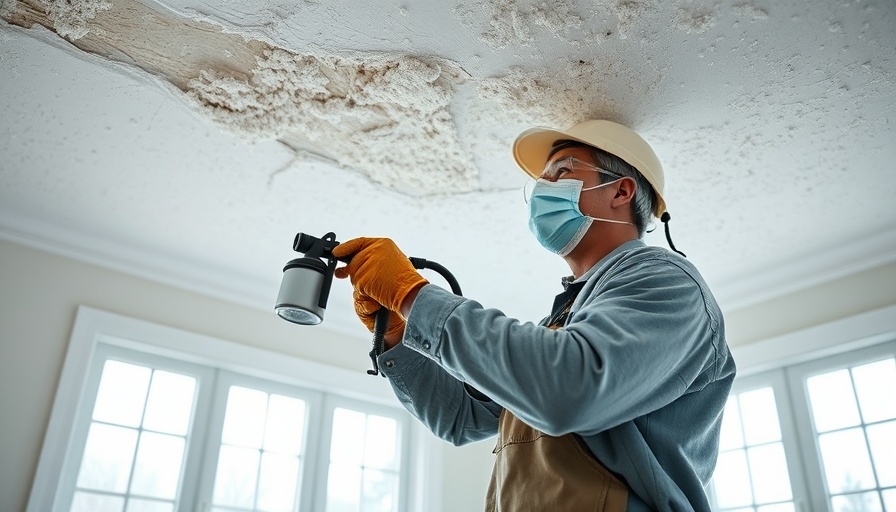
Step 1: Test for Asbestos

Before embarking on this DIY journey, it’s crucial to test for asbestos. Homes built before the 1980s are particularly susceptible to asbestos in popcorn ceilings. Asbestos testing kits can be purchased at hardware stores, or it’s advisable to hire a licensed professional for proper evaluation. If tested positive, halt all work immediately and reach out to licensed asbestos removal contractors. If the results are negative, you can proceed with the removal.

Step 2: Prepare Your Workspace

Preparation is the key to a successful removal process. To start, gather necessary tools such as:

  • Drop cloths or plastic sheeting
  • Painter’s tape
  • Safety goggles and a dust mask or respirator
  • A garden sprayer or spray bottle filled with water
  • A drywall knife or putty knife
  • Ladder or scaffolding
  • Sanding tools
  • Joint compound and paint for finishing up

Additionally, using a vacuum scraper can make this process cleaner and faster, minimizing dust and mess.

Step 3: Moisten and Scrape

Once the area is prepared, use your spray bottle to moisten a small section of the ceiling. This will help loosen the popcorn texture for easier scraping. Working in small sections ensures that the moisture does not dry before you can scrape it off. As you do this, be ready to catch any falling debris with your drop cloths, ensuring your floors remain clean.

Should You DIY or Hire a Pro?

While many homeowners might consider this a rewarding DIY project, if your popcorn ceiling potentially contains asbestos, it’s best left to the professionals. Hiring expert help might feel more costly upfront, but it guarantees safety and proper disposal of hazardous materials. On the other hand, if you’re confident in your skills and your ceiling is asbestos-free, DIY can be a fulfilling experience, especially when you get to enjoy the smooth finish afterward.

The Importance of a Clean Finish

After removing the popcorn texture, you’ll often need to patch any imperfections left beneath. This is where the use of joint compound and a smoothing technique comes into play. Once patched and sanded, a fresh coat of primer and paint will rejuvenate your ceiling, creating a seamless, modern look that enhances your home’s overall appeal.

The Emotional Impact of Home Renovation

Remove popcorn ceilings and you may find yourself marveled at the transformation of your space. Jason Graphix, a homeowner who undertook this challenge more than two decades ago, reflects, “Even after 20 years, removing the popcorn ceilings was one of the best upgrades we’ve made. Smooth ceilings make a huge difference in how we feel about our space.” This emotional uplift is a pivotal aspect that many underestimate when considering home improvement projects.

Take Action Now!

Ready to elevate your home’s look? Whether you're gearing up to put your property on the market or simply wish to enhance your living space, removing popcorn ceilings can be a game-changer. Engage with local real estate listings to understand how your renovations could influence your property’s value. Explore websites like Redfin or Zillow to see how updated spaces are performing in your real estate market.

Final Thoughts

Removing popcorn ceilings not only utilizes practical skills but can also enhance your home’s aesthetic and marketability. Whether you decide to take on this task yourself or hire a contractor, understanding the nuances of the process can lead to a rewarding outcome. Don’t underestimate the power of a modern ceiling—consider it your canvas for future possibilities.

Real Estate News

11 Views

0 Comments

Write A Comment

*
*
Related Posts All Posts
11.27.2025

Mastering HOA Documents for Closing: The Ultimate Guide for Buyers and Sellers

Update Understanding the Importance of HOA Documents for Closing Buying or selling a home in a homeowners association (HOA) community adds a layer of complexity to the real estate process. Within an HOA, a variety of documents, collectively known as the resale package, are essential to ensure a smooth closing. Missing or incomplete documentation can cause delays, leading to frustration and potential financial implications for both buyers and sellers. Thus, understanding the requirements and importance of these papers cannot be overstated. The Nuts and Bolts of a Resale Package An HOA resale package is primarily aimed at providing crucial information regarding the community's rules, fees, and governance structure. It typically includes a couple of key components, namely the resale certificate and the governing documents. The resale certificate informs prospective buyers about any outstanding dues, fees, or assessments that may be due upon closing. This transparency helps buyers assess their financial exposure before finalizing the purchase. On the other hand, governing documents such as Covenants, Conditions, and Restrictions (CC&Rs), bylaws, and rules and regulations reflect the community's operational framework and outline homeowners' responsibilities. By reviewing these documents, buyers can ascertain property restrictions, pet policies, and neighborhood expectations – elements that could significantly impact their quality of life. What Documents You Should Expect As you embark on your real estate journey, it’s crucial to know what documents will likely come into play during the closing process. Here's a comprehensive list: Covenants, Conditions, and Restrictions (CC&Rs): This document sets the foundation for the community’s living standards, detailing property restrictions, architectural controls, and typical household expectations. HOA Meeting Minutes: Past meeting minutes serve as a report card on the HOA’s operational decisions and concerns, revealing important information such as budgetary issues and pending projects. Financial Statements: These documents indicate the financial health of the HOA, outlining current income, expenditures, and reserve funding which can signal future costs to homeowners. Reserve Study: This assesses the long-term financial planning for major repairs and maintenance, with underfunded reserves raising potential red flags for future special assessments. Insurance Certificate: A crucial document that discloses the HOA's coverage type, which buyers need to understand to determine any additional insurance needs. Who Bears the Responsibility? One of the most common questions surrounding HOA documentation is who pays for the resale package. The answer varies by state and depends on the purchase agreement. In many cases, the seller is responsible for providing the resale package, while buyers might be liable for specific fees associated with ordering documents. It’s crucial for both parties to consult their real estate agents to clarify these responsibilities early in the process to avoid any unwanted surprise costs. A Practical Guide to Obtain HOA Documents Once an offer is accepted, the seller or their agent generally initiates the request for the resale package. This can be done through one of the three primary methods: Using a management company or online portal such as HomeWiseDocs or CondoCerts. For self-managed HOAs, directly contacting the HOA board. Employing third-party document services for convenience. Regardless of the method, request the documents well in advance, as delays can potentially impact the closing timeline. Key Takeaways: Avoiding Common Pitfalls Many issues can arise around HOA documents at closing. Understanding these potential pitfalls can save both buyers and sellers time and stress: Outdated Documents: Make sure you receive the latest copy of community rules and fees. Delivery Delays: Always order documents with ample time to avoid last-minute issues. Surprise Restrictions: Know potential restrictions regarding pets or rental properties that might come as unexpected news. Emotional Impact and Lifestyle Implications For many buyers, moving into an HOA community represents a fresh start and an exciting new chapter in their lives. However, unanticipated challenges surrounding HOA documentation can dampen this enthusiasm. As you make the transition into your new home, understanding the ins and outs of HOA documents can help alleviate stress and ensure you’re equipped with all the necessary knowledge to settle into your new community comfortably. Conclusion: Don't Leave Money on the Table Understanding HOA documents is crucial when navigating the real estate market, especially if you're considering homes in such communities. By familiarizing yourself with what to request, review, and deliver, you can streamline the closing process, thereby saving yourself time, money, and unexpected headaches. Stay informed, and take proactive steps to facilitate your closing! Take action now! Equip yourself with the knowledge of HOA documents to make informed decisions in your home buying or selling journey. Your future home depends on it!

11.26.2025

Dry Closing Explained: Risks, Legalities, and State Regulations

Update Understanding the Mechanics of Dry Closings A dry closing is a unique aspect of real estate transactions, where all the necessary paperwork is signed, yet the funds aren’t disbursed on the same day. Typically, lenders wire the necessary funds the very next business day, leading to potential confusion and risk for both the buyer and seller. In this scenario, the buyer remains in a legal limbo; ownership does not shift until funding is completed, leaving sellers with transactions hanging in uncertainty. The Differences Between Dry and Wet Closings To grasp the importance of dry closings, it is essential to contrast them with wet closings. In a wet closing, funds are disbursed immediately, offering both parties a sense of security and ensuring the legal transfer of property happens seamlessly. However, wet closings are not always feasible. Factors such as last-minute verifications, underwriting backlogs, or even state-specific regulations can dictate the timing of the funding, leading to a preference for dry closings in certain situations. State Regulations: Where Are Dry Closings Permitted? Dry closings are legislatively permitted in various states across the U.S. Such states include California, Oregon, Nevada, and Utah, among others, which often embrace practices that allow for the delay of fund disbursement. Conversely, many regions, particularly in the South and Midwest, require wet closings, emphasizing the need for an immediate exchange of funds to finalize the transaction. Risks for Buyers and Sellers in Dry Closings One of the looming risks of dry closings is the uncertainty present for both parties. Buyers, for example, cannot take possession of the property until the funds are received. This can complicate moving logistics, leading to delays and potential additional costs if movers or storage units need to be rescheduled. On the seller’s side, they run the risk of delay in receiving the proceeds from the sale, which can hinder subsequent real estate transactions they may have planned. Navigating a Dry Closing: Tips for Success If facing a dry closing, preparation is key for a smoother transition. Buyers should maintain constant communication with their lender for updates on funding timelines and any outstanding documentation requirements. Connecting with a knowledgeable real estate agent is also crucial to manage expectations and ensure that all necessary steps are followed for a successful transaction. What Happens if Funds Are Delayed Even with a well-laid plan, unforeseen delays can occur after a dry closing. Once documentation is completed, buyers must sit tight until the funds are wired. This typically occurs the next business day, but it can extend to several days if complications arise with the lender. Understanding these timelines is paramount for buyers and sellers, ensuring they have alternate plans in place should the process take longer than expected. Concluding Insights Dry closings are an integral part of the real estate market landscape, impacting how transactions unfold across different states. While they provide the flexibility necessary for day-to-day real estate operations, they inherently carry risks that both buyers and sellers must navigate. Knowledge and preparation remain critical, reducing anxiety while fostering a smoother transaction process. Call to Action: If you are looking to navigate the complexities of real estate transactions, whether you’re interested in homes for sale, or need guidance through the closing process, connect with a trusted real estate agent who can help mitigate risks and clarify the logistics of your next move.

11.22.2025

13 Ingenious Storage Solutions for Apartments and Tiny Homes

Update Unlocking Space: Innovations for Small Living As urban living becomes more prevalent, the charm of small homes and apartments continues to rise. The quest for efficient use of limited space leads to innovative storage solutions that transform tight quarters into functional havens. In this article, we'll explore 13 surprisingly clever strategies for maximizing storage in apartments and tiny homes. Vertical Solutions: Reclaiming Room in the Air When horizontal expansion isn’t an option, rising upwards is key. Creative vertical storage can redefine the feeling of your space. Invest in tall bookshelves, sleek stacked storage cubes, or wall-mounted shelving to draw the eye upward, making rooms instantly feel larger. Additionally, consider custom wall grids or pegboards that not only showcase personal touches—like decor items or kitchen utensils—but also serve as practical storage solutions. The Power of Multi-Functional Furniture When space is at a premium, every piece of furniture should serve more than one purpose. Choosing storage ottomans, lifting beds, or collapsible tables can turn small rooms into multifunctional areas that serve both dining and working purposes. Smart choices like a coffee table that opens up for additional storage can greatly enhance the utility of your living area. Small Tweaks With Big Benefits Sometimes, it’s the minor tweaks that yield the most significant results. Implementing simple organization hacks like vacuum seal bags for seasonal clothing or using tension rods in cabinets invites more order into your life. Irrespective of the design style in your home, these small adjustments can nearly double your storage capacity. Clever Ways to Free Up Space Wondering what to do with items that clutter your living space? The answer often lies in strategic off-site storage; if something is rarely used, it can find a new home in a storage unit. Ask yourself: does this item really elevate my living experience? If the answer is no, consider renting temporary spaces to lighten your load. The Context of Tiny Living: Without Compromise on Comfort The concept of tiny living, while minimalist, does not require sacrificing comfort. Innovations such as hidden compartments, under-bed storage, and the use of corners for shelving can create a cozy and stylish environment. Being savvy about design enables residents to enjoy small spaces without the discomfort of clutter. Smart Tips for Hidden Storage Look for areas in your home that can hide storage cleverly. In kitchens, under-stove pull-out drawers or toe-kick drawers hidden beneath cabinets can store less frequently used items while utilizing typical inaccessible spaces. Similar tactics can be applied in the bathroom with double drawers to tuck away towels neatly. Why Decluttering Is Key to Effective Storage The practice of decluttering is essential for those thriving in small spaces. Focus on intentionality—ask whether you really use or need each item. This process not only creates more physical space but fosters mental clarity, making small homes feel more comfortable and calm. Future Predictions: The Rise of Smart Living Solutions As demand for compact living spaces grows, so too does innovation in the realm of design and storage solutions. Expect to see more smart furniture, seamless technology integrations, and eco-conscious materials in the tiny homes market. By embracing these trends, potential homeowners can enjoy a space that’s not only functional but also aligns with their lifestyle and values. Taking Action: Craving More Space? If you're ready to take control of the clutter and reclaim your living space, now is the time! These solutions empower residents to transform their homes into stylish, efficient spaces without losing comfort. Explore nearby real estate listings on Redfin or Zillow for new properties that cater to your lifestyle needs while still keeping the charm of intimate spaces.

Terms of Service

Privacy Policy

Core Modal Title

Sorry, no results found

You Might Find These Articles Interesting

T
Please Check Your Email
We Will Be Following Up Shortly
*
*
*