Add Row
Add Element
cropper
update
Marin Home Ideas
update
Add Element
  • Home
  • Categories
    • Home Remodeling Ideas
    • Interior Design & Decor Ideas
    • Gardening & Landscaping Ideas
    • Outdoor Living & Entertaining
    • Health & Wellness at Home
    • DIY at Home
    • Kitchen Ideas
    • Bedroom Ideas
    • Bath Ideas
    • Cooking at Home
    • Home Office Ideas
    • Lighting Ideas
    • Furniture Ideas
    • Architecture Ideas
    • Senior Living at Home
    • Home Finance
    • Real Estate News
March 14.2025
4 Minutes Read

Unlock the Secrets: Easy Ways to Propagate Succulents at Home

How to propagate succulents: stages and leaves in soil.

Unlocking the Secret: Easy Ways to Propagate Your Succulents

Succulents have risen to fame as some of the most delightful houseplants, loved not only for their unique forms and vibrant colors but also for their resilience and low maintenance needs. However, beyond just being beautiful decor, did you know you can easily propagate succulents right at home? This process could yield multiple new plants from just one parent succulent. As spring rolls in, it’s an excellent time for succulent lovers to dive into the art of propagation. Let’s explore various methods to nurture your green thumb and potentially expand your plant collection.

Understanding Plant Propagation

At its essence, plant propagation is about creating new plants from existing ones. For succulents, the process can involve using leaves, stems, or even roots. The variety of propagation methods available makes succulents particularly forgiving, giving them a strong appeal for beginners and experienced gardeners alike. According to recent insights by horticulturists, propagating succulents is not only an opportunity to create new plants but also an effective method to rejuvenate older plants by pruning and removing leggy growth.

When to Begin Your Propagation Journey

The most favorable time to propagate succulents is during their active growing season, which is typically spring and summer. However, don’t be daunted if you wish to try your hand at this process during fall or winter—success can still be achieved, albeit with a bit more patience. If your succulent looks overgrown or “leggy,” like an Echeveria stretching for sunlight, it’s a prime candidate for propagation. You could transform one unwieldy plant into numerous charming offsets!

Methods to Propagate Succulents: Choose Your Style

Succulents offer various propagation techniques, allowing you to choose whichever method suits your gardening style:

  • Leaf Propagation: Gently twist off healthy leaves and place them on well-draining soil. They will begin to generate roots and new plantlets within weeks.
  • Stem Propagation: Cut sections of a stem, allow the cut end to callus, and then place it in soil or water to develop new roots.
  • Root Propagation: For more established plants, you can even uproot older plants and divide them, allowing each segment to root separately.
  • Water Propagation: Submerge part of the leaf or stem in water, ensuring that only the bottom is submerged to prevent rot.
  • Dry or Air Propagation: Letting leaves or stems dry out initially before planting can help reduce the risk of rot.

Steps for Successful Propagation

To guide you through the propagation process, here are some key steps:

  1. Start by selecting healthy leaves or stems from the parent plant, preferably from a well-cared-for succulent.
  2. Leave cuttings in a shaded area for a few days to allow the cut surface to dry and callus. This crucial step helps reduce the likelihood of rot.
  3. Once dried, place your cuttings in well-draining soil or water based on your chosen method. Keep them in bright, indirect sunlight.
  4. Patience is essential: roots may take weeks to develop. Regularly check moisture levels.
  5. Once roots are established, transfer your new plant babies into their own pots, and care for them as you would a mature succulent!

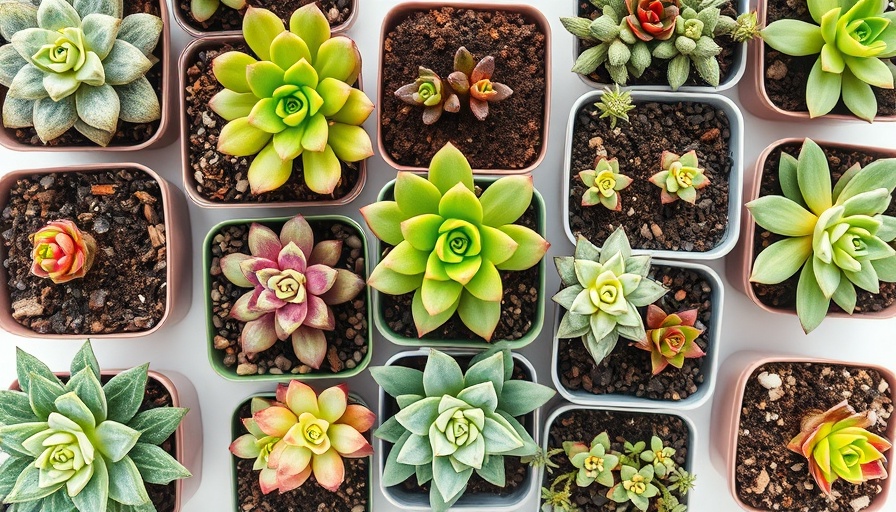
The Best Succulents for Propagation: Let’s Get Growing!

Some succulent varieties are particularly well-suited for propagation. Popular choices include:

  • Echeveria: Known for their rosettes, they're a favorite for both beauty and propagation ease.
  • Jade Plant: This hardy variety is forgiving and often roots quickly.
  • Burro’s Tail: This succulent’s trailing nature makes it a unique addition to your plant collection.
  • String of Pearls: Their round leaves create an aesthetic visual, making them charming as both mature and propagated plants.

Common Challenges and Solutions in Succulent Propagation

While the process of propagation can be fulfilling, challenges may arise. Here are common issues and how to address them:

Root Rot: This can occur if cuttings are kept too moist. Ensure proper drainage and consider using a soil mix designed for succulents.

Lack of Growth: If your cuttings aren't producing roots, check that they are receiving sufficient light without direct, harsh sunlight.

With awareness of these typical pitfalls, you can take proactive measures to ensure your propagation journey is a success.

Conclusion: Start Your Propagation Adventure

Propagating succulents is not just a practical way to expand your plant collection; it’s also a rewarding hobby that brings the joy of gardening right into your home. Dive into the world of succulent propagation, and you may discover more than just new plants but a flourishing connection to nature and creativity. Get your scissors ready, and let’s get propagating!

Home Remodeling Ideas

12 Views

0 Comments

Write A Comment

*
*
Related Posts All Posts
02.15.2026

Effortlessly Install a Murphy Bed: An Essential Guide for Transforming Small Spaces

Update Maximizing Space: The Benefits of a Murphy Bed Living in spaces that offer flexibility can significantly enhance our overall quality of life. A Murphy bed, known for its adaptability, is a perfect solution for adding sleeping space without compromising precious floor area. Consider how it transforms a small room into a multifunctional space suitable for guests or even an unexpected workspace. With a smart installation approach, transforming your room with a Murphy bed is not only achievable but straightforward.In How to Install a Murphy Bed, the discussion dives into the practical steps of transforming small spaces and the potential benefits of emphasizing home renovation ideas. Step-by-Step Guide to Install a Murphy Bed The video How to Install a Murphy Bed details an easy-to-follow, step-by-step installation process utilized by Jackie and Ricky. By starting with proper wall and floor preparations, users can ensure that their installations are both secure and sustainable. It’s crucial for homeowners to pay close attention to their surroundings and take measurements accurately before embarking on this home renovation project. Tools of the Trade: Essential Equipment for Installation Equipping yourself with the right tools can make all the difference. The installation requires essential tools such as a level, stud finder, drill, and more. Understanding how to use these tools correctly will not only ease the installation but also elevate the bed's overall functionality. This knowledge empowers those venturing into DIY projects to take on future home renovations confidently. Understanding the Costs of Murphy Bed Installation One of the common dilemmas faced by homeowners is weighing the remodeling costs. Generally, the overall cost to install a Murphy bed can vary based on settings and whether professional help is hired. Often, DIY installations are less expensive, and when shared with the right tips, these methods can offer effective solutions without incurring a hefty price tag. Aligning and Leveling: Ensuring Safety and Functionality Once the Murphy bed is anchored to the wall and floor securely, focusing on its alignment is crucial. The video emphasizes ensuring the bed is perfectly level to facilitate smooth opening and closing. This aspect contributes to the aesthetics of the room while also ensuring prolonged safety during use. Real-Life Applications: Space-Saving Success Stories The impact of adding a Murphy bed transcends its immediate functionality. Consider families in urban areas where space is a premium. For them, converting a home office into a guest bedroom overnight is invaluable. This installation journey showcases how practical home improvements can lead to emotional upliftment, especially when family gatherings or overnight guests emerge. After Installation: Final Checks Before Use Prior to putting your Murphy bed into action, the video outlines a checklist to ascertain that everything is functioning as intended. Checking for alignment accuracy and the ease of operation can prevent future inconveniences. This proactive approach to home improvement ensures that your space remains a sanctuary for comfort and utility. Conclusion: Embracing Change with Innovative Solutions As our lifestyles alter, so too should our living spaces reflect those changes. Understanding how to install a Murphy bed stands as a testament to innovative living solutions. Whether for expanding guest space, enhancing a home office, or facilitating versatility in small apartments, Murphy beds open the door to new possibilities. If you’re excited about creating an adaptable space that embodies both function and comfort, consider starting with a Murphy bed installation—an impactful way to embrace change.

02.08.2026

Step-by-Step Guide for Toilet Replacement During Home Renovation

Update Understanding the Essentials of Toilet Replacement Replacing a toilet may seem daunting, but with the right approach, it can become a straightforward weekend project that adds great value to your home. When tackling a bathroom remodel or a larger home renovation, understanding how to replace a toilet can save you time and money.In 'How to Replace a Toilet,' the discussion dives into essential bathroom renovations, inspiring us to expand on the topic for homeowners looking to improve their spaces. Why You Should Consider This DIY Home Improvement Whether you're looking to enhance your living space or increase your home’s resale value, replacing old fixtures like a toilet is a practical step. Simple changes can transform the look and functionality of your bathroom. Materials You’ll Need for Toilet Replacement New toilet Wax ring Toilet bolts Adjustable wrench Bucket Toilet installation kit (if necessary) Before you dive into the project, make sure to gather all necessary materials. Shopping for a new toilet, consider design options that will complement your existing bathroom decor. A Step-by-Step Guide to Replacing Your Toilet Turn Off the Water Supply: Before removing your old toilet, locate the supply shutoff valve behind the toilet and turn it off. Drain the Toilet: Flush the toilet to drain the tank and remove any remaining water using a sponge or towel. Disconnect the Water Line: Use an adjustable wrench to unscrew the water supply line from the toilet tank. Remove the Existing Toilet: Unscrew the nuts securing the toilet to the floor, gently rocking it to loosen it before lifting it off. Install the New Toilet: Follow the installation instructions, using a new wax ring for a proper seal. Reconnect the Water Supply: Reattach the water line, ensuring it’s tight enough to avoid leaks. Test for Leaks: Turn the water supply back on and flush the toilet multiple times to check for leaks. Tips for a Successful Bathroom Renovation Incorporating the replacement process within a broader bathroom remodel can elevate your space further. Consider complementary fixtures, such as a stylish bathroom vanity or shower combination. Additionally, if you're working with limited space, opt for compact toilet designs that maximize usability. The Cost Factor: Budgeting for a Toilet Replacement Understanding remodeling costs is crucial. On average, replacing a toilet can cost between $150-$600 for parts and installation. If you hire remodeling contractors, labor costs can further impact your overall budget. It's essential to compare quotes from different remodeling companies and check local options for the best deals. Frequently Asked Questions About Toilet Replacement How long does it take to replace a toilet? Most homeowners can expect the process to take between 2 to 4 hours if they follow the steps carefully. Can I hire a local remodeling contractor for this job? Absolutely! If you're uncomfortable doing the job yourself, reach out to remodeling contractors near you. They can manage everything from design choices to final installations. What to do with the old toilet? You can check with local waste management services for guidance on proper disposal methods or even donate it if it’s still in good working condition. Conclusion: Your Next Steps in Home Improvement Replacing your toilet is just one of many ways to enrich your home environment while also enhancing its value. Whether you're embarking on a full bathroom remodel or just making targeted improvements, such efforts reflect an investment in your living space. If you’re eager to transform your bathroom or explore more remodeling ideas, remember that each change brings you one step closer to the home of your dreams!

02.02.2026

Exploring Lowe's 10 Million Square Feet of Impact Through Home Renovation

Update Transforming Communities: Lowe's Commitment to Impact In the recent video titled This Is What Showing Up Looks Like | 10 Million Sq Ft of Impact, Lowe's expresses an inspiring commitment to not just the retail world but to the community at large. The company aims to create a positive change by improving local neighborhoods—highlighting a significant initiative of impacting roughly 10 million square feet. This ambitious goal reflects Lowe's dedication to community welfare, aligning with sustainability and health trends that consumers today value.In This Is What Showing Up Looks Like | 10 Million Sq Ft of Impact, Lowe's outlines their vision for community support, prompting us to analyze the implications for homeowners and community activists alike. The Importance of Community Involvement In a world where local support can often feel overshadowed by bigger issues, Lowe's commitment emphasizes how businesses can play a vital role in uplifting and revitalizing their local environments. Community involvement not only fulfills corporate responsibility but also fosters a sense of pride and belonging among residents. For homeowners considering a home renovation or improvement, this connection enhances their purchasing decisions—look for companies that contribute positively to their surroundings. Exploring Home Renovation Opportunities As communities grow stronger through initiatives like Lowe's, many homeowners may contemplate their spaces. From a kitchen remodel to bathroom updates, these improvements can greatly enhance both functionality and aesthetic appeal. The prospect of remodeling sparks excitement, but it’s essential to approach it with informed anticipation. Whether you are looking into remodeling costs or local remodeling contractors, understanding your options fosters better decision-making. Remodeling Ideas That Make a Difference Home renovation is not merely about changing spaces; it’s about creating environments that enhance quality of life. Simple remodeling ideas include utilizing light colors in small bathrooms to give the illusion of space, or integrating storage solutions in kitchens for better organization. For those on a budget, consider DIY approaches or exploring remodeling options that don’t require complete overhauls. Insight into Remodeling Costs A common hesitation in home improvement projects often revolves around costs. Remodeling a bathroom or kitchen can span a variety of budgets. For example, understanding the remodeling costs per square foot can help homeowners gauge affordable options versus luxury upgrades. Planning is key; knowing the average costs allows for a more realistic budget that can match your aspirations for your home. Local vs. Global Perspectives in Home Renovation The desire for more sustainable living continues to challenge traditional renovation practices. Locally sourced materials, for instance, have grown in popularity due to their lower environmental impact and the support they provide to regional economies. When engaging with remodeling companies in your area, consider asking about their materials' sourcing—this not only supports your local economy but contributes to greener renovation practices. Future Trends in Home Renovation As we look ahead, the home improvement industry is likely to continue evolving with technology. Smart homes are becoming the norm, integrating energy-efficient appliances and systems that not only transform living spaces but also promote sustainability. Those considering remodeling should explore options that future-proof their investments, including energy-efficient designs that not only benefit homeowners but also contribute to broader efforts of environmental stewardship. Why Home Improvement Matters For many, investing in home renovation symbolizes personal growth and an enhanced lifestyle. Spaces can profoundly influence mood, productivity, and overall well-being. As Lowe's emphasizes community impact, remember that each renovation, large or small, contributes to your local community and the world at large. By choosing sustainable methods and supporting local businesses, you participate in a cycle of positivity. In the wake of Lowe’s 10 million square feet commitment, homeowners are encouraged to join the movement—be it through simple improvements or larger remodeling projects, contributing to a healthier community and lifestyle. Embrace this opportunity by considering how your next project can reflect your values, as well as beautify your home.

Terms of Service

Privacy Policy

Core Modal Title

Sorry, no results found

You Might Find These Articles Interesting

T
Please Check Your Email
We Will Be Following Up Shortly
*
*
*